Since real estate photography has some pretty unique attributes, there are some secrets that most might not know about when starting with it.
And since we are dealing with inanimate pieces of property, we have a huge flexibility to our advantage that allows us to use different techniques that a photographer might not be able to use in another style of photography.
Let’s take a look at these three secrets and why they can easily help us.
1. Shooting Under Exposed
To the average individual, shooting under exposed might not seem like the right thing to do. They would think that we need to shoot at properly exposed so the shot can be well lit.
But we can afford to shoot images under exposed. Not only that but it would help us in the long term by retaining the details and highlights of a shot.
This would be used for one exposure shot images only. But don’t worry, we’ll get into another secret that discusses multiple shots soon.
There are several editing techniques that allow us to brighten up an image and still retain those details and highlights, such as using a brush in Lightroom or Photoshop to increase exposure in only certain areas of the image that are dark. This gives us much more control over the final image.
2. Shooting at a Smaller Aperture
This could also be another case of a typical individual thinking that we should shoot at a larger aperture (e.g. f/1.2 – f/2.8) than a smaller one (e.g. f/8 – f/22).
Of course, we would be trained to let more light in and probably adjust the aperture until we feel like the image is properly bright or lit.
But there’s something with aperture that also changes when we go larger, and that is the depth of field or the amount of bokeh that is produced at larger apertures.
Take a look at this chart to really understand how depth of field or bokeh (blurriness from your subject and background) works from the range of available apertures.
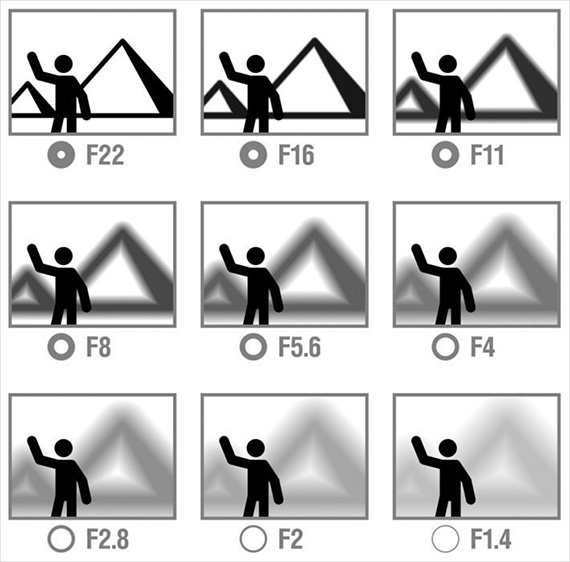
So, notice how when the aperture gets larger (and the number gets smaller. I know, very confusing), the background from the subject gets blurrier.
For real estate, we would technically want the whole image in focus and no blurriness at all, so we’ll want to keep our aperture relatively smaller.
Now we don’t have to take the aperture all the way to f/22 but we could stick around f/8 – f/11 and focus the camera on an object toward the second half of the image. Meaning, don’t focus on the farthest object but an object that is around three quarters of the way from your camera and the farthest point in the image.
Let’s just look at this example below to easily understand the complicating thing I said above about focusing.
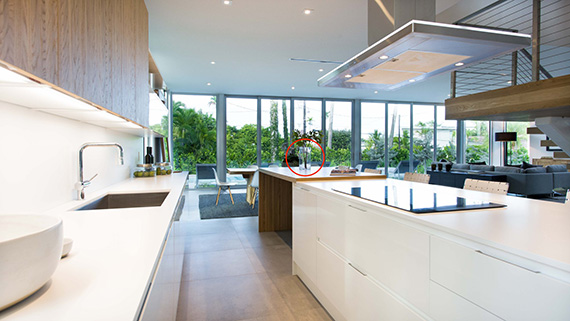
Shot at f/8
Notice how everything is in focus with my aperture at f/8 and the focus point set on the flower vase in the red circle. We can see that the focus point isn’t the farthest object from the image and it’s not too close to the camera. It’s within that second half of the image range.
3. Shooting Multiple Exposures and Blending
When shooting real estate, our subject is never moving so we are able to plop our camera onto of a tripod to get the most stable shot for us.
That’s the beauty of working with real estate. So, we take that into account and develop a technique to use based on that advantage.
Voila!
We can take multiple exposures of one shot that we can then easily blend in post to get the perfect shot.
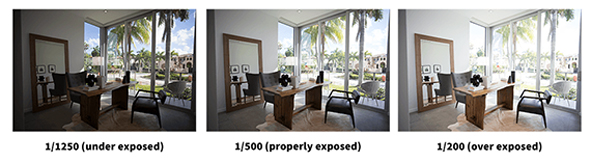
The way that this technique is accomplished is by taking a minimum of three different exposures (you could probably do two exposures but I think three is the best minimum).
One shot under exposed, one shot properly exposed, and one shot over exposed. Here’s a look at what that should look like…
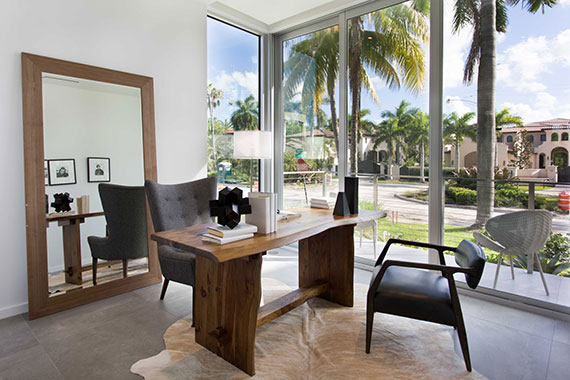
And then here is the final image but blended together from the three exposures above.
By the way, the term for capturing multiple exposures is called bracketing. Simply put, we are bracketing the shots from under exposed to over exposed.
Nick, what do you mean specifically by under exposed, properly exposed, and over exposed?
Glad you asked!
As referring to the auto exposure bracketing indicator highlighted by the orange rectangle on your DSLR below…
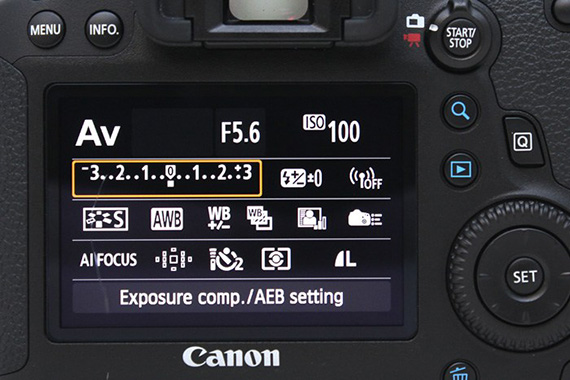
Under exposed is when the bottom marker (which is currently under 0) is anywhere to the left of the 0—negative numbers.
Properly exposed is when the marker (where it’s currently at) is on the 0.
And over exposed is when the marker is anywhere to the right of the 0—positive numbers.
When ever you adjust the shutter speed, aperture or ISO, that meter will change and let you know where the exposure currently stands at.
And each number represents an amount of shutter stop. For example, the number 1 that is to the left, is -1 shutter stop, which is considered under exposed. And vice versa for the right side.
Now for the sake of the above example, I labeled the darker image as under exposed, balanced image as properly exposed and the brighter image as over exposed.
There may be some instances where the exposure marker is on the 0 (representing properly exposed) but the shot is still pretty dark.
This can happen when you have a lot of light coming in from a large window and it’s trying to compensate that large amount of light coming in.
So for situations like that, you would just want to bracket the exposures from dark to bright based on your own eye.
(I hope I’m explaining this well and sorry if I’m saying too much. Just want to make sure everyone understands this well.)
You could even get fancy with it and do even more bracketing than just three exposures. For example, five brackets or seven brackets.
If you are shooting a shot that has a window in it and you want to capture both the outside and the inside, you’ll definitely be in the 5–9 bracket range.
Let’s quickly recap the three secrets of real estate photography that we just talked about:
- Shoot under exposed if only shooting one shot images so you can retain detail and just boost in post.
- Shoot with a mid-range aperture of about f/8 to f/12 to widen the depth of field, and focus the camera at an object within the second half of the image.
- Shoot with multiple exposures to capture the highs and lows more independently, and then blend them in post to create a better resulting image.
Now take these new ideas and start using them today!
About the Author:
This articles was kindly provided by ApertureUniversity and Nicholas Cuervo.
Go to full article: 3 Secret Techniques from Real Estate Photographers
What are your thoughts on this article? Join the discussion on Facebook
PictureCorrect subscribers can also learn more today with our #1 bestseller: The Photography Tutorial eBook
The post 3 Secret Techniques from Real Estate Photographers appeared first on PictureCorrect.