We’ve shared a number of videos that help you sharpen your Adobe Lightroom skills. This time, we’ve got a full-length Lightroom course from Tim Grey. Grab a cup of coffee and enjoy:
Unlike other videos that teach you what a certain tool does or how you can use it, what Grey tries to do here is to teach you how he uses the software out in the real world, the types of edits he does, and the reasoning behind his editing decisions. I highly recommend watching the entire video, as it was—at least for me—a good opportunity to improve.
If a picture is worth a thousand words and a video has roughly 25 images flashing before you in a second, it would take several novels to do justice to this video, so I’m going to leave you with just a couple of the highlights that I got from watching it. Again, the entire course is fantastic!
Adjusting Saturation According to Color
This is something that I assumed everybody should be doing, but I never got the hang of it on my own. Basically, Lightroom offers you the possibility to adjust each color depending on the needs of a particular photo.
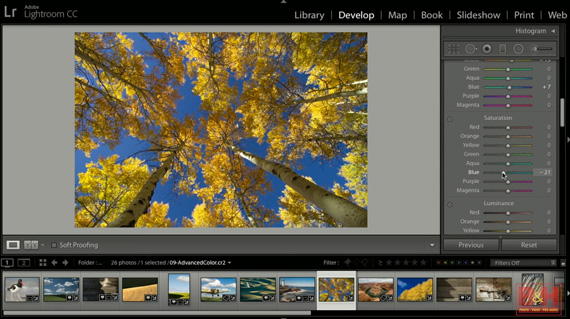
Individual color adjustment. Here we see the sky being toned down a bit.
In the photo above you can see how Grey controls a single individual color—in this case, the blue of the sky—to make it stand out less and give the photo a look that is closer to autumn. After seeing this technique in the video I went over some of my shots and I saw that a lot of my photos had a particular color that I wanted either toned down or highlighted, so it’s quite possibly one of the most helpful things I got out of the video.
Another thing to remember about this is that you should most times avoid using the Luminance sliders, as you can notice a muddy, watered-down tone to your colors.
Create HDR Photos in Lightroom
If you have multiple exposures and want to blend them into an HDR image, you probably go to Photoshop to do that—at least that’s what I always did before seeing this video. However, there is a simple way to achieve the same effect in Lightroom! Go to Photo > Photo Merge, and select HDR.

The HDR option in Lightroom is different than the one used in Photoshop, and it proves to be quite helpful.
I also found the two checkboxes at the top of the HDR module extremely helpful: the first one, Auto Align, should always be kept checked, as even if you have taken the photos on a tripod you have no way of knowing for certain if there isn’t the slightest difference between the frames. Checking this box will ensure that the software aligns all the images properly before applying the HDR effect. Similarly, the Auto Tone checkbox will automatically apply adjustments in the Develop module, so that should be kept checked as well.
These are just two of the many techniques that are presented in the video, all of which come with practical examples of real world usage of the software. They’re the ones that helped me out the most and I’ll definitely use this in my future work. What’s your favorite one?
Amazing Lightroom Presets Deal Ending Soon:
If you want to reduce the amount of time you spend on post processing and get amazing results with your photos, these Lightroom presets could be the answer. We were able to negotiate an exclusive 70% discount for our readers this week which includes 14 different collections for a total of 300 presets that will totally change your work in Lightroom.
Learn more: 300 Professional Lightroom Presets at 70% Off
Go to full article: How to Approach Photo Editing in Adobe Lightroom: MasterClass
What are your thoughts on this article? Join the discussion on Facebook
Article from: PictureCorrect