Other than for special effect, photographers generally do not want out-of-focus images. But sometimes, regardless of which camera settings are used, not every detail of an image can be captured tack sharp. Depth of field (DOF) can be so shallow, that interesting aspects of the photos are without sharpness. Setting to a smaller aperture may be used to increase DOF, but moving the aperture farther from a lens’s sweet spot introduces lens diffraction into the image, again resulting in some fuzziness. Also, if stopping down the camera’s aperture, shutter speed will need to be increased and blurry images may result. Increasing ISO to help with the exposure will introduce digital noise to the image.
So, how do you shoot with the best aperture and shutter speed combination, and get sharp images from front to back of an image? A technique that can help resolve this problem is called focus stacking. Here’s some helpful info about this technique.

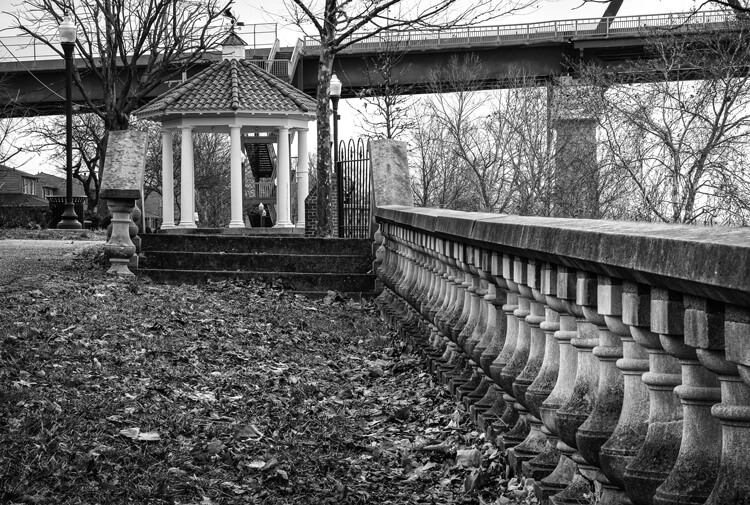
13 image focus stack
What You Need
- A tripod.
- A DSLR camera, capable of shooting in manual mode. It is possible to use a point and shoot camera, but it must have manual mode and manual focus capabilities.
- Depth of Field iPhone app (helpful but not required).
- Photoshop or another focus stacking software.
How to Shoot for Focus Stacking
Focus stacking is similar in principle to HDR. However, with focus stacking, images are captured with different focus points, and later combined in Photoshop, to create an image with more DOF than would be possible with a single exposure. Landscape and macro photography are two genres of photography that benefit most from using this procedure. Be warned – calm winds and reasonably stationary objects are a must!
Before beginning to shoot, it is always helpful to know a lens’s sweet spot, defined as the aperture that the lens produces its sharpest image. (It is usually found about two to three stops from wide open.) Experiment until this important setting is determined.
Landscape
There are two basic scenarios when shooting landscapes, that may benefit from focus stacking. The first is when the subject is a close foreground object, with an interesting background, both desirable aspects to be in sharp focus. The second, is when using a telephoto lens (which typically has a shallow depth of field) and the subject covers multiple distances, that may be brought into sharper focus. (FYI: If shooting a landscape with a wide angle lens, the DOF may be adequate enough to capture a sharp image that has no benefit in being processed by focus stacking.)
Tip: Here is a little trick to find out if focus stacking will benefit an image when photographing a scene or subject. After composing the image, set the focus point about one third into the image. Then, using Live View, enlarge the image and check to see if the foreground and background are sharp or blurry. If either or neither are in focus as sharply as desired, the image could benefit from focus stacking.
Steps for Shooting Landscapes for Focus Stacking
- Place the camera on a sturdy tripod – a must!
- Frame the subject and compose the shot.
- Determine exposure for the scene, and set the camera to manual mode, to ensure that the exposure is constant for every image.
- Set the camera to Live View and aim the focus point on the nearest object desired to be in focus. Use the camera’s zoom (+ button, not zoom on the lens) to preview the focus through Live View. Then switch to manual focus and use the focus ring to fine tune for sharpness if necessary.
- Take the first exposure.
- Without moving the camera or adjusting any settings, move the focus point to an object mid-way in the image and refocus.
- Take the second exposure.
- Again, without changing anything, refocus on an object at the farthest point of the intended image.
- Take the third exposure.
To capture landscapes, three images are generally all that is necessary to create sharp focus stacking images, but it’s completely fine to take extra images to make sure that the entire scenee is covered. A rule of thumb would be to add more images for longer focal lengths. Be aware that extra images will take longer to process in post-production. If available, check the DOF with a Smartphone app, in order to figure out how many images will be necessary, to get every aspect of the photo in focus.

The first image was focused on the fence, the second was focused mid-way into the image, and the third was focused on the front of the house.
Macro Photography
Macro photography can benefit from focus stacking more than any other type of photography, because a macro lens has an extremely shallow depth of field.
- Place the camera on a sturdy tripod – a must!
- Frame the subject and compose the shot.
- Determine the exposure for the subject, and set the camera to manual mode to ensure that the exposure remains constant for each and every image.
- Set the camera to Live View and aim the focus point on the nearest object desired to be in focus. Use the camera’s zoom (+ button, not zoom on the lens) to preview the focus through Live View. Then switch to manual focus and use the focus ring to fine tune for sharpness if necessary.
- Take the first exposure.
- Without moving the camera or adjusting any settings, move the focus point to a distance slightly farther away from the lens. Remember that DOF in macro will be measured in fractions of an inch, instead of feet, as in landscape photography.
- Repeat step 6 as many times as needed to cover every aspect of the subject’s DOF. This could range from as few as six images to 30+ images. Make sure the entire subject is covered or the results may be unusable. If available, check the DOF with the iPhone app (www.setmycamera.com), in order to figure out how many images will be necessary to get every aspect of the photo in focus.
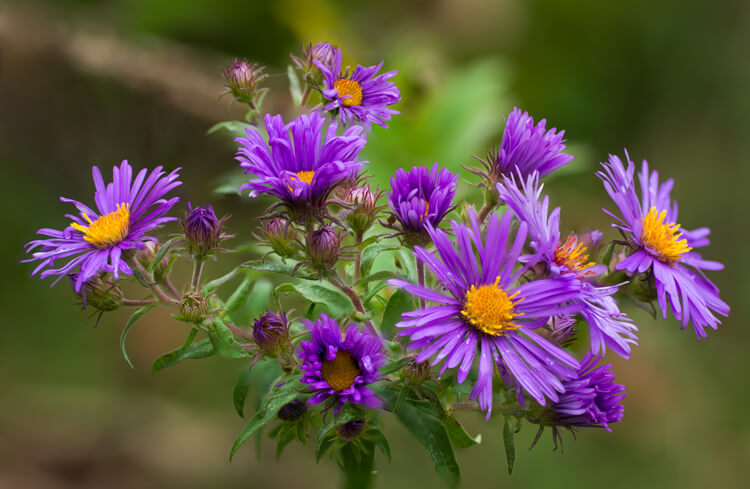
Focus stacking the flowers only makes the flowers stand out from the background.

The image on right is a single image capture at 85mm focal length. The image on right is a 12 image focus stack. Each image had a DOF of less than one inch. Note the additional detail in the image on the right, compared to the single image.
Tip: As often used when capturing HDR images, take a shot with your hand in front of the camera before and after each series of images. When working with the images later, this will make it easier to tell where each series starts and ends.

Use your hand to mark the beginning of each series of images. This will make processing your images easier.
Processing the Final Images
Processing the files to accomplish the final image may seem like the most difficult part of creating a focus stacked image, but it’s really very simple to do in Photoshop. Here’s how:
- Open Photoshop
- Get each image on a separate layer: Under File, choose Scripts and Load files into stack. Click Browse and select all the images.
- Check the box for Attempts to Automatically Align Source Images.
- Click OK and each of the images will open into a new layer in Photoshop.
- Open the Layer palette and select All Layers.
- Under Edit, select Auto-Blend Layers.
- Check the box for Stack Images and Seamless Tones and Colors. Optionally, select Content Aware Fill Transparent Areas, which will fill any transparent areas generated by aligning images in step 3. (Be aware this will increase processing time. Generally, I do not choose this option; rather, I just crop the image slightly later, if necessary.)
- Click OK
- Flatten the image by selecting Layer/Flatten image and save.
Note: If you are using a Lightroom and Photoshop workflow, after importing your images into Lightroom, instead of following steps 2 through 5, you can simply add all your images into Photoshop layers by selecting all your images, then go to Photo/Edit in/Open as Layer In Photoshop. This will open all the selected images as layers. You will then have to Align your images by selecting all the layers in the layer palette, then go to Edit/Auto Align Layers. Then continue at step 6 above.
Summary
It is nearly every photographer’s intention to capture the sharpest images possible, and focus stacking can be another tool to help you achieve this goal. The trick to this whole process is to take enough focused images, to create a final photo that is in focus from foreground to background. The results can be amazing once you get the hang of it! Give it a try and post your results and any questions you have here.
The post A Beginner’s Guide to Focus Stacking by Bruce Wunderlich appeared first on Digital Photography School.