Histograms are helpful tools for both capturing your images and editing them. When used correctly, histograms can help you to use the proper exposure levels while capturing your images. In this video tutorial, Phlearn explains how histograms work and how you can use them to create the perfect exposure for your images:
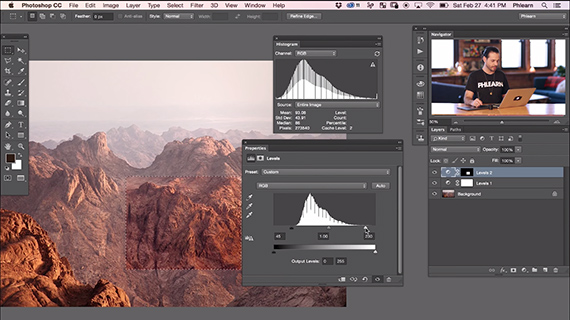
To begin, you need to open your histogram window (Windows > Histogram). Since there are multiple types of histograms, it will depend upon what you are trying to accomplish to determine which histogram you need to use. Typically, the default will be either the RGB (red, green, blue) or CMYK (cyan, magenta, yellow, black). This tutorial uses RGB.
Once open, click on your Histogram Menu and open the Expanded View. This will provide you with more information about the histogram and your image source. An ideal histogram will appear as if it extends across the entire graph. If the histogram is too far to the right, your image will lose color information into the white, while histograms too far to the left lose the information to the shadows. In most cases, when you blow out an image, the information is gone and you will not be able to get it back.
Histogram and Levels using a Selected Layer as the Source option
There are three Source options to choose from while working with histograms in Photoshop:
- Entire Image
- Selected Layer (where you can view a histogram of a specific section of your image)
- Adjustment Composite
While histograms are great for understanding both color and exposure, it is important to remember it will not change your exposure. To make these corrections to your exposure values, you need to use Levels (Layer > New > Adjustment Layer > Levels). These indicate where your white point, midtones, and black point are located on your histogram.

Before and After images showcasing exposure level changes
By altering these levels, you can adjust your histogram to compensate for the lack of white or black in your photo that would otherwise be missing information. However, depending upon your image data, adjusting your levels can degrade your overall image. Therefore, to ensure you get the most color information, you should always photograph using a RAW 16-bit, as 8-bit images provide less data and are more prone to degrading.
During your photo shoot, you should check your camera’s histogram. This will let you see if you have over or under exposed an image that at first glance appears okay, and it provides you the opportunity to change your exposure to the proper levels to obtain all the information you need for your photo.
How do you use histograms in your workflow?
For Help with Post-Processing
Learn how to do everything from re-touching to color grading to advanced photo manipulation. Found here: 33 Professional Photoshop Tutorials
Go to full article: How to Edit Photos Using the Histograms in Photoshop
What are your thoughts on this article? Join the discussion on Facebook
Article from: PictureCorrect