 You don’t have to shoot in Manual mode to take complete control over the exposure process.
When you use shooting modes other than Manual, the camera will set at least one of the three exposure controls (shutter speed, aperture, and/or ISO) for you. However, your camera provides you with an override called exposure compensation. It gives you the ability to change the camera’s exposure values from something other than what the camera automatically sets for you. In this article, I will show you how to use it to get the exposure you want every time.
When should you use Exposure Compensation?
First, let’s back up and talk about when you might want to use exposure compensation. You may wonder why you’d want to change anything, if your camera is already determining the proper exposure level.
The first reason is that your camera’s meter can be fooled by some of the conditions you face. The meter operates by looking at the tones in its view, then averaging them out. Basically, the manufacturers have determined that most scenes will average out to a middle grey tone, often referred to as 18% grey. Therefore, if the tones in your frame are darker than this middle grey tone, the meter will show that there is not enough light for a proper exposure, and therefore the meter thinks your picture will be underexposed. Conversely, if the tones in your frame are lighter than middle grey, the meter will show that there is too much light for a proper exposure and it thinks your photo will be overexposed. A lot of the time the camera meter is right, but sometimes it is not.
Some situations are supposed to be brighter than middle grey. A classic example is a photograph taken of a snowy scene. Your camera’s meter will assume that all that white snowy scene should be grey, and will therefore choose exposure settings that underexpose the image. Obviously you don’t want that. Here is an example, the picture to the left was taken strictly by the camera’s meter, and the picture to the right overexposed by one stop according to the camera’s meter:
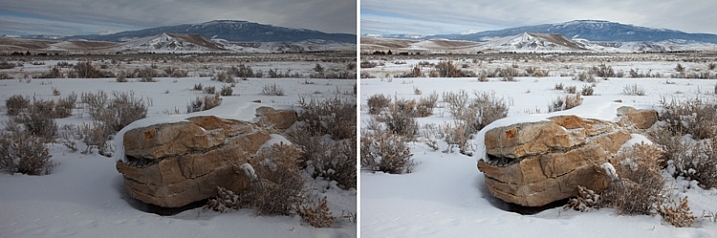
A snowy scene frequently confuses your camera’s meter. To the left, is a shot taken at normal exposure. To the right, is one taken after adding in a stop of exposure compensation (overexposure).
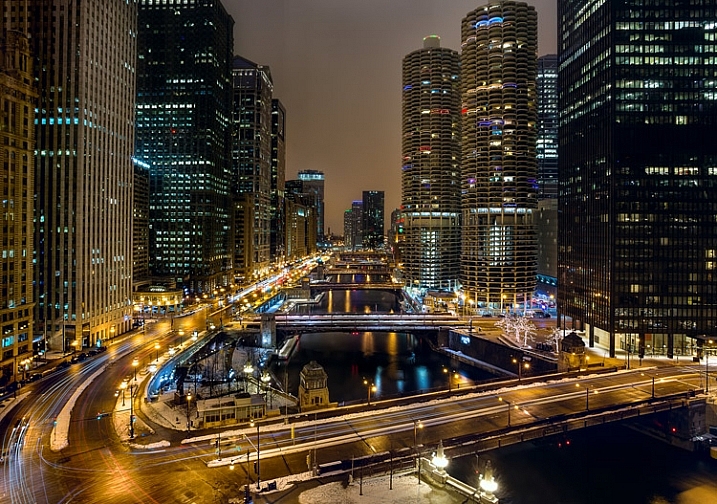
Another example is night photography, where the darkness of the scene should result in dark tones in your picture. The camera’s meter won’t recognize this though, and will tell you to brighten up the picture. Using exposure compensation will allow you to take control, and set a proper exposure.
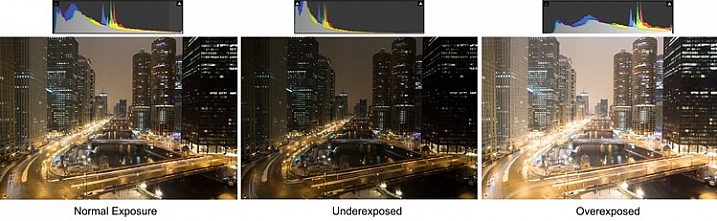
As an example, check out the pictures below. In the picture on the left, taken at normal exposure as per the camera’s meter, it brightened the night scene and it looks a little washed out. To the right is an underexposed (according to the meter) image that more closely resembles the actual conditions of the scene.
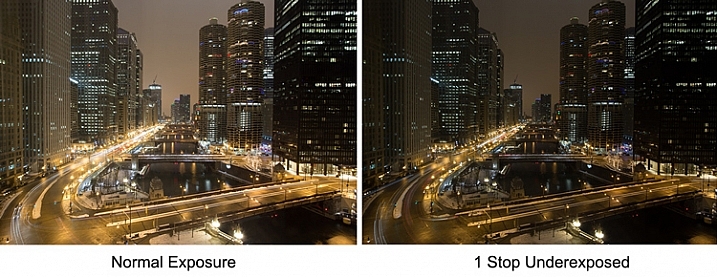
The camera’s meter (and even the histogram) tells you that the normal exposure is correct (see below). But the reason the camera thinks the normal exposure is correct, is that it that the average of the tones closely approximates middle grey. However, the underexposed image actually more closely captures the reality of the situation.

Another reason you may want to use exposure compensation is that you simply don’t like the “correct” exposure. You may want to darken the scene to add some mood or drama, or you may want to brighten things up. Photography is ultimately an artistic endeavor, and is highly subjective, so exposure compensation gives you a tool to put that to work.
Finally, if you subscribe to the theory that you should expose to the right, exposure compensation will allow you to do so in camera modes other than Manual. If you are unfamiliar with this concept, expose to the right means that you slightly overexpose your images so that most of the tones appear on the right side of the histogram (without clipping anything). You later reduce the tones in post-processing and this can sometimes result in slightly better image quality. The overexposure happens by using exposure compensation.
How Exposure Compensation Works
Now that you know what exposure compensation is, how do you use it? In most cases, your camera will have a little button with a +/- on it. That is the button you press to change the exposure compensation. While pressing that button, turn the main dial of your camera right or left (by main dial, I am referring to the dial on the top right of your camera, usually next to the shutter release button). That will change the exposure compensation. Turning the dial one way will reduce the exposure, and the other way increases it. Each click of the dial will usually change exposure settings by 1/3 of a stop.
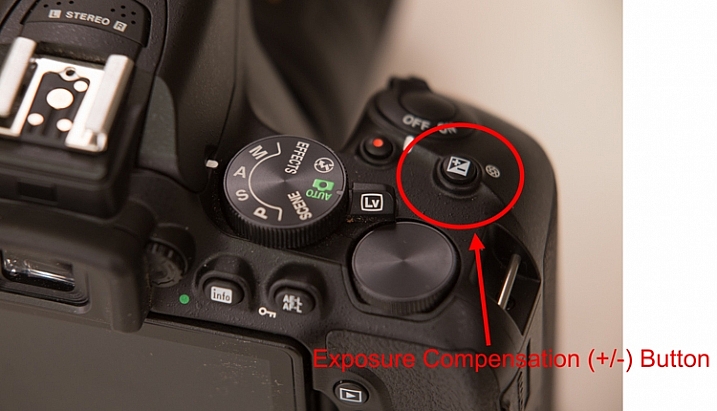
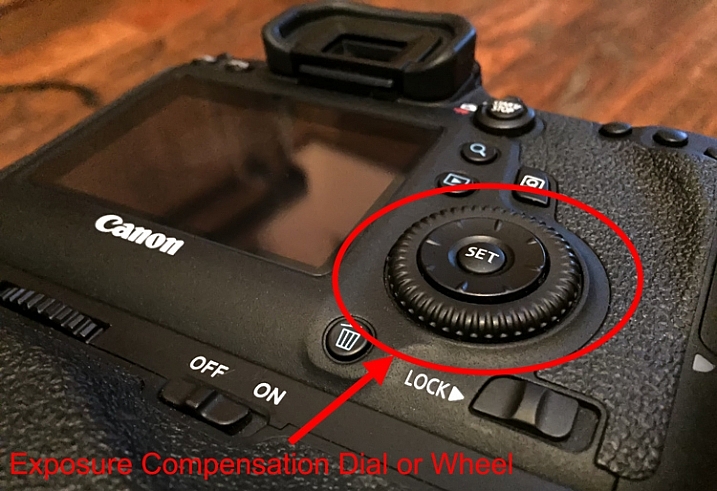
If you have a higher-end DSLR, then your camera will have a second dial or wheel on the back of the camera. Those cameras will usually not have the +/- button, but that second dial will be used to change the exposure compensation settings. The advantage is that you can just turn that dial with your right thumb without needing to press any buttons.
Exposure Compensation in Different Camera Modes
So what does exposure compensation actually do? You know that it changes the exposure, but how does it do so? By changing the aperture? Or the shutter speed? Or both?
The answer is that it depends on what mode you have your camera in. I will explain what is going on for each of the camera modes:
- Aperture Priority Mode – In Aperture Priority mode, exposure compensation changes the shutter speed. Remember that in this mode, you set the aperture and the camera sets a corresponding shutter speed. If you change the Aperture, your camera just sets another corresponding shutter speed, and there is no change in the exposure level. Exposure compensation gives you the ability to change the shutter speed (and the overall exposure value) while staying at the same aperture you originally set.
- Shutter Priority – In Shutter Priority mode, exposure compensation changes the size of your aperture. It is basically the reverse of Aperture Priority mode. You set a shutter speed, and the camera sets a corresponding aperture. Exposure compensation therefore changes the exposure by allowing you to change that aperture size.
- Program – In Program mode (P on your mode dial), exposure compensation changes the shutter speed. At least that’s what happened on the cameras I tested. It is possible that yours works differently, or that you can change it in the menu. As with so many things, this is a good excuse to pull out your camera’s user manual and go through it.
What about Manual and Automatic modes? These don’t have exposure compensation. In Manual mode, the camera does not set an exposure value for you in the first place, you set everything yourself. Whenever you change the aperture or the shutter speed, you are changing the exposure value. In Automatic mode, there is no exposure compensation because you have no control over exposure – the camera does everything for you. That is one of the reasons why you should never use this mode.
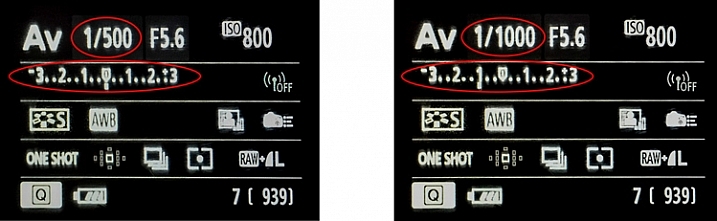
Here we see the back of the camera before and after applying one stop of exposure compensation. In the example to the left, the camera shows a normal exposure with a shutter speed of 1/500 of a second. In the example to the right, the shutter speed is reduced by 1 stop to 1/1000 of a second, and the meter reading reflects that.
Exposure Bracketing
While talking about exposure compensation, there is a related topic that you might find useful as well. It is Auto Exposure Bracketing (AEB, or just bracketing). It is where you set your camera to take multiple pictures in a row with the first at normal exposure, the next one(s) underexposed, and the final one(s) overexposed (if you have Canon it may look more like this: underexposed>normal>overexposed, you can also change the order on a Nikon if you go to your menu settings).
When you enable the feature in your camera’s menu, you set the amount of under and overexposure. The camera will take three to five pictures in rapid succession (depending on your camera, if you shoot Canon you have to also set your drive mode to high speed burst). In a way, this accomplishes the same thing as exposure compensation, because you are dialling in a certain amount of underexposure or overexposure.
Why would you want to do this? Several reasons. Usually it comes into play when there is a wide divergence of tones in the image. Using a little blending later, you can use the brightest tones from the underexposed image and the darkest tones from the overexposed image. In addition, if you are ever going to use any high dynamic range processing on your images, you should have multiple images to work with. Finally, you might just think of it as “exposure insurance” for important shots to make sure that you have nailed the exposure.
Conclusion
We all want to be able to take complete control over the exposure process, but not all of us want to work in Manual mode. When you work in a mode like Aperture Priority mode, the camera offers you a lot of benefits – speed being the main one. By adding exposure compensation to your process, you can get the speed of other modes, along with the control of manual.
If you haven’t used exposure compensation before, give it a try. If you are familiar with it, chime in below with your own tips and experiences.
The post How to Use Exposure Compensation to Take Control of Your Exposure by Jim Hamel appeared first on Digital Photography School.