The key to being a good landscape photographer is to understand how the look of a subject changes according to light, and photograph it during the best lighting conditions. Unlike in other genres of photography, a landscape photographer has no control over the light source. In the following video, landscape photographer Ross Hoddinott discusses how you can use filters to manipulate exposure and take better landscape photographs:
Filters are the bread and butter of landscape photography. They allow photographers to produce results that are impossible to see with the naked eye. Before we jump into the video, it’s necessary to understand the concept of “stops.” A stop is the doubling or halving of the amount of light entering through the lens. For instance, let’s say that you meter a scene to be well exposed at 1/30 second. If the ambient light now decreases by one stop, the exposure needs to be doubled to get the correct exposure, which is now 1/15 second (aperture and ISO value remaining constant). Keep this concept in mind if you aren’t well acquainted with stops.
Using ND Filters for Landscape Photography
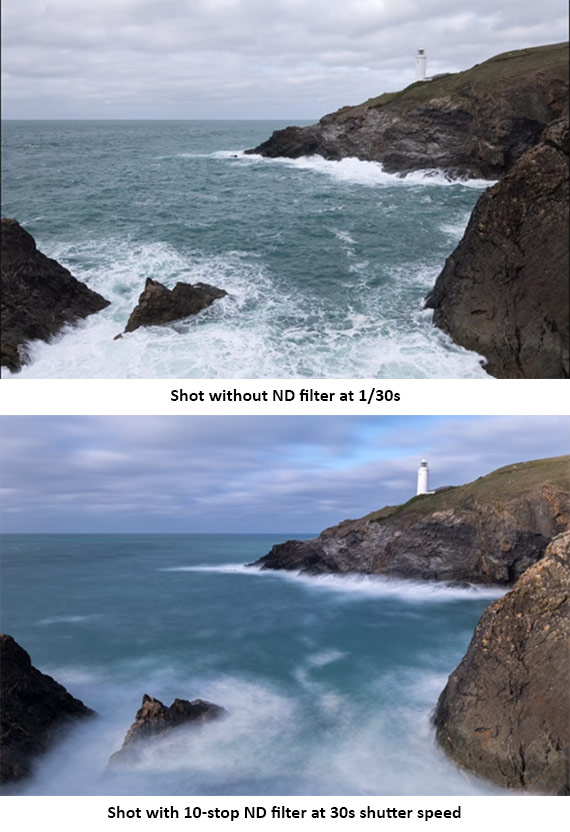
Neutral Density (ND) filters are like sunglasses for the lens. Just as we use sunglasses when it’s too bright outside, we can use ND filters on our lens to block some ambient light. By doing so, we can artificially manipulate the exposure settings in our camera. As Hoddinott demonstrates in the video, without using any kind of filters, he was getting a correct exposure at 1/30 second. By using a 3-stop ND filter, he was able to halve the light three times (i.e., 1/8 of original, hence the 1/4 second exposure).
But why is long exposure necessary? The answer is simple. It just makes the photograph look beautiful when used correctly. Since our eyes are naturally incapable seeing long exposures, photographs that are created by using long exposure technique seem surreal to us. By exposing a shot for a longer period, we can record the trails left by moving subjects, such as clouds, water, and light. This adds a dreamy and hazy effect. The stronger the ND filter, the slower the shutter speed, thereby making the long exposure effect more prominent.
There are certain things to keep in mind while using ND filters:
- Since ND filters block light entering your camera, some cameras may have difficulty in focusing with the filter on. If this is the case, focus prior to placing the ND filter.
- ND filters tend to have a color cast (i.e., the color of your subject in the photograph can have some kind of tint). To fix it, either manually input the white balance, or if you’re shooting RAW (which you should be), you can easily fix it in post.
Using Graduated ND Filters for Landscape Photography
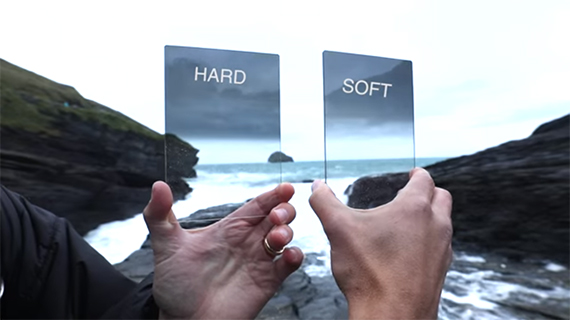
There’s a very basic difference between an ND filter and a graduated ND filter. While ND filters are uniformly dark, graduated ND filters are half coated and half clear. Graduated ND filters are useful when shooting scenes with high contrast lighting. If you have ever shot a scene with the sky in the frame, you must have faced this situation; exposing for the sky underexposes the land area and exposing for the land area overexposes the sky. Graduated ND filters are designed to solve just this kind of issue. By darkening the sky, a graduated ND filter allows us to get a less contrasting exposure of the sky as well as the land.
Like solid ND filters, graduated ND filters are also available in a variety of strengths: 1, 2, or 3 stop. They also have varieties of feathered edge transitions. You can get hard transitions if you shoot landscapes where the horizon is straight and even (like in case of coastal images). If the horizon is not even, you’re better off getting a soft transition graduated ND filter.
To choose the strength of a graduated ND filter, you will need to understand the difference in exposure between the sky and the foreground. If you get an exposure reading of 1/500 second for the sky and 1/30 second for the foreground, there is an exposure difference of 4 stops. Since skies naturally tend to be brighter than land, exposing with a 2 stop difference between the land and the sky would be a good idea. Hence, a good choice in this example would be to shoot with a 2 stop graduated ND filter.
While others may argue that filters are unnecessary and you can get away from using them by just bracketing your shots, remember that you will need to spend a lot of time in post working with the bracketed shots. As professionals value time, they choose to get most things correct in-camera.
Hopefully, you now have an understanding of how you can take better landscape images using ND and graduated ND filters. If you have any other ideas of using these filters creatively, let us know in the comments below.
Go to full article: Landscape Photography: Essential Lens Filters Tutorial
What are your thoughts on this article? Join the discussion on Facebook
PictureCorrect subscribers can also learn more today with our #1 bestseller: The Photography Tutorial eBook
The post Landscape Photography: Essential Lens Filters Tutorial appeared first on PictureCorrect.