I often think that photography enthusiasts talk too much about photographic equipment and too little about the actual photos that they take.
Example 1. “In 25 years, he’ll be going the other way.”
It may also be relevant to talk about photographic equipment if you are going to buy something new, but in my opinion, once you have it just go out into the world and use it!
All the photos in this article are taken with a Nikon D7200 and Nikon 20 mm 1.8G prime lens (30 mm full frame), which I think is a good combination for street photography.
For a street photographer, the concept of “one camera, one lens” is a good motto and definitely if you mainly shoot candidly from the hip. “One lens” can just as well be a zoom lens, which is fixed at a certain focal length. The advantage of a constant focal length, is that with a little practice, you soon find out where to position yourself and exactly how much you get in the photo frame. You become “one” with your equipment.
For example, if you are taking a landscape photo, you usually have plenty of time and can benefit from setting the time, aperture and ISO manually. In street photography, it may be a good idea to use the “P”-setting (Programmed auto) together with auto-ISO and also limiting the minimum shutter speed.
Things do sometimes happen quickly and situations can easily change, making it difficult to use manual settings. Maybe you are focusing on a situation in the shade, but seconds later something more interesting appears on the other side of the street in the sun. You would then need to change the settings for this new situation, and the opportunity for taking the photo may be missed.
Remote Control and Spirit Level
If you are using the technique of shooting from the hip, it may be an advantage to have a wireless remote control with you. It can be used to make both you and the camera more invisible. I can easily shoot with it from my pocket or from the palm of my hand. No one seems to notice that I am taking a photo when my fingers are nowhere near the shutter button.
I usually combine it with a small spirit level in the hot shoe, and then I can see if the camera is level on both axes. I can easily correct the camera with one hand without it being noticed.
“Shooting from the Hip” Technique
The “shooting from the hip” technique basically means taking a photograph without looking through the viewfinder. You can do this in several ways, for example by hanging the camera around your neck and letting it rest on your stomach (if you have one!) or by holding the camera in your hand with your arm stretched along the side of your body.
I almost exclusively use the technique of having the camera resting on my stomach which gives me a good opportunity to use the spirit level. By consistently
using the same technique I get a better photo accuracy. This is a relatively low camera position, about the same as a camera with a waist level viewfinder. One of the most famous street photographers, Vivian Maier, was known to use a camera with one of these.
Distraction Tips
As I pretty much only use a wide angle for my street photos, I am very close to the people I photograph. Therefore, it is sometimes necessary to make a slight movement or sound to distract them from looking directly into the camera.
To distract them, you could maybe scratch your neck, correct your glasses, fix your hair, look at your watch, check your mobile phone etc. Meanwhile, you are pressing your wireless remote control and taking your photo. In this way, you can avoid eye contact with the people you are photographing and get more natural photos. It was only after I learned this technique from another street photographer at 500px in 2011 that I really got started with street photography. Since then, I have taken many thousands of photos using this technique, and as yet, I have had no questions or confrontations from anyone that I have taken a photo of.
How I Work with Street Photography
In the following paragraphs, I will show you some examples of how and why I have chosen a particular photo to display. I start by looking at all the images I took in relation to a selected photo. Although I would not normally show the other images to anyone, I keep them on my hard drive just in case. I’m not good at tidying up on my hard drive and as hard drive space is cheap to have, I actually don’t need to! The examples in this book show how important foresight is in street photography. Therefore, I usually “scan” the street or the surrounding area at all times to see what may be coming or happening further on. Once I have found an interesting person to photograph, I concentrate on finding a relevant background or maybe even another similar/contrasting person to be in the photo.
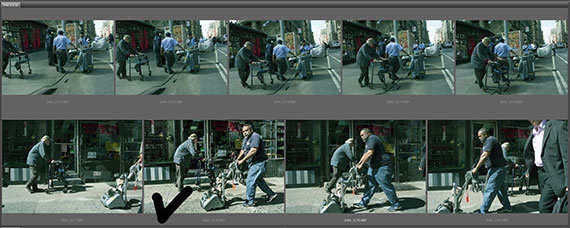
Sometimes, I find it necessary to follow or walk in front of a subject (see Example 1). To make sure you have the photo of the “decisive moment”, it is important to take multiple photos of the same situation.
This may well mean that you have to take up to 10 shots to get the right photo, but don’t worry you can always discard them. It is important to
remember:
The easiest way to achieve a reputation as a skilled photographer is by never showing your bad photos!
When working with a particular genre, such as street photography, it is easy to fall into a rut and become fixed on a particular style. I think this also
happened to me. Not consciously, but maybe because I have had success with this particular style before and therefore think it is the style that I am best at. For me, it is situation photos. I admire a lot of other photographers’ street photos, via street photography Internet groups and on the photo sharing site 500px, which is my favourite. Here I sometimes see very contrasting black and white backlit shots with long shadows or a photo of a small person, as part of a larger scene—for example, in connection with beautiful architecture. They are a pleasure to look at. I have repeatedly tried to take some street photos like this, but I haven’t succeeded. I even made an extra effort in New York, taking advantage of the sunny late afternoon hours to create some special long shadow photos, but nothing usable came out of it.
You should not expect to take a “master photo” every time. Sometimes you should be happy that you are able to just bring home one usable photo. For me, a usable photo is one that possesses a quality making it suitable for publication on one of the photo social media sites, which I participate in.
Patience, determination and a good pair of shoes is an advantage in the quest for a good street photo!
I am active on 500px and some Facebook and Google+ groups. There is usually a good community spirit in groups like these, and even if people do not know each other personally I still feel that I know a great deal about the other people through the comments which I leave for other people and the comments I receive myself.
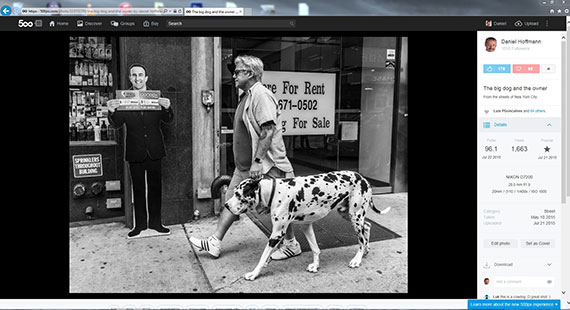
I advise and encourage you to participate in these types of social media sites. Please remember though to participate actively – that is, comment on and “like” the photos you think are good, so that the photographers get feedback. Above is an example of one of my uploads on 500px. It is possible to “like” the photo, make it your favourite, see how many people have seen it, and also read their comments. There is also a rating based on how many likes and favourites you have received. You shouldn’t read too much into these figures, but appreciate that other people like a photo that you have taken and therefore they will “like” it.
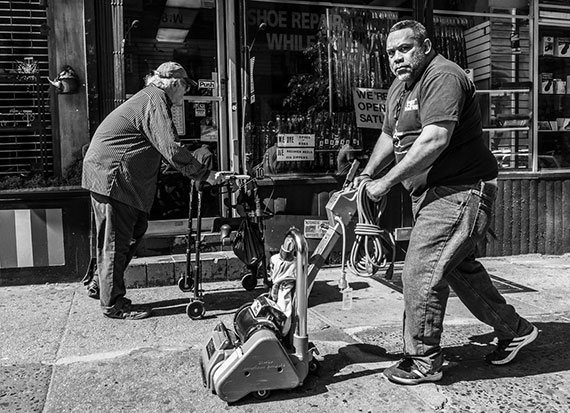
Example 1
“In 25 years, he’ll be going the other way.” (See above.)
I saw the older gentleman with a walking frame, near the Flat Iron building. My thought was to find a suitable background, something that would relate to him or be in contrast to him—something that could provide some more elements to the photo. I took some photos with some street cleaners in the background, but this
didn’t give me the photo I was looking for. The older gentleman proceeded slowly towards 23rd Street, and I hurried to walk in front of him. Further along the street, a workman was walking towards the older man, pushing a floor stripping machine. I tried to calculate when they would pass each other, and by just using four
attempts, I managed to get the photo I wanted. Namely, when they passed each other pushing their vehicles. For me, this photo symbolizes two people, two generations, that are both at their own stages in life. The workman, should expect to be going in the other direction in 25 years, perhaps with his new vehicle, a walking frame!
Example 2
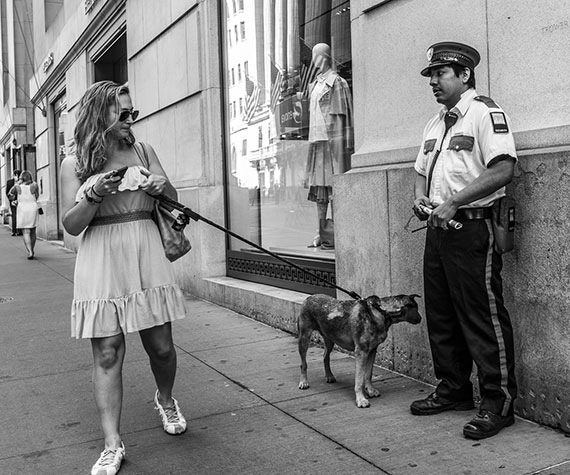
Example 2: “The dog, the woman and the security guard.”
I was on one of the streets leading down to Wall Street and The Stock Exchange. I saw the woman in the yellow dress and her dog walking towards a street corner, where a security guard was standing in front of a building. The woman was walking very slowly, as she was constantly checking something on her phone. Meanwhile, she was letting her dog stop and sniff at absolutely everything. This gave me plenty of time to get in front of her and position myself at the corner where the security guard was standing. When the woman passed, the dog stopped to sniff the security guard and it was right at this moment, that I got the photo that I was looking for. The security guard didn’t seem to be entirely comfortable with the situation and had a worried look on his face, but he didn’t move from his position outside the building he was guarding. I don’t know what might have been going through his mind, but in a city like New York, which was subjected to the terror of 11 September 2001 and with it being so close to the financial centre, I would expect any security guard to be extra wary when someone gets close to them.
In the reflection shown in the window behind, you can see some of the buildings around the financial centre. Again here, I have used the technique of shooting from the hip, and you can see that the range fits nicely until you look at the last 4 photos where I’ve cut off some of the girl’s feet. But that’s the risk you run when you are taking candid photos. However, you can almost be certain that by using this technique, people don’t realise you are taking photos.
Example 3
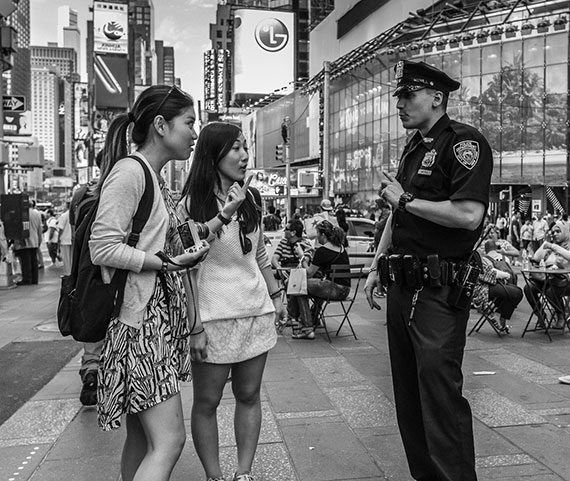
Example 3: “Cool down or I’ll arrest you!”
This photo of two girls who seem to be having a serious and heated discussion with the police officer in Times Square may make you wonder if the photo is telling the right story. Is the officer’s raised finger his last warning before arresting the girls? Actually, when police officers in Times Square are not undertaking police duties they are very friendly tour guides. That was the situation I captured in this photo. If you look at the other 19 photos in large-format, you would not be in any doubt that they were just having a perfectly normal conversation. I don’t know and couldn’t hear what they were talking about, but you can see both the police officer and the girls laughing in many of the photos. So the photograph is only telling the truth in the sense that the subjects have those expressions on their face and are making those gestures at the precise time that I took the photo. That is the only truth in the photo. Some people can show a funny or dramatic facial expression for just a fraction of a second, and I have often exploited this as a street photographer.
Example 4
This clip from a different photo tells a different and more actual story:
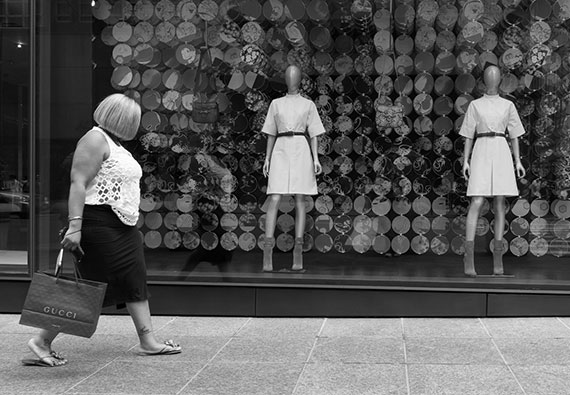
Example 4: “Hair or not.”
5th Avenue in Manhattan is a really good place to take photographs, especially the northern end towards Central Park. This part is full of expensive brand-name stores like Gucci, Chanel, and Louis Vuitton. Here you can see wealthy New Yorkers in expensive cars out shopping and also tourists, who are only “looking” at the many expensive items. You will also find beggars and homeless people waiting for handouts from the passers-by.
I noticed a shop window where there were two fashion-clad mannequins exhibited. They were both bald and didn’t have faces. I was hoping that a bald man or maybe even two bald men would walk past, creating a connection to the two bald mannequins. Instead of two bald men, a woman with bobbed hair walked past. Maybe she had just been shopping in Gucci! I thought that her hair style was a sharp contrast to the bald mannequins, and I also the liked the similarity that you could not see the woman’s face because of her hair. In total I took 4 shots and I like the first one best, as the woman isn’t directly in front of the mannequins.
Example 5
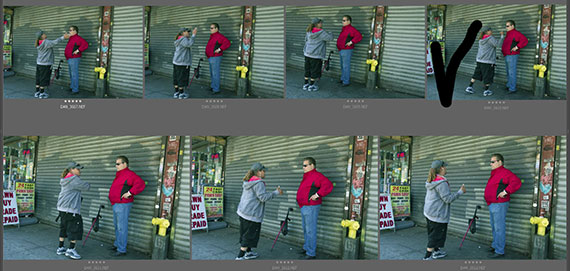
Example 5. “Woman against man.”
A good place to take photographs is on 125th Street in colourful Harlem. This is one of the busiest streets in Harlem and extends over several kilometres.
Here I came across a woman and a man arguing loudly. I took the 7 photos you can see above. The choice of which photo to choose, was pitted between no. 1, 2 or 4. The woman was gesturing strongly with her arms as if to emphasize her side of the argument in all three photos. The man however was standing in roughly the same position in all three photos and seemed to be fairly relaxed. Although the woman’s hand is stretched out in photos no. 1 and 2, I chose to use the fourth photo. Unlike in the previous photos, the woman is stepping closer to the man and is almost leaning against him. Notice her left heel is slightly lifted off the ground whilst she continues arguing.
About the Author:
Daniel Hoffman has been an amateur photographer since 1973, and has moved between many different photographic genres. He recently released an eBook called Street Photography – A week in New York City.
Go to full article: Street Photography Tips & Techniques in New York City
What are your thoughts on this article? Join the discussion on Facebook
PictureCorrect subscribers can also learn more today with our #1 bestseller: The Photography Tutorial eBook
The post Street Photography Tips & Techniques in New York City appeared first on PictureCorrect.