The simple definition of overexposure is when a photo comes out lighter than you intended, and that sounds like it ought to be something that’s quite easy to fix with an image-editor like Photoshop or Lightroom.
That’s not always the case, however, and it’s all because of the way digital camera sensors capture images. They do this using individual photosites (or pixels) which collect light (photons) which is then converted into an electrical signal for processing.
Why can’t you fix it later?
The there's a limit to the intensity, or brightness, of light that these photosites can capture, so in a very bright part of the picture the camera will just record a blank white tone. In technical terms, these areas are said to be ‘clipped’.
You see this a lot in high-contrast scenes, where blue skies sometimes come out as a pale, washed-out cyan color, or cloudy skies just appear a solid white. That’s because these areas are overloaded – overexposed – and it’s no good trying to recover this detail later in software because it’s just isn’t there (although you can recover highlights in less severely overexposed images if you shoot raw – more on this below).
So you do have to be careful to avoid overexposure in digital photography. This is very different to the old days of analog film, where underexposure was the big problem. Because of the way film reacts to light, it was relatively easy to claw back bright detail, but shadow areas were difficult or impossible to recover because there’s no detail. Digital sensors are the opposite – you can often recover amazing amounts of detail from the shadows, but overexposed areas are gone for good.
How can you prevent it?
It’s not difficult to prevent overexposure if you know what to look for and when it’s likely to happen. You can check your camera’s histogram display, either in live view mode or in playback mode, and if the right-hand side of the histogram is abruptly chopped off, that’s an indication that the picture has significant areas of overexposure – quite often you can see this in the saved picture even without the histogram display.
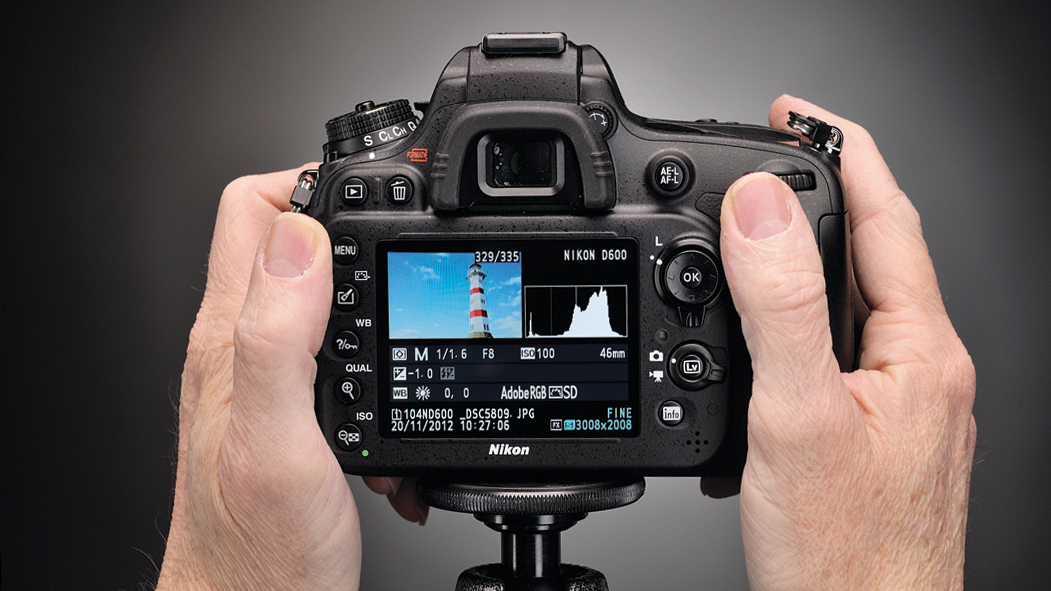
You can quickly check for overexposure using the histogram on your camera. Here the highlight information falls short of the right edge of the histogram, so the highlights aren’t clipped
You can put this right by using the camera’s exposure compensation control to reduce the exposure; by swapping to a different metering system, such as centre-weighted metering, which gives more emphasis to bright areas; or by pointing the camera at a brighter part of the scene, applying the exposure lock and then reframing to take the picture.
Part of the problem is that modern multi-pattern metering systems are very sophisticated. and very good at ‘reading’ a scene to make sure that darker parts of the picture aren’t lost in shadow. They’re designed to deliver a picture that ‘looks about right’, rather than one with a full range of highlight tones.
You should also shoot raw files rather than JPEGs, because raw files contain more highlight (and shadow) information compared to JPEGs, and most raw conversion programs will let you access this extended image data and recover ‘blown’ highlights. In exposure terms, you can typically recover up to 1EV of extra highlight detail.