Digital cameras have an array of squares or dots, that you see when you look through the viewfinder, which represent the points at which it is capable of focusing. Put your subject on top of one of those dots, press the shutter button, and you’ll get a nice sharp image….usually.
But, sometimes your camera doesn’t light up the right dot, or your subject is out of the range of the focus points, or you want to select a specific point but you have trouble moving the buttons, knobs, and dials on your camera fast enough. If this sounds like you, or if you just want to check out a new way of using your camera, you might want to try the focus-and-recompose technique.
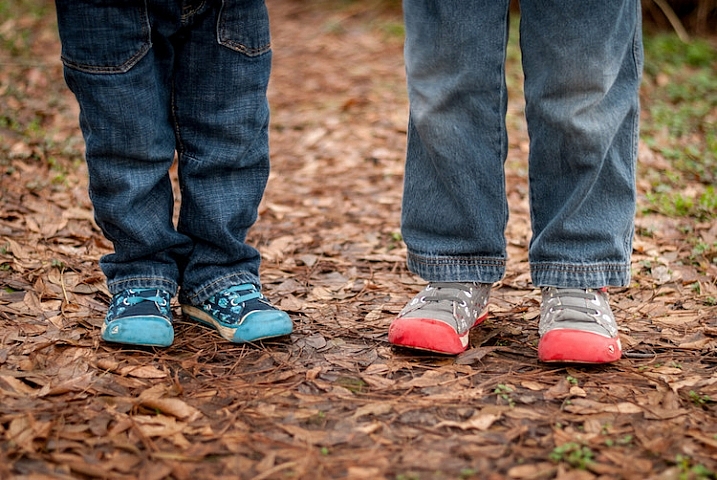
Kids move around all the time, so rather than hunt for a specific focus point I used the center point to focus on their shoes and then instantly recomposed before snapping the photo.
Every digital camera allows you several options when selecting which focus points to use such as:
- Full automatic – Your camera decides which dot to use, and what should be in in focus, often based on what’s closest to the viewfinder.
- Face Detect – Your camera looks at the scene to see if there are any faces and prioritizes those above all else. If there are multiple faces, it usually looks for the ones that are closest.
- Single Point – You select one point to be in focus and your camera makes sure that one specific spot is sharp before taking the picture.
There are other methods as well, but these are the most common, and all of them are quite effective but can also be a bit limiting. Automatic and Face Detect generally work fine but aren’t always accurate. If you want to select the focus point yourself you will usually have to turn a dial or press a joystick on the back of your camera, which can cost you precious seconds, and lead to some missed shots. Focus-and-recompose inverts the equation a bit, and instead of moving the focus point around you focus once, and then move your camera around to compose and get the shot you want.

Focus-and-recompose is a process wherein you select the focus point, often just one single dot or square in your viewfinder, and lock focus with a half-press of the shutter button. Then with a flick of your wrist you physically move your camera back and forth, or up and down just a bit, in order to recompose your shot will still keeping the focus where you locked it. It sounds a bit complicated, but once you get used to this technique it quickly becomes second nature, and is much faster than fiddling with buttons and dials to select a focus point every time.
In the following image I have overlaid an exact representation of all 51 focus points on my Nikon D750 camera. You will notice that the object on which I wanted to focus, the red pully mechanism on the crane arm, falls outside the focus points of my camera.
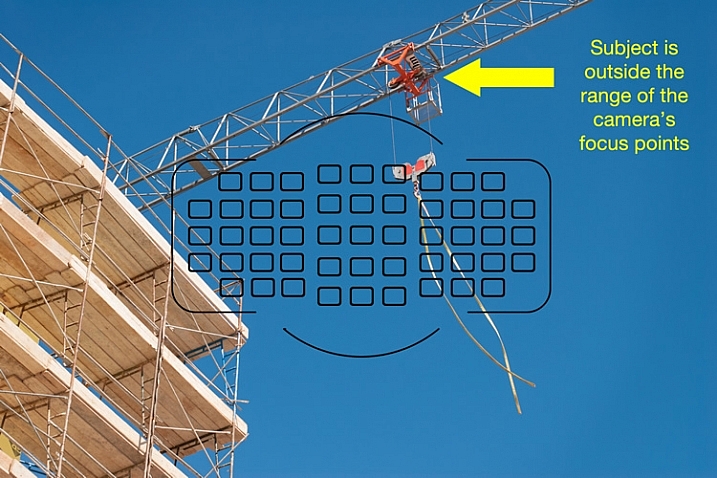
If I had to rely solely on the focus points of my camera, I wouldn’t have been able to get the shot I wanted. However, the focus-and-recompose technique offered an easy solution. All I had to do was focus on the top pully, lock it with a button on my camera, and then recompose the shot by shifting my camera’s field of view down just a bit. By using this method I did not need to make an compromises, and I am pleased with the final image
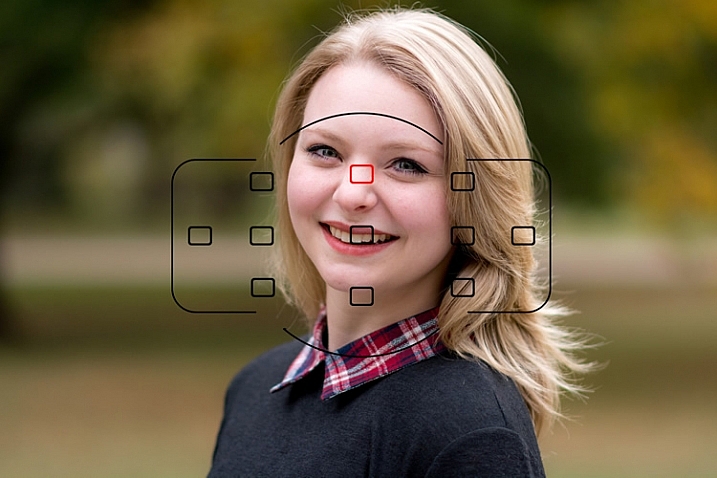
Even though some cameras offer a much broader spread of focus points that can reach to the very edge of the frame, it is time-consuming to select them, or shift from one to the next using the dials on your camera. Some cameras don’t have nearly the number of focus points as higher-end models, which can be a bit frustrating when your subject falls between two points, but focus-and-recompose can solve this issue as well. I don’t even use all 51 of my camera’s points, because it’s quicker to select one from only 11, as you can see in the image below, and then recompose as needed.
It’s not always possible to get the focus precisely where you want it, if you let your camera do all the work for you.
This portrait of a college sophomore (above) illustrates a big problem for traditional focusing methods, especially on cameras without a lot of focus points. In order to get the focus point precisely on her left eye where I wanted it, the only option using traditional methods would have been to scoot my camera’s field of view over a bit, which would have meant compromising what I wanted the shot to look like. Rather than sacrifice my artistic vision because of the limitations of my camera, I selected the top center point (highlighted in red), focused my camera on her eye, and then shifted my camera over just a bit to get the picture. Because I was only using 11 out of 51 possible focus points it was much quicker to select the one I wanted instead of repeatedly tap-tap-tapping on the dial on the back of my camera.
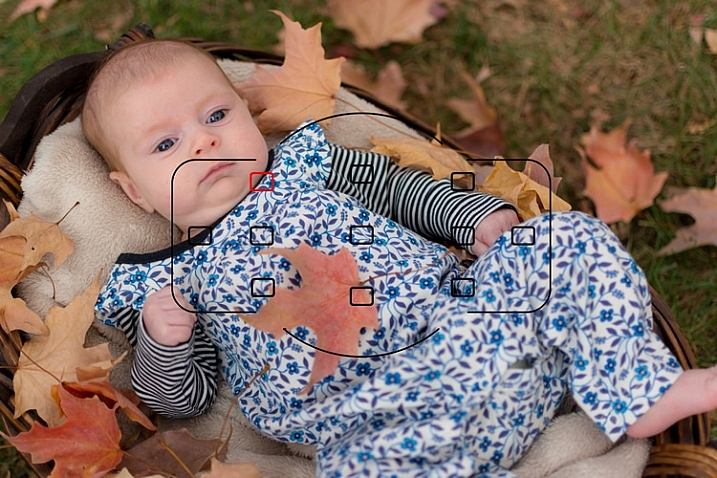
This baby’s eyes were out of the reach of my focusing area so I used the top-left square to lock focus and then recomposed to get the shot I wanted.
There are some important limitations to know about this method, and it does not work for every type of photographic situation. Most cameras have a few different autofocus modes such as single (the camera focuses once and doesn’t refocus until you shoot a picture) and continuous (the camera refocuses continually until you take a shot). If you shoot static subjects, such as landscapes and architecture, you can leave your camera in single mode, in which focus-and-recompose works quite well.
However if you shoot things that are always on the move such as families, kids, sports, autos, or animals, you will get better results using continuous focusing. This makes focus-and-recompose tricky because as soon as you move your camera to re-frame your shot, the focusing point moves too. In these instances I usually just leave my camera in continuous focusing mode while I move myself around to get the picture I want, since the subject has usually moved by the time I would normally lock focus, and recompose the shot.
One of the trickiest aspects of focus-and-recompose involves the physical action of holding the shutter button halfway down with your finger, while you reframe your shot. Fortunately you can solve this if you use the back button focus, technique which decouples the action of focusing, from that of actually taking a picture. Moving to back button focus, along with using focus-and-recompose, has entirely transformed my approach to photography, and made me a lot more nimble and versatile as a photographer.

I used focus-and-recompose to nail focus precisely on the Tesla “T” logo.
One other thing to note about focus-and-recompose is that the center focusing points on most cameras are typically more sensitive than those along the outer edge of the frame, and are thus able to get more a more accurate focus, especially in dim light. If you use the outer focusing points, your pictures might not always be as sharp as they could be, but if you focus with the center point and then recompose your shot you will likely get more keepers. Of course this is not recommended for macro photography or other applications where your depth of field is razor thin, since any tiny movement of the camera will dramatically alter your picture, but for most other situations it can be a huge benefit.
What about you? Have you tried this technique or do you have other focusing tips to share? Leave your thoughts in the comments below!
The post Understanding the Focus and Recompose Technique by Simon Ringsmuth appeared first on Digital Photography School.