Notice: Function wp_enqueue_script was called incorrectly. Scripts and styles should not be registered or enqueued until the wp_enqueue_scripts, admin_enqueue_scripts, or login_enqueue_scripts hooks. This notice was triggered by the swfobject handle. Please see Debugging in WordPress for more information. (This message was added in version 3.3.0.) in /hermes/bosnacweb06/bosnacweb06am/b647/ipg.sitisitiaruba61744/photo-natural.com/wp-includes/functions.php on line 5905
Deprecated: Methods with the same name as their class will not be constructors in a future version of PHP; nggGalleryview has a deprecated constructor in /hermes/bosnacweb06/bosnacweb06am/b647/ipg.sitisitiaruba61744/photo-natural.com/wp-content/plugins/nextgen-galleryview/nggGalleryview.php on line 14
Deprecated: Function create_function() is deprecated in /hermes/bosnacweb06/bosnacweb06am/b647/ipg.sitisitiaruba61744/photo-natural.com/wp-content/plugins/nextgen-galleryview/nggGalleryview.php on line 100
Deprecated: Function create_function() is deprecated in /hermes/bosnacweb06/bosnacweb06am/b647/ipg.sitisitiaruba61744/photo-natural.com/wp-content/plugins/youtube-channel-gallery/youtube-channel-gallery.php on line 1223 www.photo-natural.com, the best photo articles on the Net | Photo-natural.com - Part 5
Fall is one of the best times of the year anywhere. The trees change colors, and even the weather is at its best during this season. Photographer bull961 took the following image in Ontario, Canada and it’s nothing short of spectacular:
“Peak Fall in Ontario, Canada” by bull961 (Via Reddit. Click image to see full size.)
The photographer shot this image with a Panasonic Lumix GH5 camera.
The varying colors with a beautiful mix of light and shadows add a beautiful sense of contrast to the image. The canal running right through the middle is another interesting element. While it acts as a strong leading line to draw the viewer right in, it also divides the image into two equal halves.
Doing underwater bubble photography is both fun and challenging! Read on for easy-to-follow techniques, tips, and tricks for you to try no matter which underwater environment you’re in!
Safety
For your safety, have someone on land, in a boat or in the water with you to act as a spotter. Have them keep a floatation device with them at all times too. Underwater photography can be tiring, and you might feel the need for assistance from time to time.
Have drinking water accessible regardless of the weather. Be sure to have sunscreen on and beware of the sun reflections off the water: sunburns hurt!
Equipment
There are many devices you can use, including a GoPro, underwater phones, and the disposable ones they sell at the drug store. However, the best way to achieve shots like these is to have an SLR camera within a professionally-made underwater housing. You can still try these types of shots with whichever device you do have, but it is easier to take them with a lot of control going in.
You can shop for professional underwater equipment from a variety of places, but Ikelite – www.ikelite.com has a strong reputation internationally, and for good reasons. You can also check out Mozaik Underwater Camera – www.housingcamera.com
Both websites sell camera and housing packages for underwater photography and also individual housing cases. You definitely want reliable, trustworthy equipment to achieve consistent, sharp images.
Equipment check
Please note that human error causes most floods (where water breaches the housing compartment, and you risk losing your camera and every photo you’ve taken). Common causes of floods are sand, hair, or dust in the O-ring (which you should lightly lubricate every so often) and improperly secured latches.
With a professional underwater housing, you have the same capabilities underwater as you do on land. This saves much time if you’re in deep water – no need to climb in and out of the boat or in and out from the beach. Same for scuba diving – sometimes coming up from a deeper depth is simply not an option. For those using other devices, be sure to know the depth limit of the device, or you risk losing everything!
Camera settings and taking the first few shots
Make sure the lens on both the camera and the housing is clean. There is nothing worse than getting underwater, taking some fantastic bubble photos, and then seeing a sunscreen finger smear in the corner of each shot.
In underwater photography, your body will be moving, so too is the water and the bubbles. So if in doubt, use your camera in Auto Mode the first few times. Alternatively, try setting your camera to F22 and F20 at 1/2000th, 1/4000th, and rely on natural light.
Next, you are ready to get into the water and don’t forget to defog your goggles before putting them on (spit or a defogging spray work great).
Bring your equipment in and determine if it’s working underwater with a few test shots (aim at your feet) and then check the image on your viewfinder. Make any adjustments necessary.
Water and weather
Take into consideration the appearance of the water. You are looking for water clarity. Sometimes, the bottom can be churned up by a recent storm, and there can be a lot of debris. Debris can cause low visibility and definitely with underwater photography, the clearer the water, the better.
If you are in a controlled setting such as a pool, the clarity of the water will depend on the chemicals added. If the water is cloudy due to improper chemical balance, there will be a hazy quality in all of the photographs.
The weather affects the light in your photographs. A cloudy day will allow you to use a flash if you have one. Only add a small amount of flash, or you run the risk of blowing out the bubbles entirely.
If you don’t have a flash, keep shallow and try taking photos in the top two feet or so as the light will only decrease the further down you go. If it’s raining, you can still take photographs. It is fun to get the water droplets falling on the surface of the water while bubbles are rising towards them.
When it’s a sunny day, light streams through the water surface and lights up the bubbles from behind. Try to take a few pictures with the sun in the shot as well.
How to create bubbles with containers
Use a variety of containers for different sized bubbles. Try sand buckets, Tupperware, or other plastic bowls. Children’s stacking cups are great too, as long as they don’t have a hole or holes in the bottom. Anything can work (re-usable drinking bottles are great too) but avoid all breakables like glass.
Bring them one by one into the water, so they don’t float away. You would benefit from a helper to pass them to you, so it’s easier to juggle your camera and the buckets.
Start with the smallest, easiest to manage container, and work up to the largest as they are the hardest to maneuver underwater.
Take the container underwater by holding the opening directly over the surface and pushing it down underwater to catch the air inside. Practice tilting the cup slowly underwater to let the air trickle out in a trail of bubbles and practice tilting the cup quickly to let all the air out at one time.
Now take a few test shots of the air escaping the container. You might have to practice a few times not to catch your hand or the container in the shot.
Try taking the container deeper. Be patient until you get the right balance of speed of the bubbles versus shutter speed. Check your viewfinder and make any necessary adjustments regarding shutter speed, focal length, or the strength of your flash if you’re using one.
Try taking a series of images of bubbles using multi-shot (continuous shooting) for a better choice of images later.
Move into another section of the water for a variety of images. If you’re using the sun as a backlight, you may also have to angle your camera up towards the surface of the water to get a better shot.
How to create bubbles without containers
Take the containers out of the water and try kicking your feet and making lots of tiny bubbles.
Editing
Once you have downloaded your images, you are ready to edit.
Adobe Lightroom will make editing easy – though, you can use any editing software of your choice. Cropping will be your most used tool as you eliminate any hands, containers, or debris. Cropping is also necessary to zoom in on a section as you attempt to create the most aesthetically pleasing bubble photograph.
Occasionally, you may want to adjust the color of the photograph by making it bluer or taking all color away to see the bubble shapes in black and white.
Conclusion
Fine art underwater bubble photography takes a lot of patience, so relax and have fun. Bubbles are fragile, finite, and often hard to predict. Your best shots may be a string of bubbles, a cloud of little ones, or a single, large one.
Let’s see what you can do! Please share your underwater bubble photography with us in the comments!
Whether you've just bought your first Nikon DSLR or you want to add something new to your kit bag, the wealth of choice available can be a little bit daunting. Fear not though, as we're here to help ensure you find the very best Nikon lens for your DSLR.
The guide has been split into two different sections. First off, there's the best Nikon lenses for DX (APS-C) format DSLRs. These are lenses which are well suited – and in some cases specifically designed for – crop sensor DSLRs like the D3500, D5600 and D7500. After that, we'll be looking at lenses which are best for Nikon FX format (full-frame) DSLRs, such as the D850.
You'll usually find that Nikon DX format DSLRs are typically sold as part of a kit which comes complete with a standard zoom lens. These will often provide sufficient to get you started with, but you might soon find that you outgrow them if you want to do something a little bit more specialized.
For example, you don't get a super wide angle for landscape and interior shots, while creating those super shallow depth of field effects can only really be achieved with a lens which has a very wide aperture. Macro lenses are very helpful for close-up shooting too.
While there are dedicated DX format lenses designed to be used with APS-C sensor cameras, sometimes FX format lenses are actually a better option, especially if you're thinking of upgrading to full-frame at a later date.
Independently manufactured lenses from the likes of Sigma and Tamron often give similar or even better performance than own-brand Nikon lenses
You'd be forgiven for thinking that it makes most sense to use Nikon lenses if you have a Nikon DSLR. But, think twice about independently manufactured lenses from companies such as Sigma and Tamron – they often have similar, or even better, performance than proprietary optics – but usually at cheaper prices.
After some rigorous testing – both in the lab and out in the real world, here you'll find the best DX lenses you'll find for your Nikon APS-C camera. We've included both our favourite picks, as well as close-contenders which suit those on a tighter budget.
Best Nikon lenses for DX format DSLRs in 2019
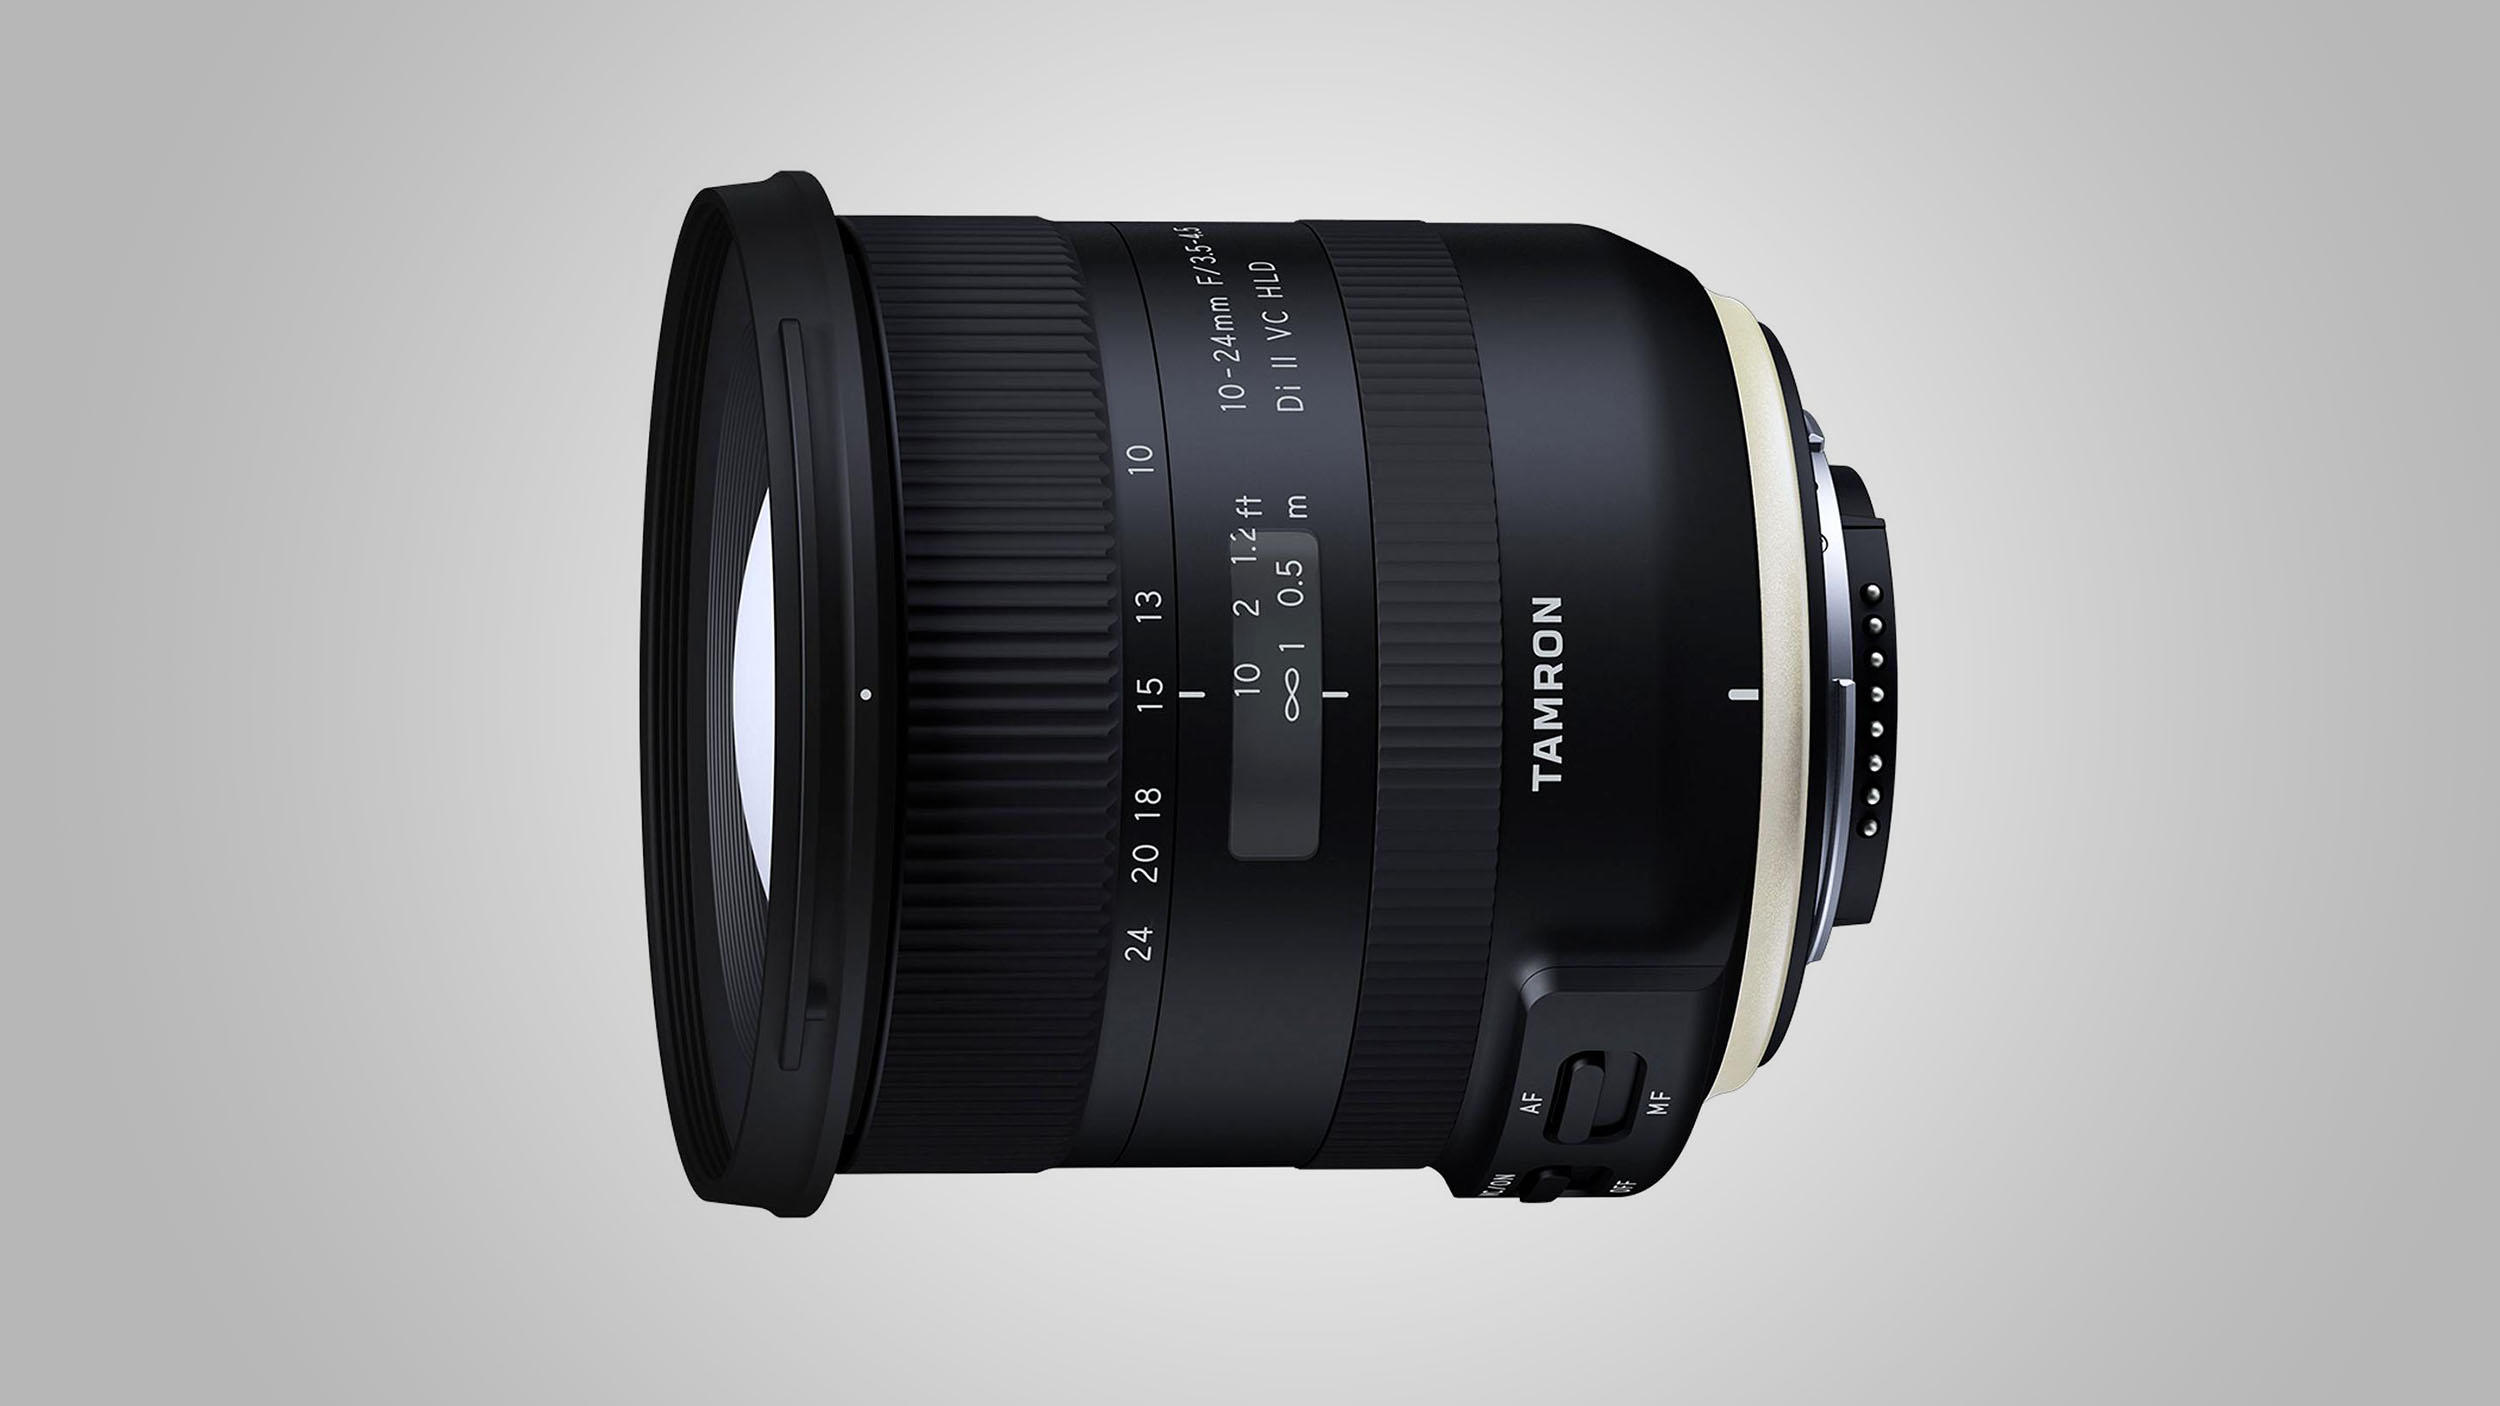
This 'VC HLD' lens includes optical stabilization alongside a new autofocus system which is quick and quiet. Handling is great, while the high-quality build includes weather sealing and a fluorine coating for the front element. Image quality is beautifully sharp, while contrast is high. Distortions are kept under control, while there's also fairly minimal color fringing.
Great-value option: Sigma 10-20mm f/3.5 EX DC HSM
For about the same cash outlay as Nikon’s budget AF-P DX 10-20mm f/4.5-5.6G VR lens, this Sigma is a more refined option. It's got better build quality and delivers greater image quality, but on the downside, lacks stabilization – something which is not too problematic at this focal length.
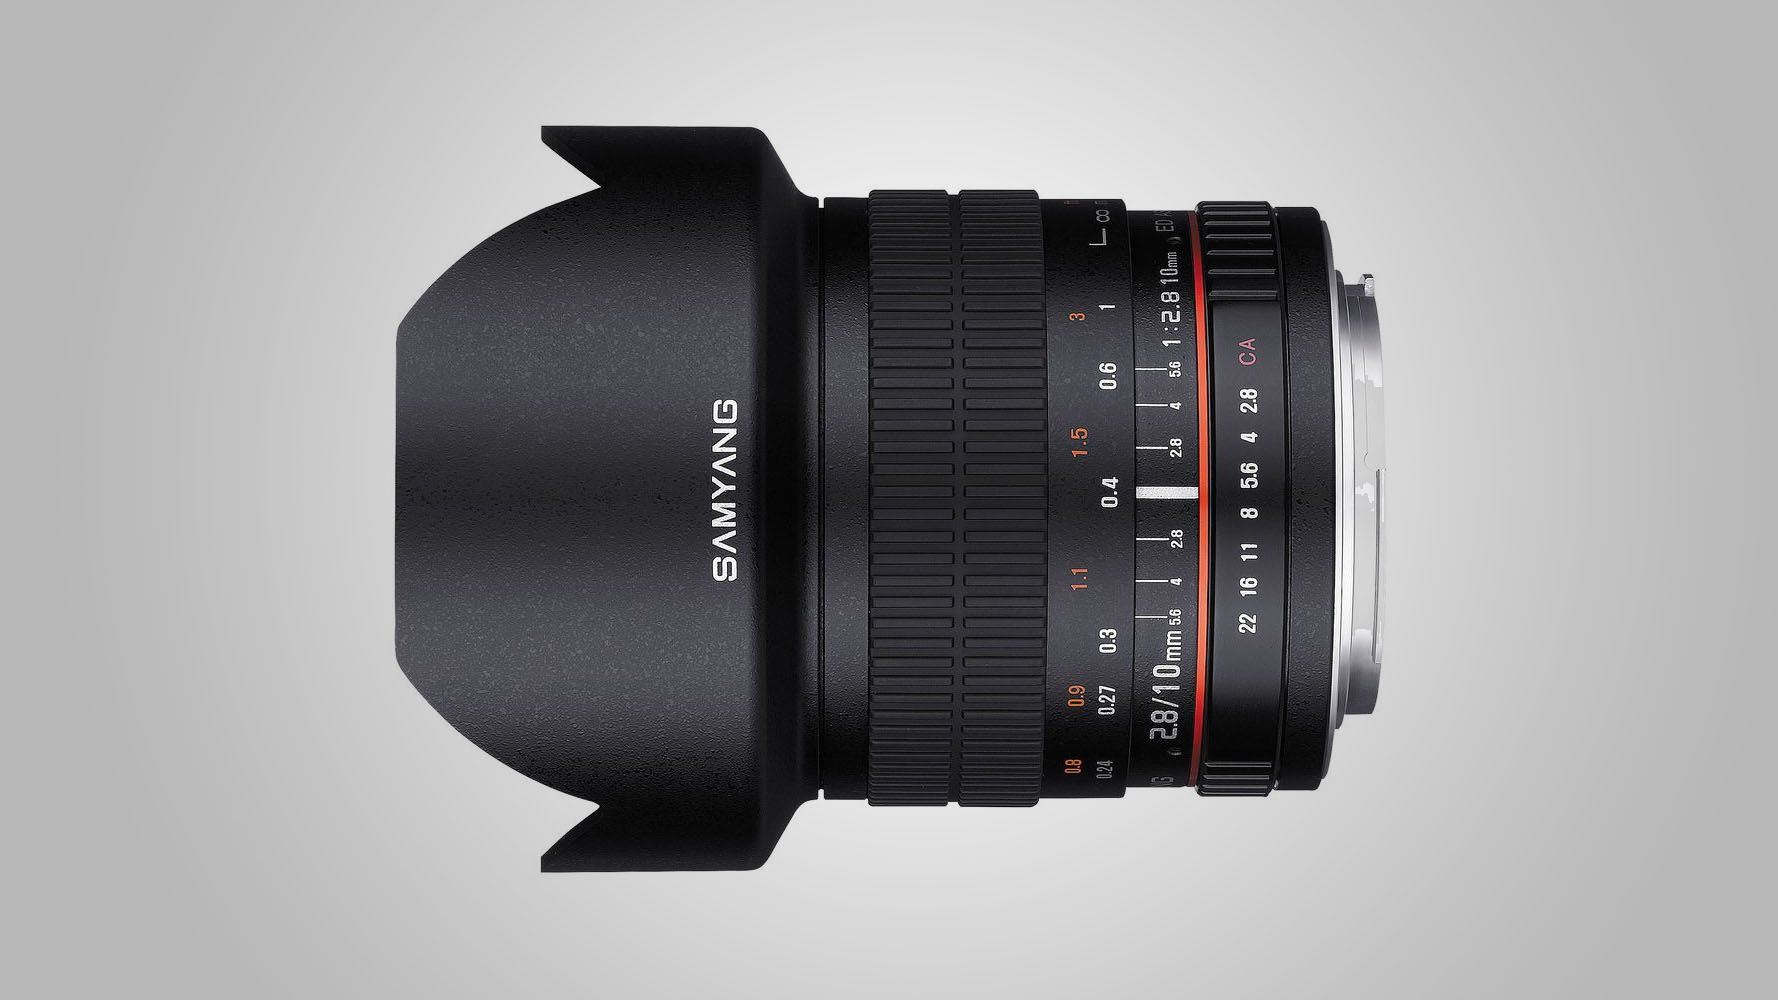
When you're pretty much reliant on autofocus, stepping back to manual focus can feel like going backwards. However, lenses like this which promise a huge depth of field thanks to a short focal length make accurate focusing less of a critical issue. To help you out, you also get a handy distance scale to try traditional focus methods for landscape and street photography – you can try setting the hyperfocal distance and 'zone focusing'. There's also high-quality glass which helps ensure the best possible image quality, with minimal ghosting and flare.
Great-value option: N/A
Wide-angle prime lenses for DX format cameras are practically non-existent. That means that the Samyang 10mm is not only the best choice, it’s also the best value.
Typically bundled with higher-end cameras, such as the Nikon D500, this is the best DX format standard zoom lens. It's a great walkaround option with a flexible range and a wide maximum aperture that sees it well suited to a lot of different subjects. It's also beautifully built, with no less than four ED (Extra-low Dispersion) elements, plus nano-structure coatings along with fluorine coatings on the front and rear elements. Focusing is swift and accurate thanks to ring-type ultrasonic autofocusing, while the VR (Vibration Reduction) stabilization system is very effective. Sharpness drops off a little at the long end of the zoom range, while you can see some barrel distortion at the short end of the lens, but otherwise it's a great option.
Great-value option: Sigma 17-70mm f/2.8-4 DC Macro OS HSM | C
Relatively compact and lightweight, this Sigma has a variable yet fairly fast aperture rating and delivers impressive image quality, all at a bargain price.
Take into account the 1.5x multiplier (or 'crop factor') of Nikon's APS-C models and with this lens you get an effective focal length of 52.5mm, which makes it pretty much perfect as a standard prime. This lens is also FX (full-frame) compatible, so should you find you upgrade later down the line, you can use it as a wide-angle prime, without being limited only to 'crop mode'. As for usability and image quality, you've got fast ultrasonic autofocusing system, plus a Tamron's VC optical stabilization system which is highly effective.
Great-value option: Nikon AF-S DX 35mm f/1.8G
It’s less expensive to buy than the Tamron, matches it for aperture rating and delivers very pleasing image quality, but it’s not as well built and lacks stabilization.
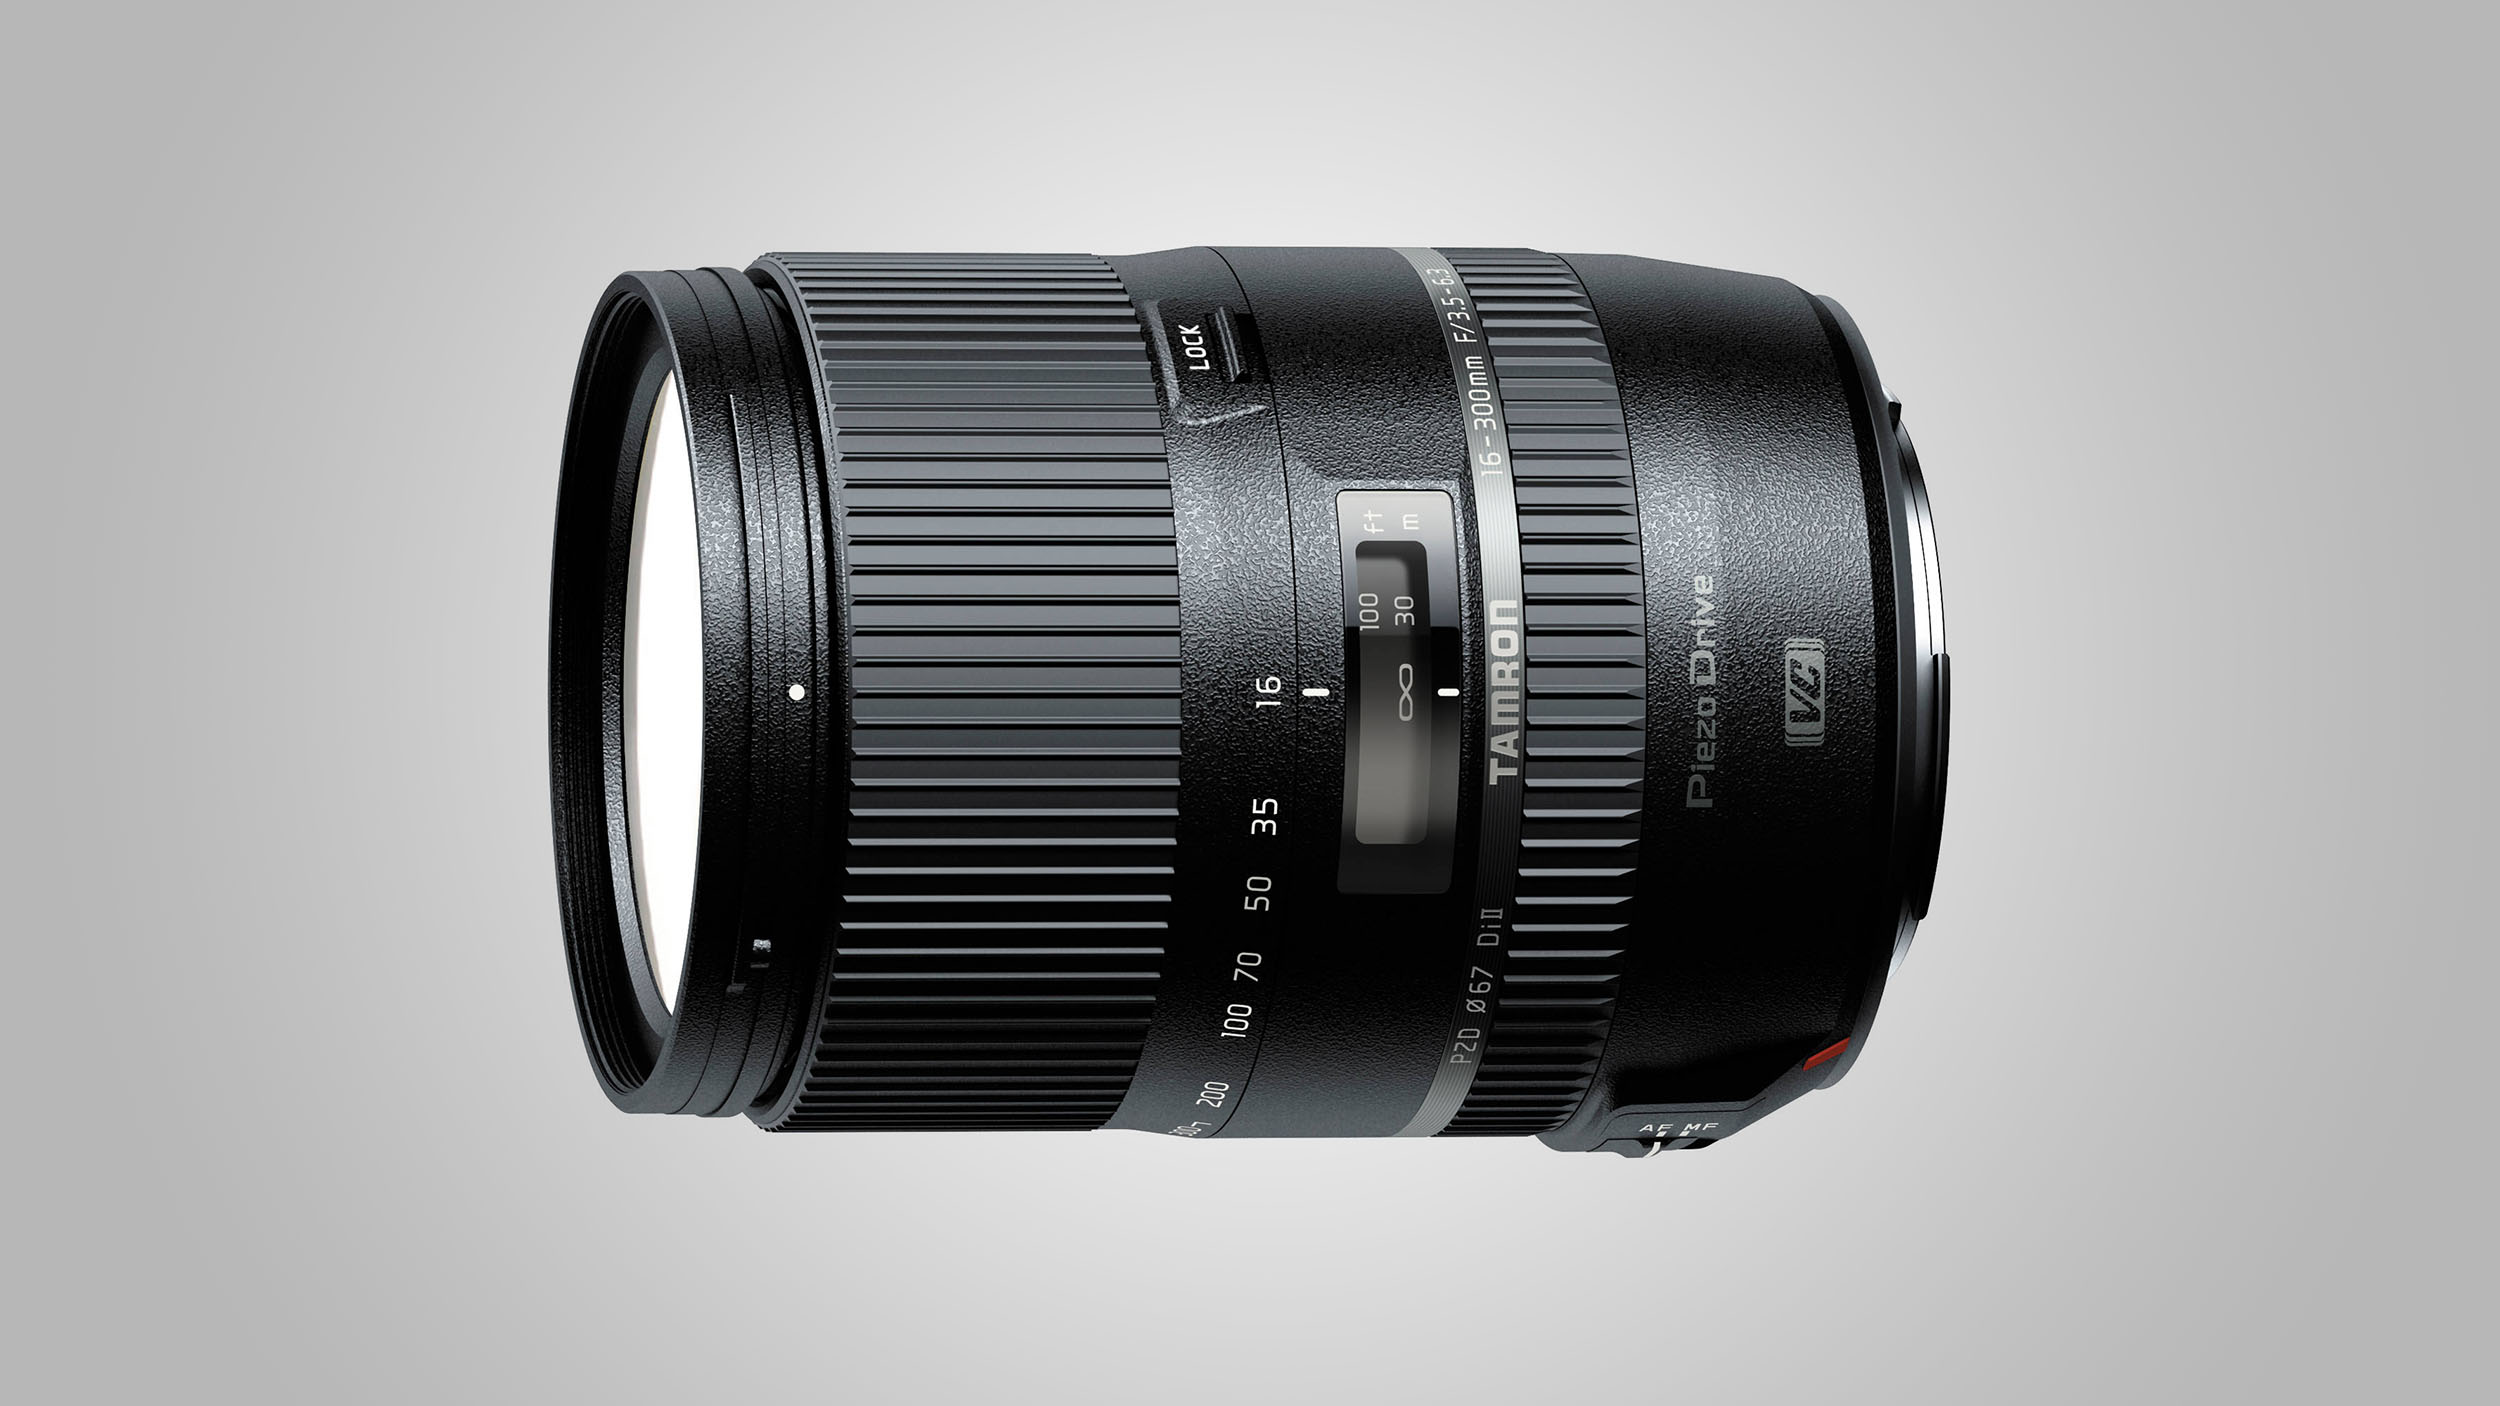
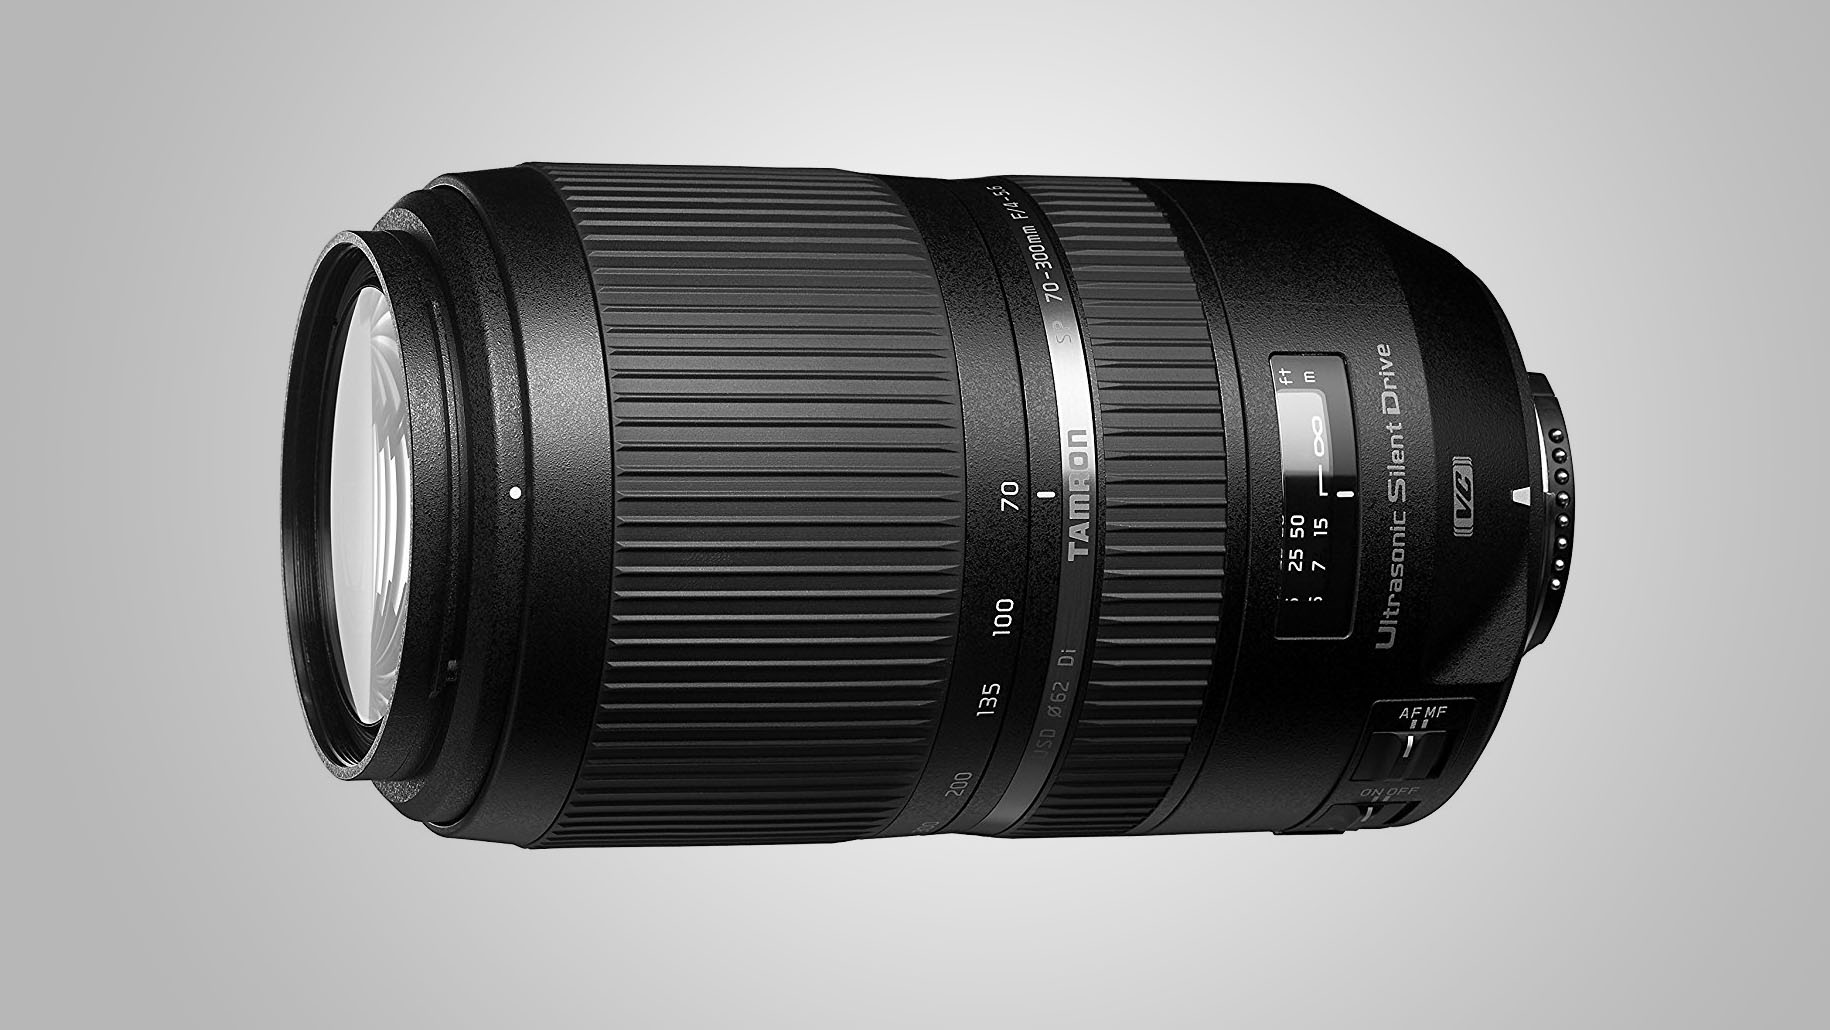
Available at a competitive price when compared with Nikon's own brand superzoom lens, this Tamron starts at 16mm, rather than the usual 18mm at the short end of its range. It might not sound like a lot, but that extra-wide-angle potential is actually very noticeable in practice. At the other end of the range, there's 300mm, which will get you nice and close to the action, too. Of course there's a compromise to be made here – that comes in the form of a little softness at the long end of the zoom range, while you'll notice some obvious barrel distortion at the short end too.
Great-value option: Tamron 18-200mm f/3.5-6.3 Di II VC
Remarkably compact and lightweight for a superzoom, Tamron 18-200mm makes an excellent ‘travel lens’ and is unbeatable value at the price.
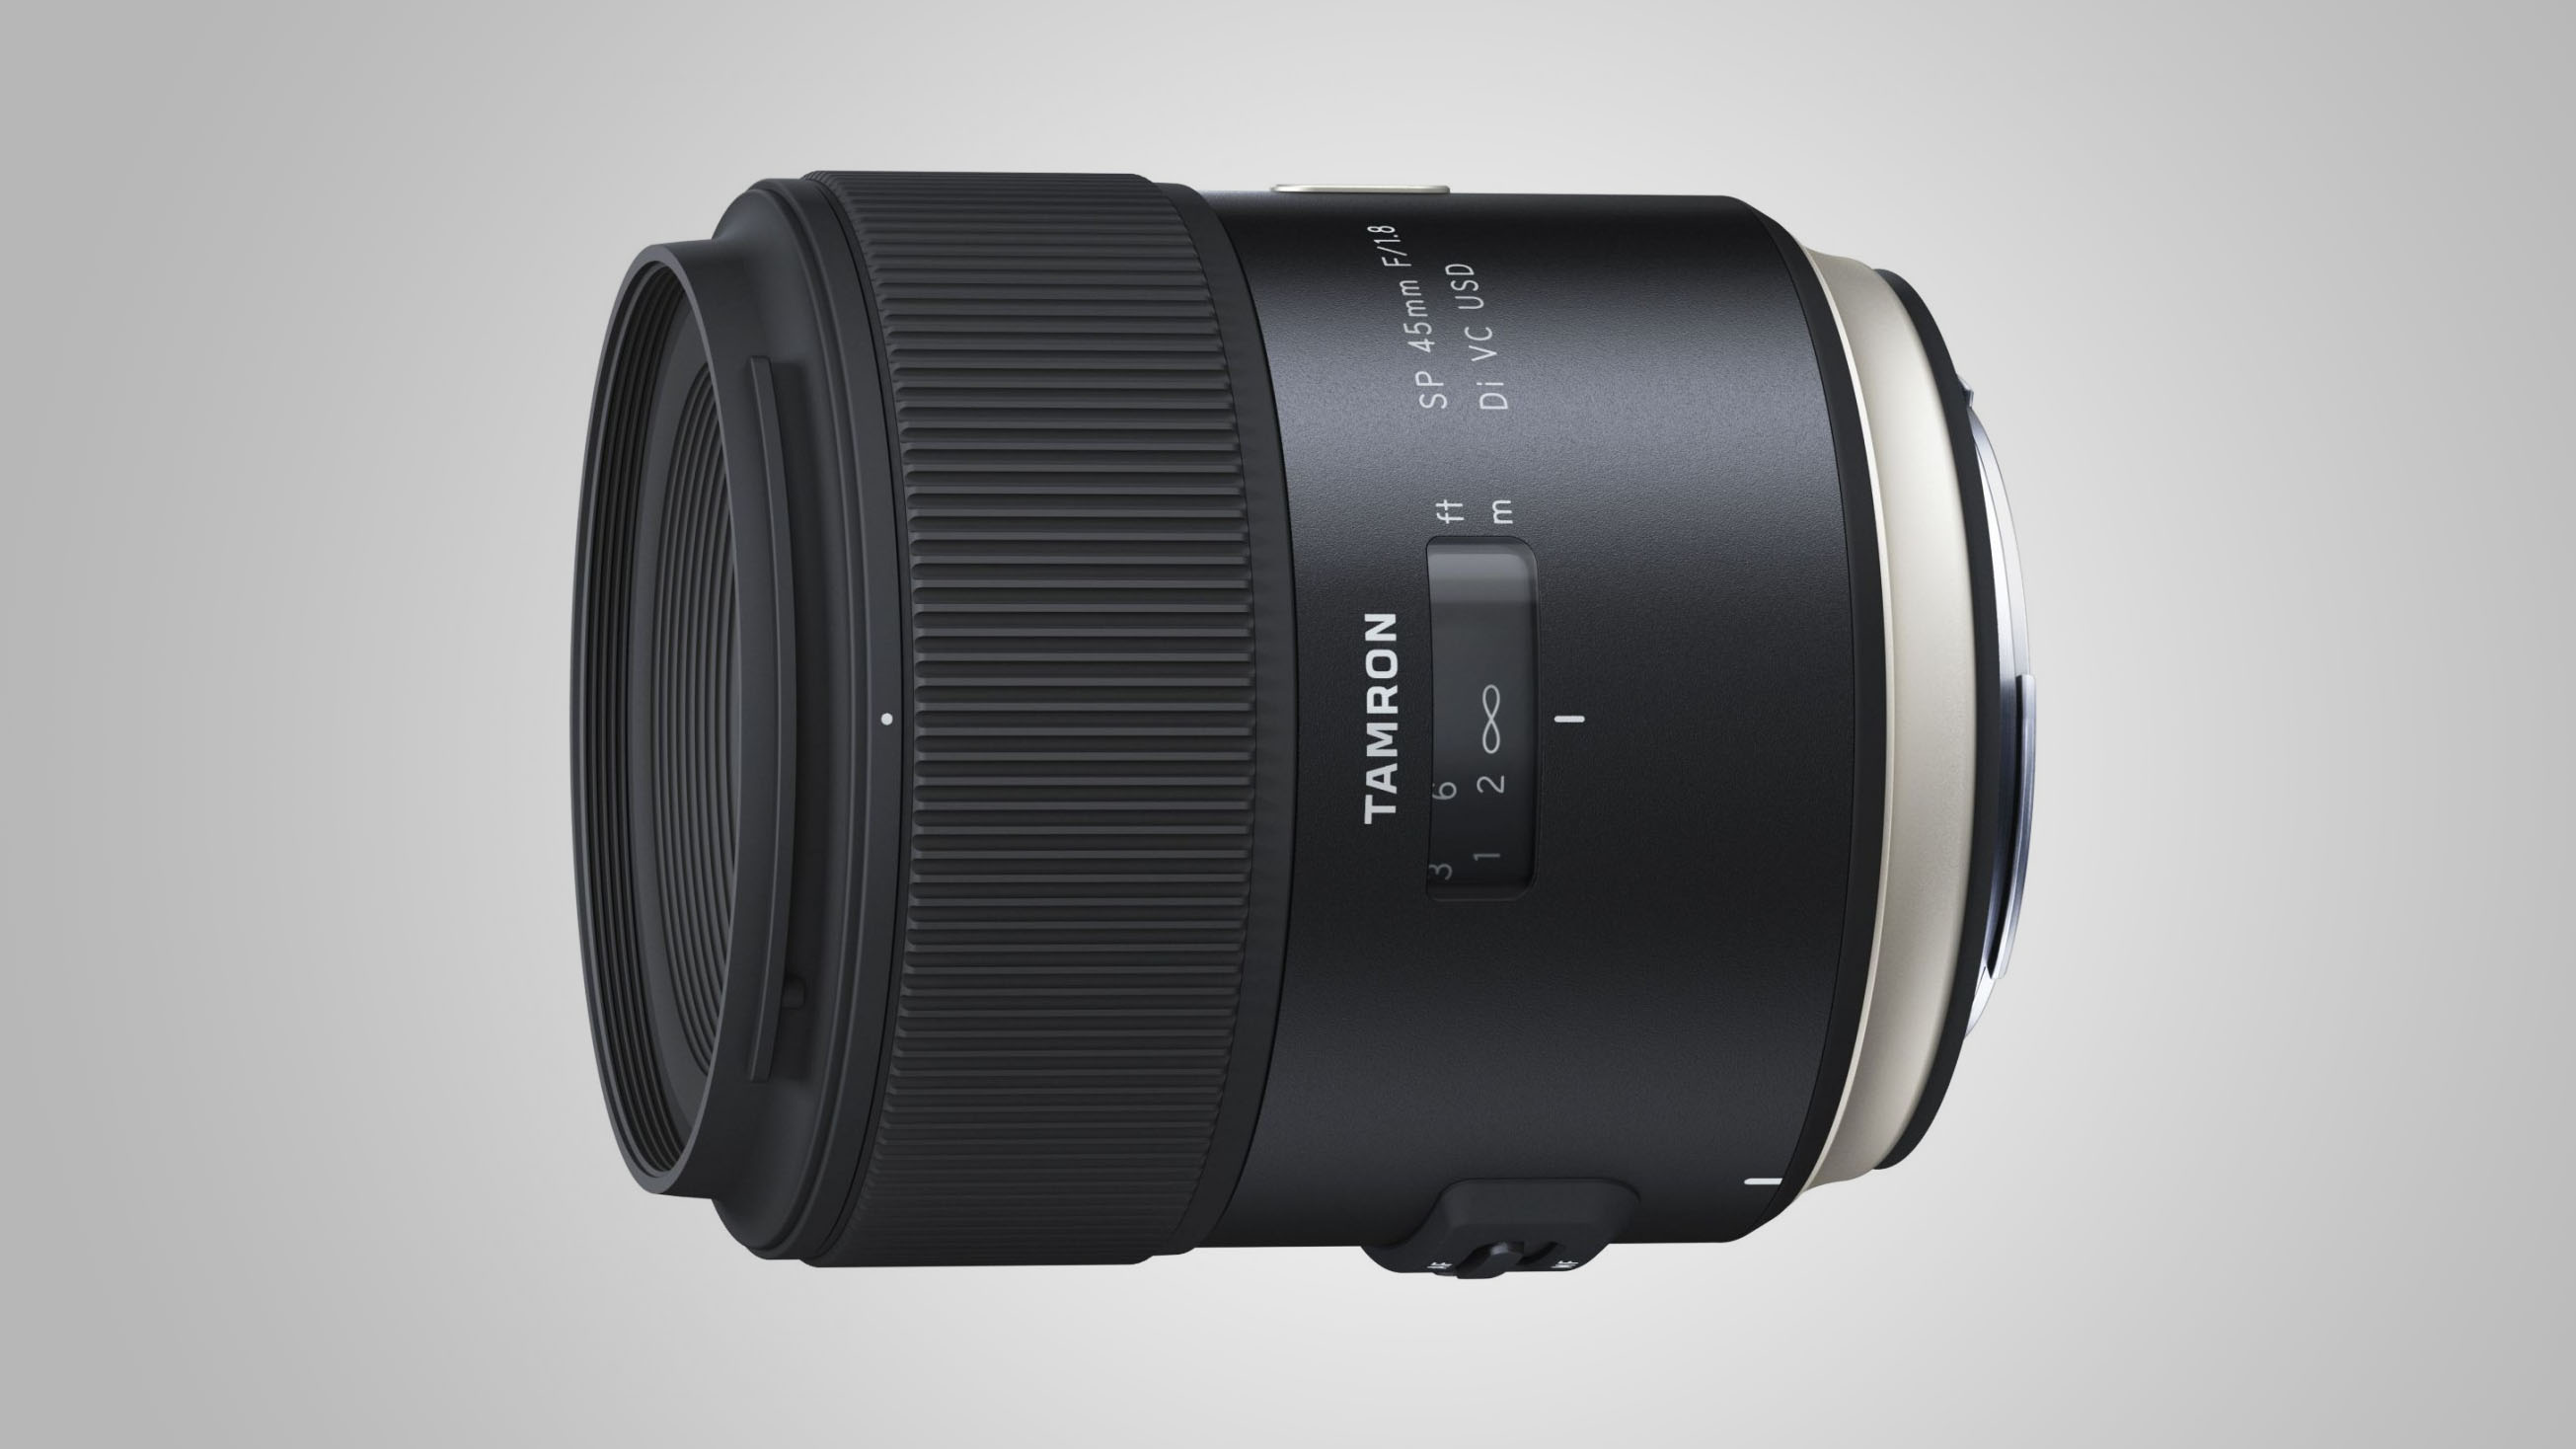
This lens is a tad (a lot) more expensive than cheap options like the Nikon AF-S 50mm f/1.8G. However, it is extremely nicely made and boasts an optical stabilizer that you won't always find in standard fast prime lenses. It's full-frame compatible, but on your DX format camera, it gives a focal length of 67.5mm, which makes it well-suited for portraiture. Bokeh (out of focus areas) is nicely rendered, being deliciously smooth and creamy while also keeping the subject nice and sharp.
Great-value option: Nikon AF-S 50mm f/1.8G
If you’re willing to sacrifice a little in terms of build and image quality, and can do without optical stabilization, this budget Nikon lens only costs about a third of the price of the Tamron.
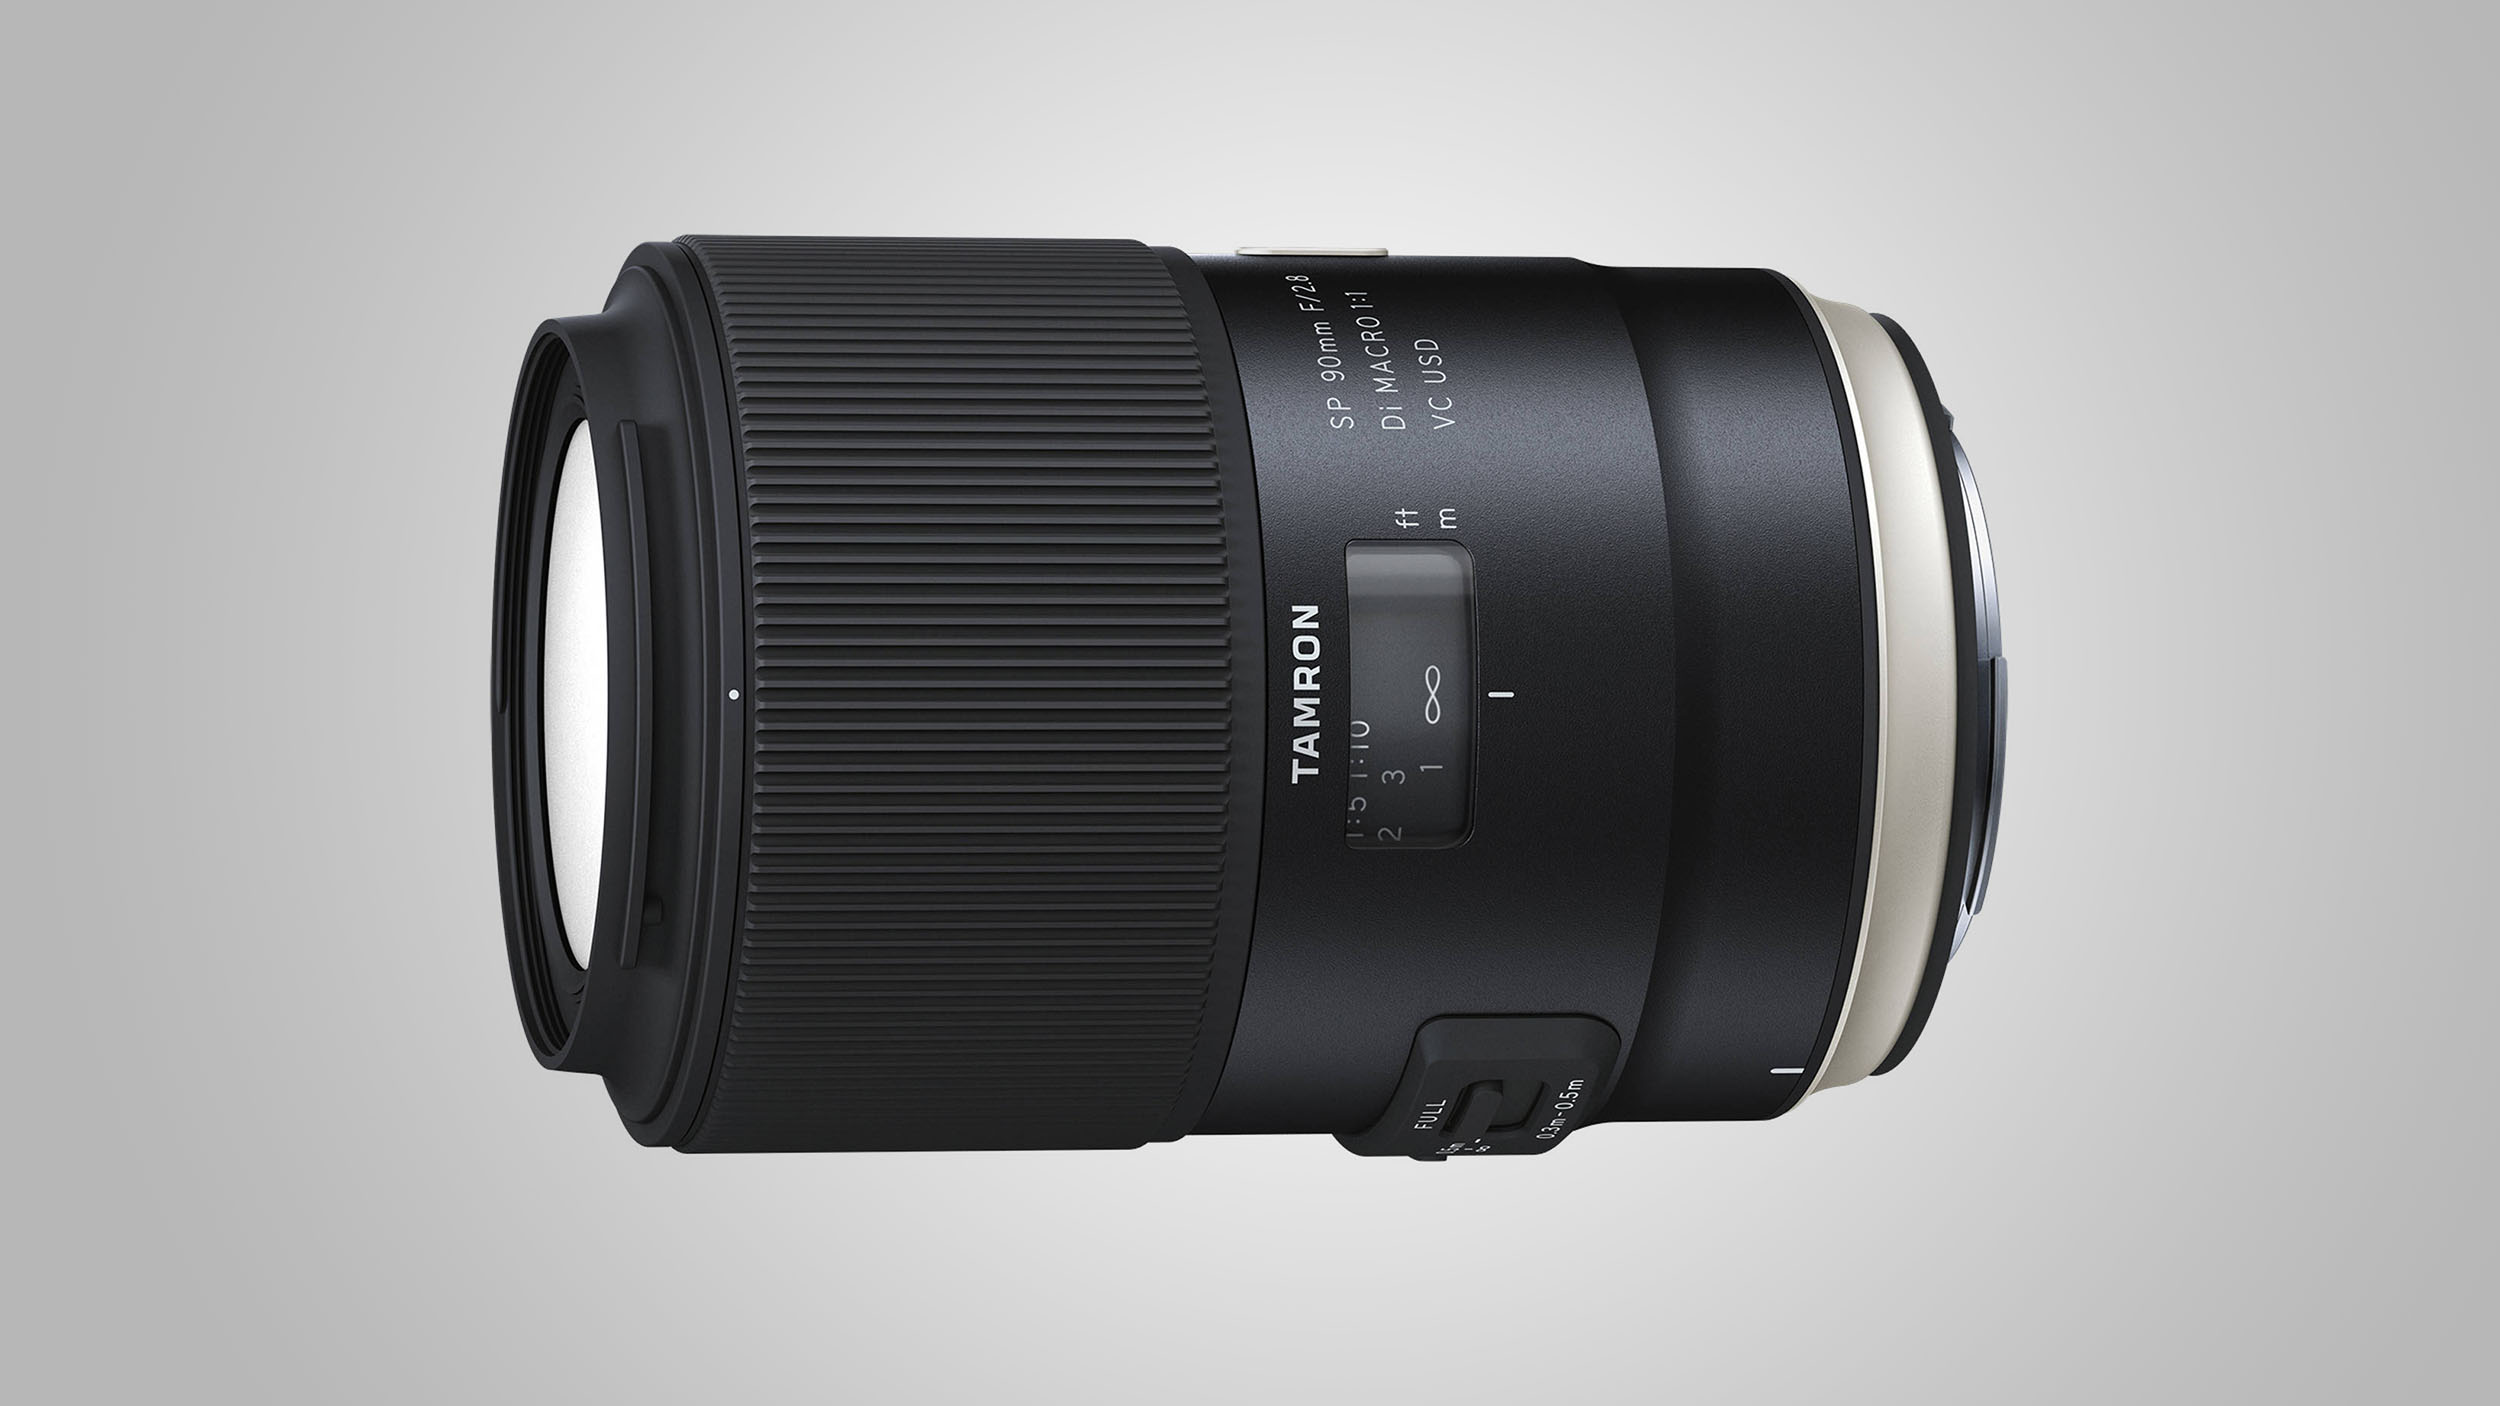
This 90mm macro lens provides a number of excellent specifications, including high-grade glass, nano-structure coating and high-quality weather sealing and fluorine coatings. The autofocus system has been optimized for close-up shooting, while the 'hybrid' optical stabilizer counteracts for axial shift (up-down or side-to-side movement) as well as the usual angular vibration (wobble). All that means that this is the best lens in its class for consistently sharp close-ups – you'll want to use a tripod though.
Great-value option: Sigma 105mm f/2.8 EX DG OS HSM Macro
It lacks the Tamron’s hybrid stabilization system and weather seals, but offers refined handling and delivers superb image quality.
This Tamron option offers better build quality than Nikon's own DX format 70-200mm lens, while being much cheaper than Nikon's FX format 70-300mm lens – it hits the sweet spot. Here, the ring-type ultrasonic autofocus system is fast and quiet, while sharpness and contrast are well rendered throughout the zoom range. Sharpness is a little softer at the full reach of the lens, but Tamron's own optical stabilization system works well to keep your handheld shots free of blur.
Great-value option: Nikon AF-S DX 55-200mm f/4-5.6G ED VR II
This DX format lens is significantly cheaper to buy than the FX format Tamron, and, while it doesn’t offer as much telephoto reach, its retractable design makes it remarkably compact for stowing away.
This is a lens that makes a heck of a lot of sense with DX format cameras. Try pairing a 70-200mm f/2.8 lens with even something like the Nikon D7500 and you'll end up with something bulky and unbalanced. By contrast, the 70-200mm f/4 option is about half the weight (and half the price) for much more comfortable shooting. This is still an FX format lens, so you'll be able to use it on either kind of body, which is good news for potential upgraders. Image quality is stunning, with excellent sharpness helped along by very effective stabilization.
Great-value option: Sigma 70-200mm f/2.8 EX DG OS HSM
A great bargain buy, the Sigma has the faster, often favored f/2.8 aperture rating and is a very good performer, although it lacks weather seals.
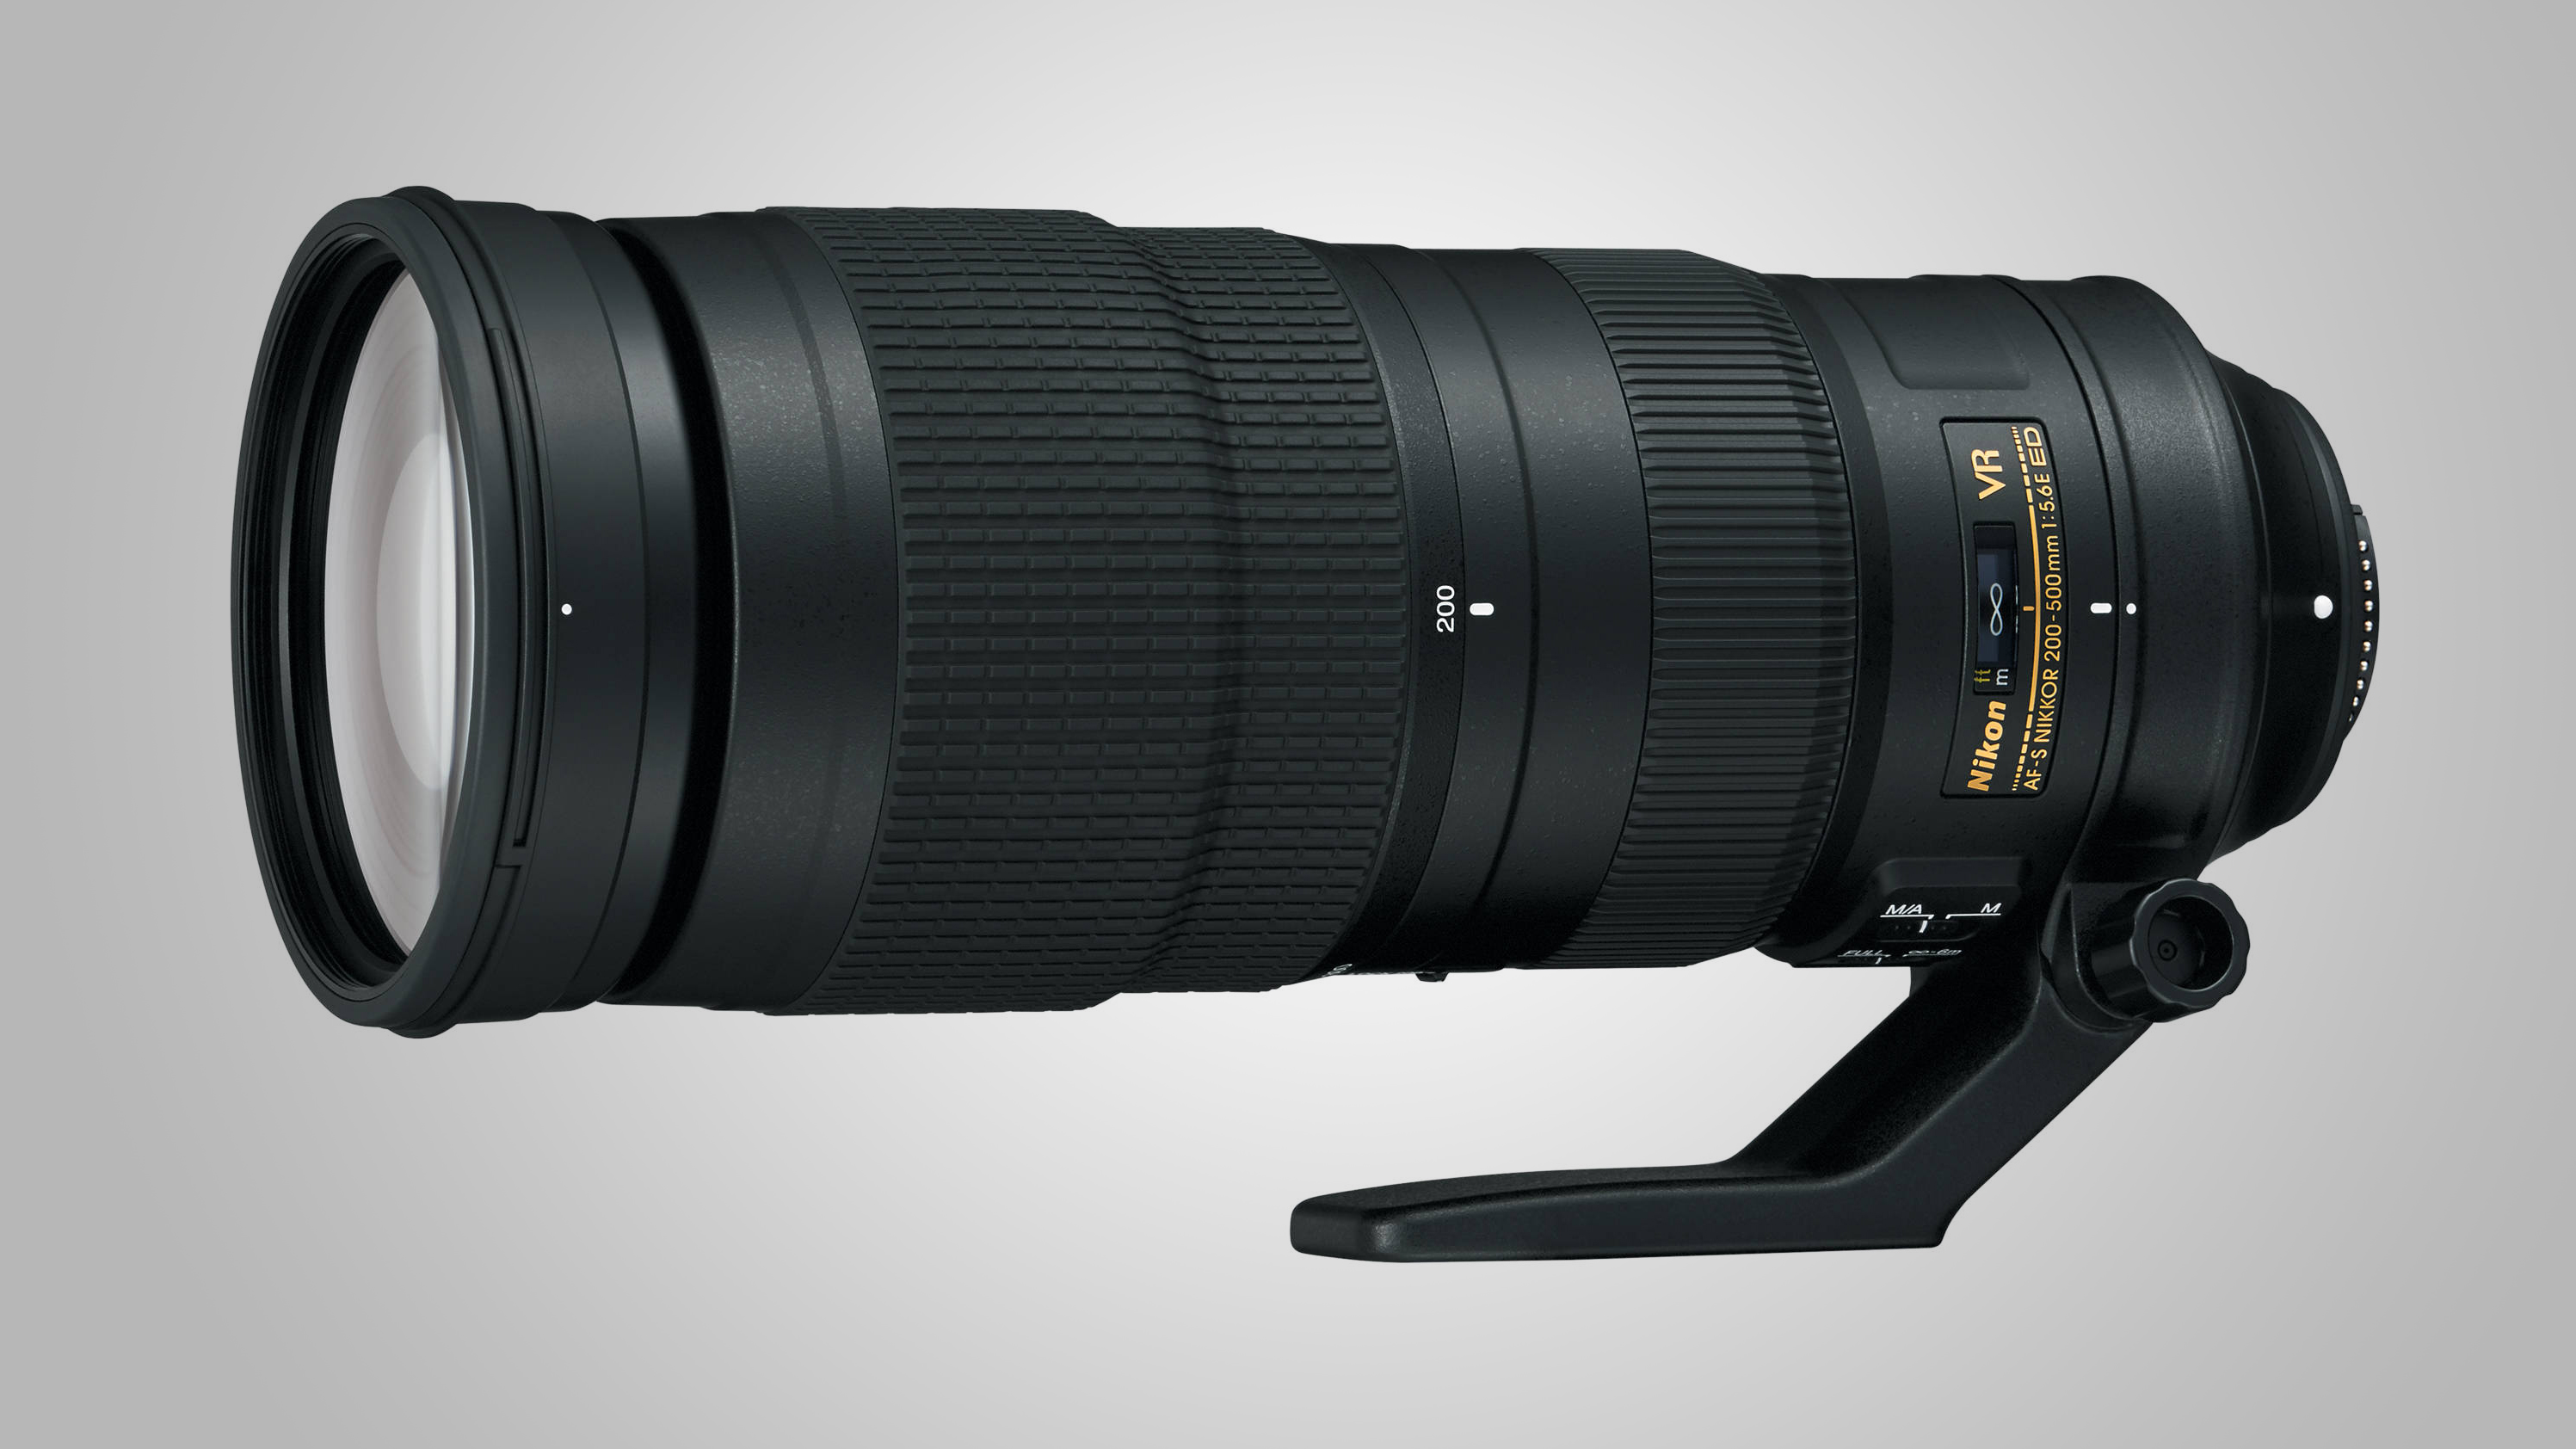
If you're a wildlife, sports or action photographer – this is one of the most versatile lenses you can pick up. It's fairly unusual in that it has a constant aperture throughout the range, which at f/5.6 is not too bad for the type of lens. On your DX body, the far end of the lens will give you 750mm, which may not be quite as much as using either a Sigma or Tamron 150-600mm zoom, but it's not too far behind. Another fantastic benefit is a 'Sport' mode, which makes it easier to track fast and erratically moving subjects through the viewfinder.
Great-value option: Sigma 100-400mm f/5-6.3 DG OS HSM | C
The maximum focal length is comparatively modest, but Sigma’s Contemporary class super-telephoto zoom is wonderfully compact and lightweight, making prolonged handheld shooting less of a strain.
You'll often hear it said that a camera is only as good as the glass attached to it. FX (full-frame) format Nikon bodies like the D810 and D850 certainly set the bar high, with high-pixel-count sensors that draw attention to any shortfall in sharpness. But it's also true that there’s more to a good lens than just its ability to resolve fine detail.
In the real world, you'll find that handling is a key factor to consider. You'll also need accurate and fast autofocus to help you get those shots that others might miss. Effective optical stabilization can also make the difference between images that win awards, versus those that are only fit for the trash.
It’s certainly not always the case that own-brand Nikon lenses outperform competitors from independent manufacturers like Sigma and Tamron
It's not just about sharpness either. You also want high contrast, even when shooting wide-open at the largest available aperture. We're also keen to look for minimal distortion, color fringing as well as resistance to ghosting and flare. Reasonably low vignetting (where the corners of the image are dark) is also something to look out for. Such shortfalls can often be corrected in-camera, or in post-production software such as Photoshop – but it's always better to get it right in the first place if you can.
Don't be fooled into thinking that own-brand Nikon lenses are the go-to options for best performance. Independent manufacturers like Sigma and Tamron have produced some corkers, while they generally offer much more of a bargain.
Based on our extensive lab tests and ‘real-world’ testing, we’re proud to present our top 10 lenses in a wide range of popular categories, as well as great-value alternatives to suit tighter budgets. Let’s take a closer look at all the winners.
Best Nikon lenses for FX format DSLRs in 2019
This spectacular lens has a class-leading maximum viewing angle, while the 'Art' designation means that its optics are the sharpest and finest possible. In terms of design, you've got an extra-large-diameter aspherical elements at the front, alongside five top-notch FLD (Fluorite-equivalent Low Dispersion) elements. There's fluorine coatings on the front and rear elements, while weather-sealing is also included. Autofocusing is swift and accurate, while a constant aperture throughout the zoom range is another bonus. Sharpness and distortion-control are both excellent, too.
Great-value option: Tamron SP 15-30mm f/2.8 Di VC USD
It’s not quite as ultra-wide as the Sigma, but this Tamron undercuts it for cost, while adding optical stabilization and a faster f/2.8 aperture rating.
You can trust your creative potential to Sigma's 'Art' range, which has been designed to be as sharp as possible, while also producing beautiful blurred backgrounds. The company has a large selection of f/1.4 primes to choose from, but this is the widest available (there is also a 14mm f/1.8 lens). Image quality is superb, while build quality – although on the chunky side – is nothing short of spectacular.
Great-value option: Irix 15mm f/2.4 Firefly
It lacks autofocus, but this is a fabulous manual-focus lens that’s beautifully built and a real joy to use. The ‘Blackstone’ edition adds a couple of extra luxuries, but the Firefly is unbeatable value.
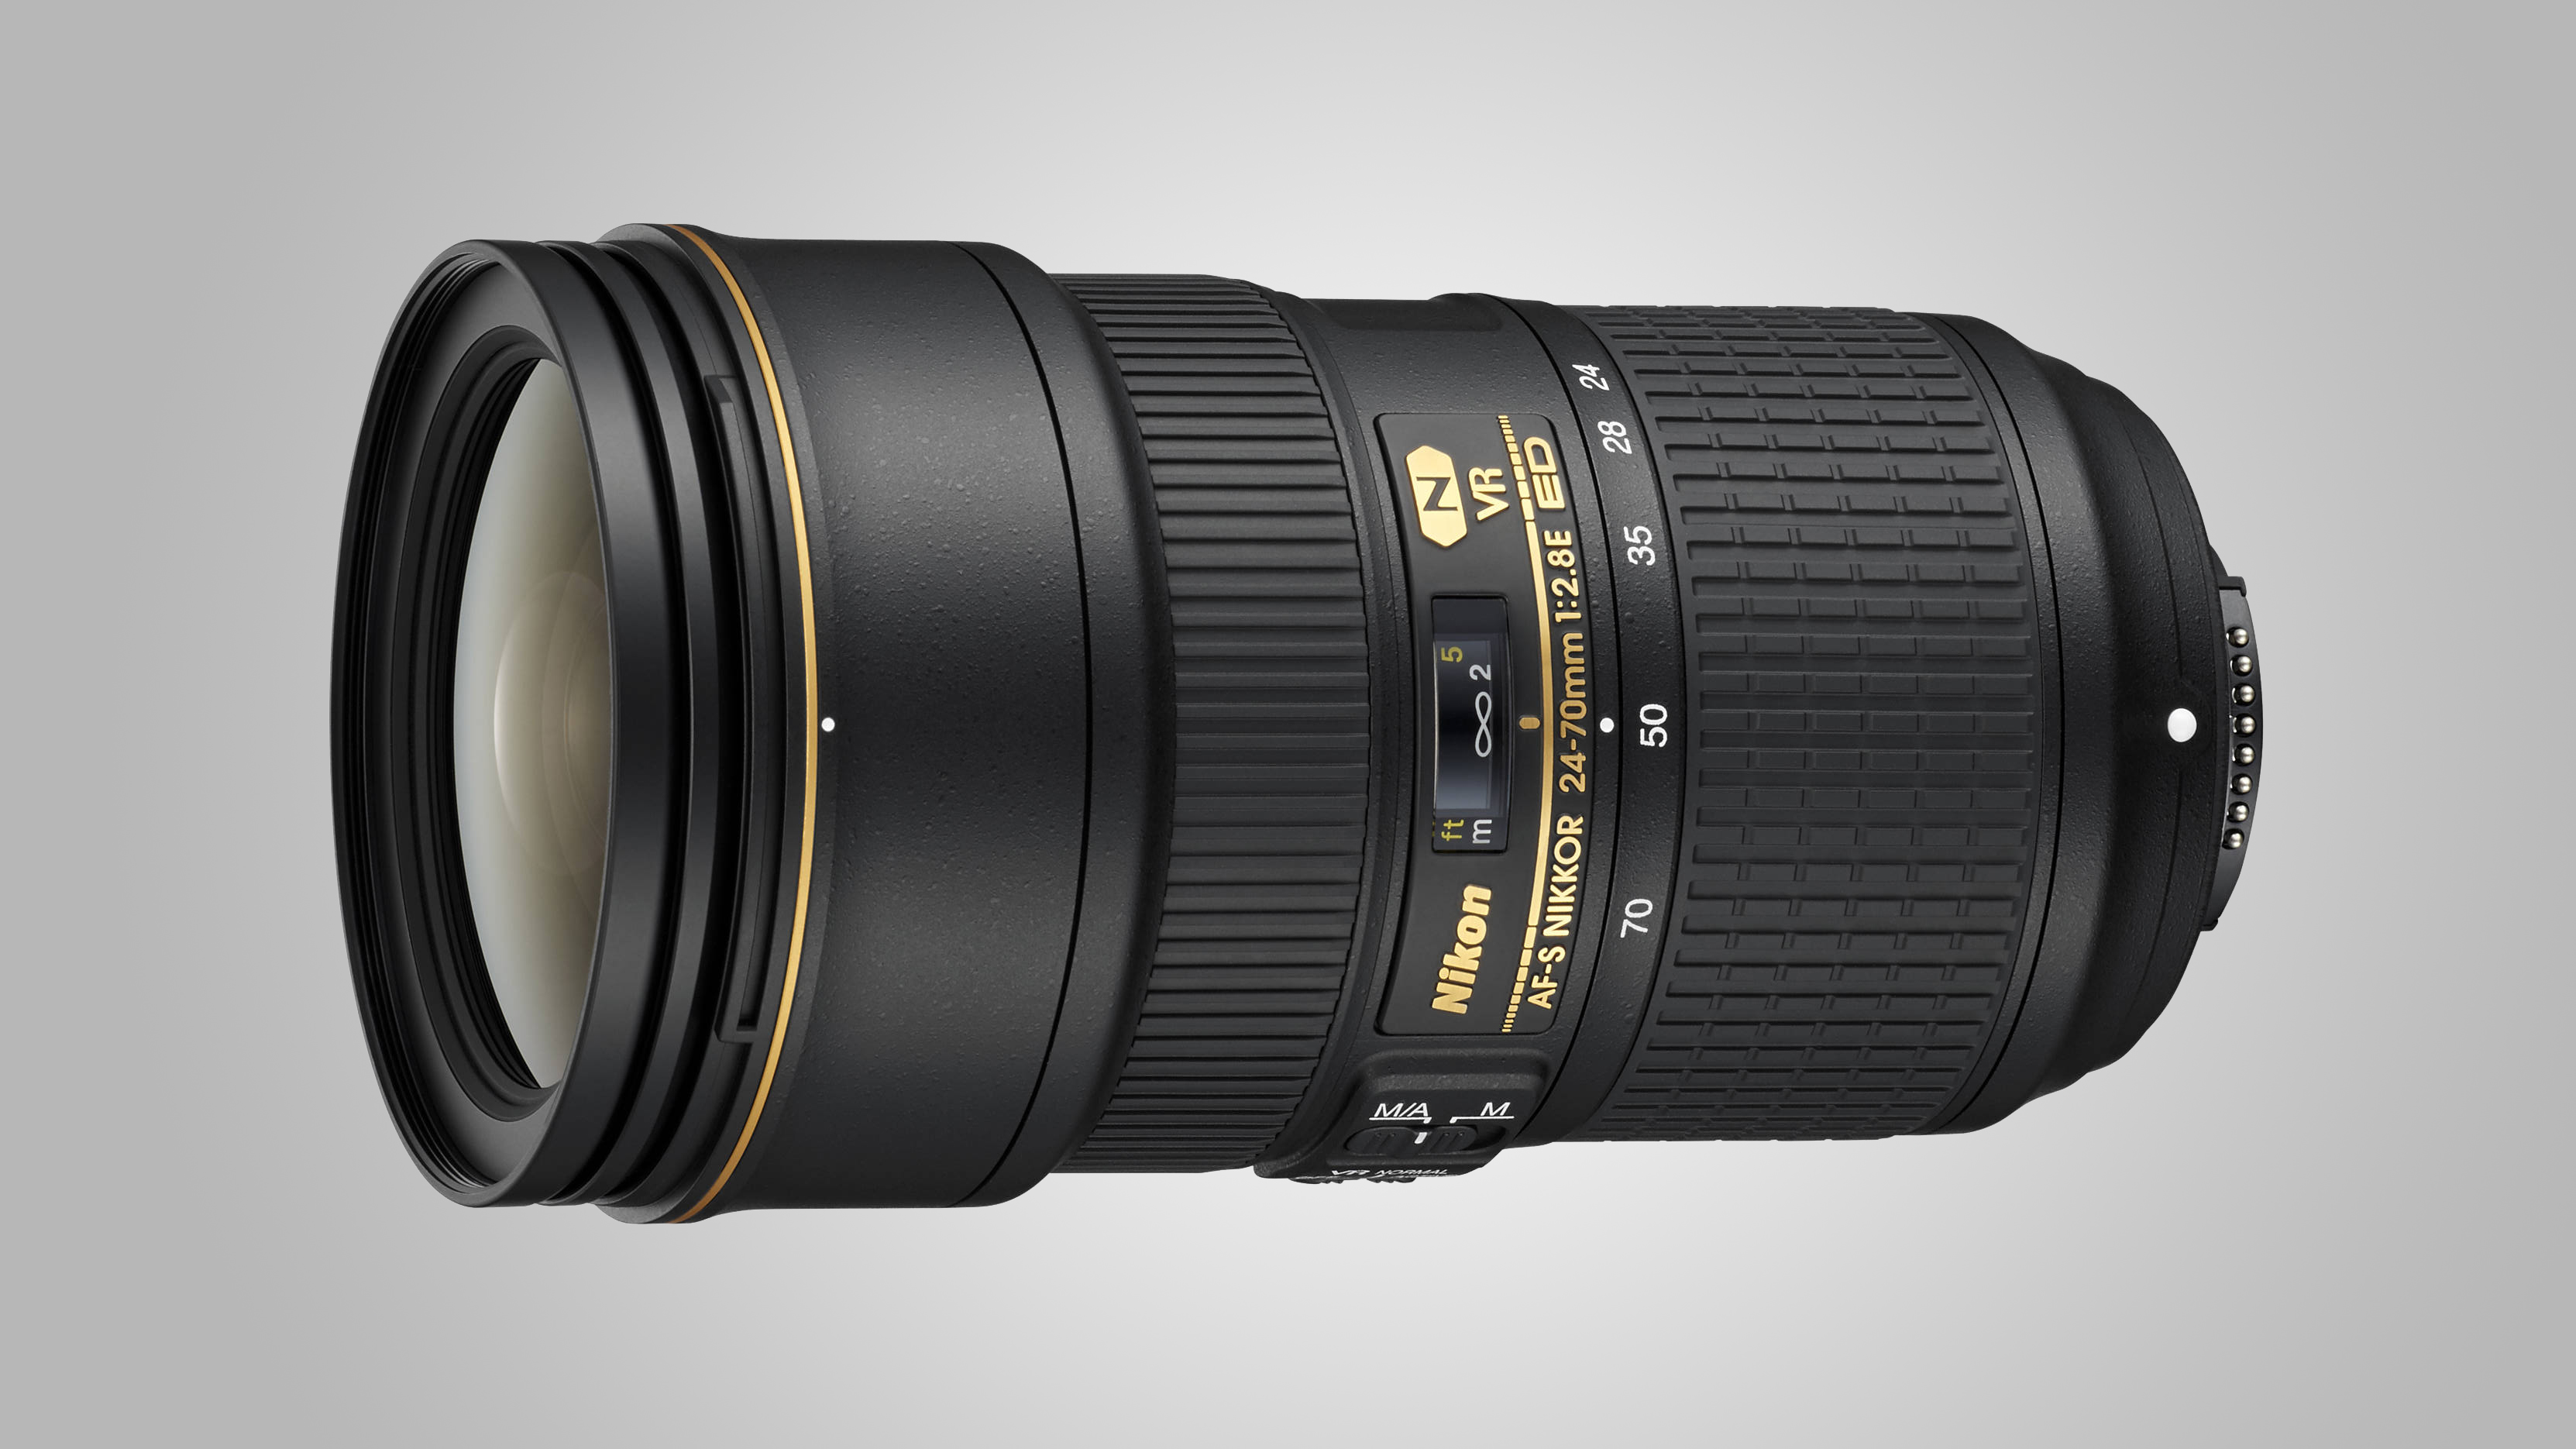
Here's a lens which towers over most standard zoom lens – but it has the benefit of remaining the same physical length no matter where in the zoom or focus range you are. There's also Vibration Reduction, while build quality is fantastic. Lens design includes four EF elements, Nano Crystal coatings, as well as fluorine coatings on the front and back elements. Image quality is great throughout the range, but you might notice some color fringing and vignetting – both things which can be easily corrected.
Great-value option: Tamron SP 24-70mm f/2.8 Di VC USD G2
The G2 (Generation 2) edition of Tamron’s 24-70mm lens combines excellent image quality with a tough build and great handling. The original edition is still on sale as well, and rather less expensive to buy.
This lens is a great choice for portrait shooters working with a DX format DSLR, but it is also our favored standard prime lens for full-frame models too. You lose out a little on the maximum aperture setting, but this lens is a very manageable size and weight, while also having the benefit of optical stabilization, too.
Great-value option: Nikon AF-S 50mm f/1.4G
Compared with the ‘budget’ Nikon AF-S 50mm f/1.8G, this f/1.4 lens is about twice the price, but still rather less expensive than the Tamron. It’s nice and sharp, but you do forego stabilization.
Travel photographers are often drawn towards superzoom lenses as it means you only have to carry one optic with you. However, when a lens like this tips the scales at 800g, it kind of loses its appeal for that purpose. That said, if you're an event or wedding photographer who finds they need to quickly – and often – switch between wide-angle and telephoto shooting, a lens like this can be a godsend. You'll have to compromise on image quality – this is a lens which is 'good' rather than 'great', but in terms of flexibility, nothing beats it.
Great-value option: Tamron 28-300mm f/3.5-6.3 Di VC PZD
It’s a cheaper option than Nikon’s FX-format superzoom and delivers similar image quality, but the autofocus system is comparatively basic and build quality doesn’t feel quite as good.
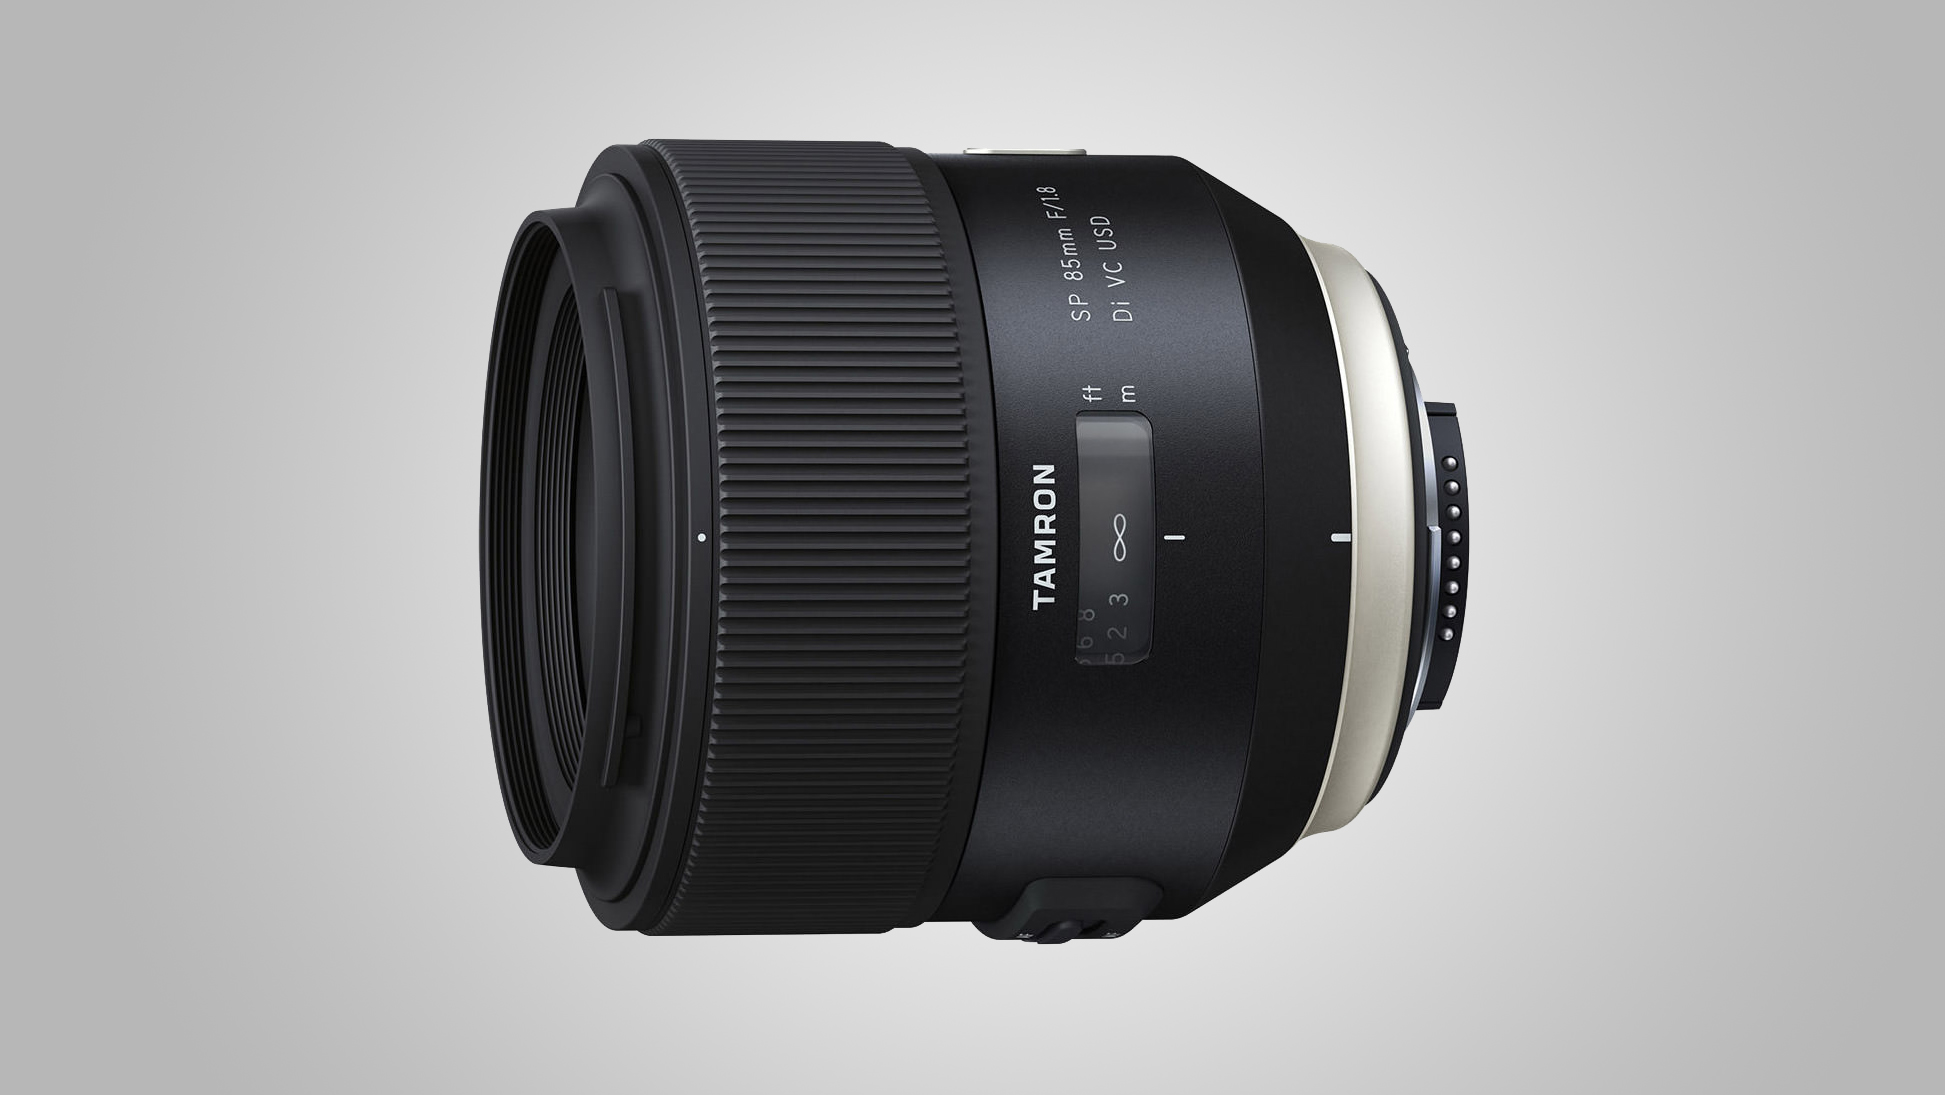
While there are some great 85mm f/1.4 lenses on the market for portrait photographers, including Nikon’s own AF-S 85mm f/1.4G and Sigma’s 85mm f/1.4 DG HSM | A, this Tamron version offers optical stabilization (and it's also a better bargain too). With a slightly narrower aperture than its rivals, it might not have the edge when it comes to blurring backgrounds, the bokeh it does produce is beautifully smooth, while the subject remains impressively sharp. If you're somebody that shoots indoors without a flash, or in low light, that stabilizer comes in especially handy – especially if you need to shoot at narrower apertures for environmental portraits.
Great-value option: Nikon AF-S 85mm f/1.8G
This Nikon lens is a bargain if you’re willing to stick with f/1.8 rather than stretching to an f/1.4 aperture, although it doesn’t feature stabilization.
This lens isn't cheap, but it's still a chunk cheaper than Nikon's popular AF-S 105mm f/2.8 G IF ED VR Micro lens. It also gives you a hybrid optical stabilization system which counteracts the shift in vertical and horizontal axes, as well as correcting for vibration and wobble. What that means is that sharpness is seriously impressive, especially for close-up shots. This lens proved to be a little sharper in our tests for extreme close-ups, with defocused areas being just a touch smoother, too.
Great-value option: Sigma 105mm f/2.8 EX DG OS HSM Macro
It lacks the Tamron’s hybrid stabilization system and weather seals, but has refined handling and delivers superb image quality.
Back in the day, the 70-300mm ED lens for film SLRs which hugely popular. The later VR edition was also a big hit among DSLR shooters. This is the replacement fro those lenses, and includes newer technology, such as an AF-P (pulse) autofocus system which is based on a stepping motor. That means you get super fast performance for shooting stills, as well as smooth and virtually silent transitions for movie shooting. It also features an electromagnetically controlled diaphragm, for more consistent apertures in rapid-fire shooting using fast continuous drive mode. On top of that, you get Nikon’s Sport VR mode, which makes it easier to track erratically moving subjects in the viewfinder. However, the AF-P autofocus and electromagnetic diaphragm control make the lens incompatible with some older DSLRs, and the relatively expensive price tag stretches the notion of a ‘budget telephoto zoom’.
Great-value option: Tamron SP 70-300mm f/4-5.6 Di VC USD
As well as being our top pick for DX-format cameras, thanks to its good performance and relatively inexpensive price, this Tamron is also a smart budget buy for FX bodies.
If you're a professional photographer, this is the lens that will be your go-to option for sports and action shots. The f/2.8 constant aperture is what many will crave, while it still retains a respectable f/5.6 aperture rating if you use it with a 2x teleconverter. Other top tricks include auto and manual priority autofocus options, a Sport VR mode, and an electronically controlled diaphragm, all of which are also featured in Nikon’s 70-300mm ‘budget’ telephoto zoom. This top-flight lens is supremely well built, however, which makes it a lot more suited to professional use. The autofocus system is super-fast and image quality is stunning, with incredible contrast and sharpness.
Great-value option: Tamron SP 70-200mm f/2.8 Di VC USD G2
This directly competing second-generation Tamron’s 70-200mm f/2.8 lens is very nearly as good as the own-brand Nikon, but costs about half the price.
Reasonably unusually for a Sigma lens, this offering gives you a full set of weather-seals, while there's a whole range of other high-tech specs. Auto and manual priority autofocus modes are available, and the clever zoom lock mechanism enables you to lock the position at any marked focal length, rather than just at the short end of the zoom range. Image quality is fantastic with superb sharpness and excellent contrast all the way to the maximum telephoto reach, while distortion and color fringing is kept to a minimum. Fast-moving subjects won't be beat by the ring-type autofocus system either, making this a smart choice for action shooters.
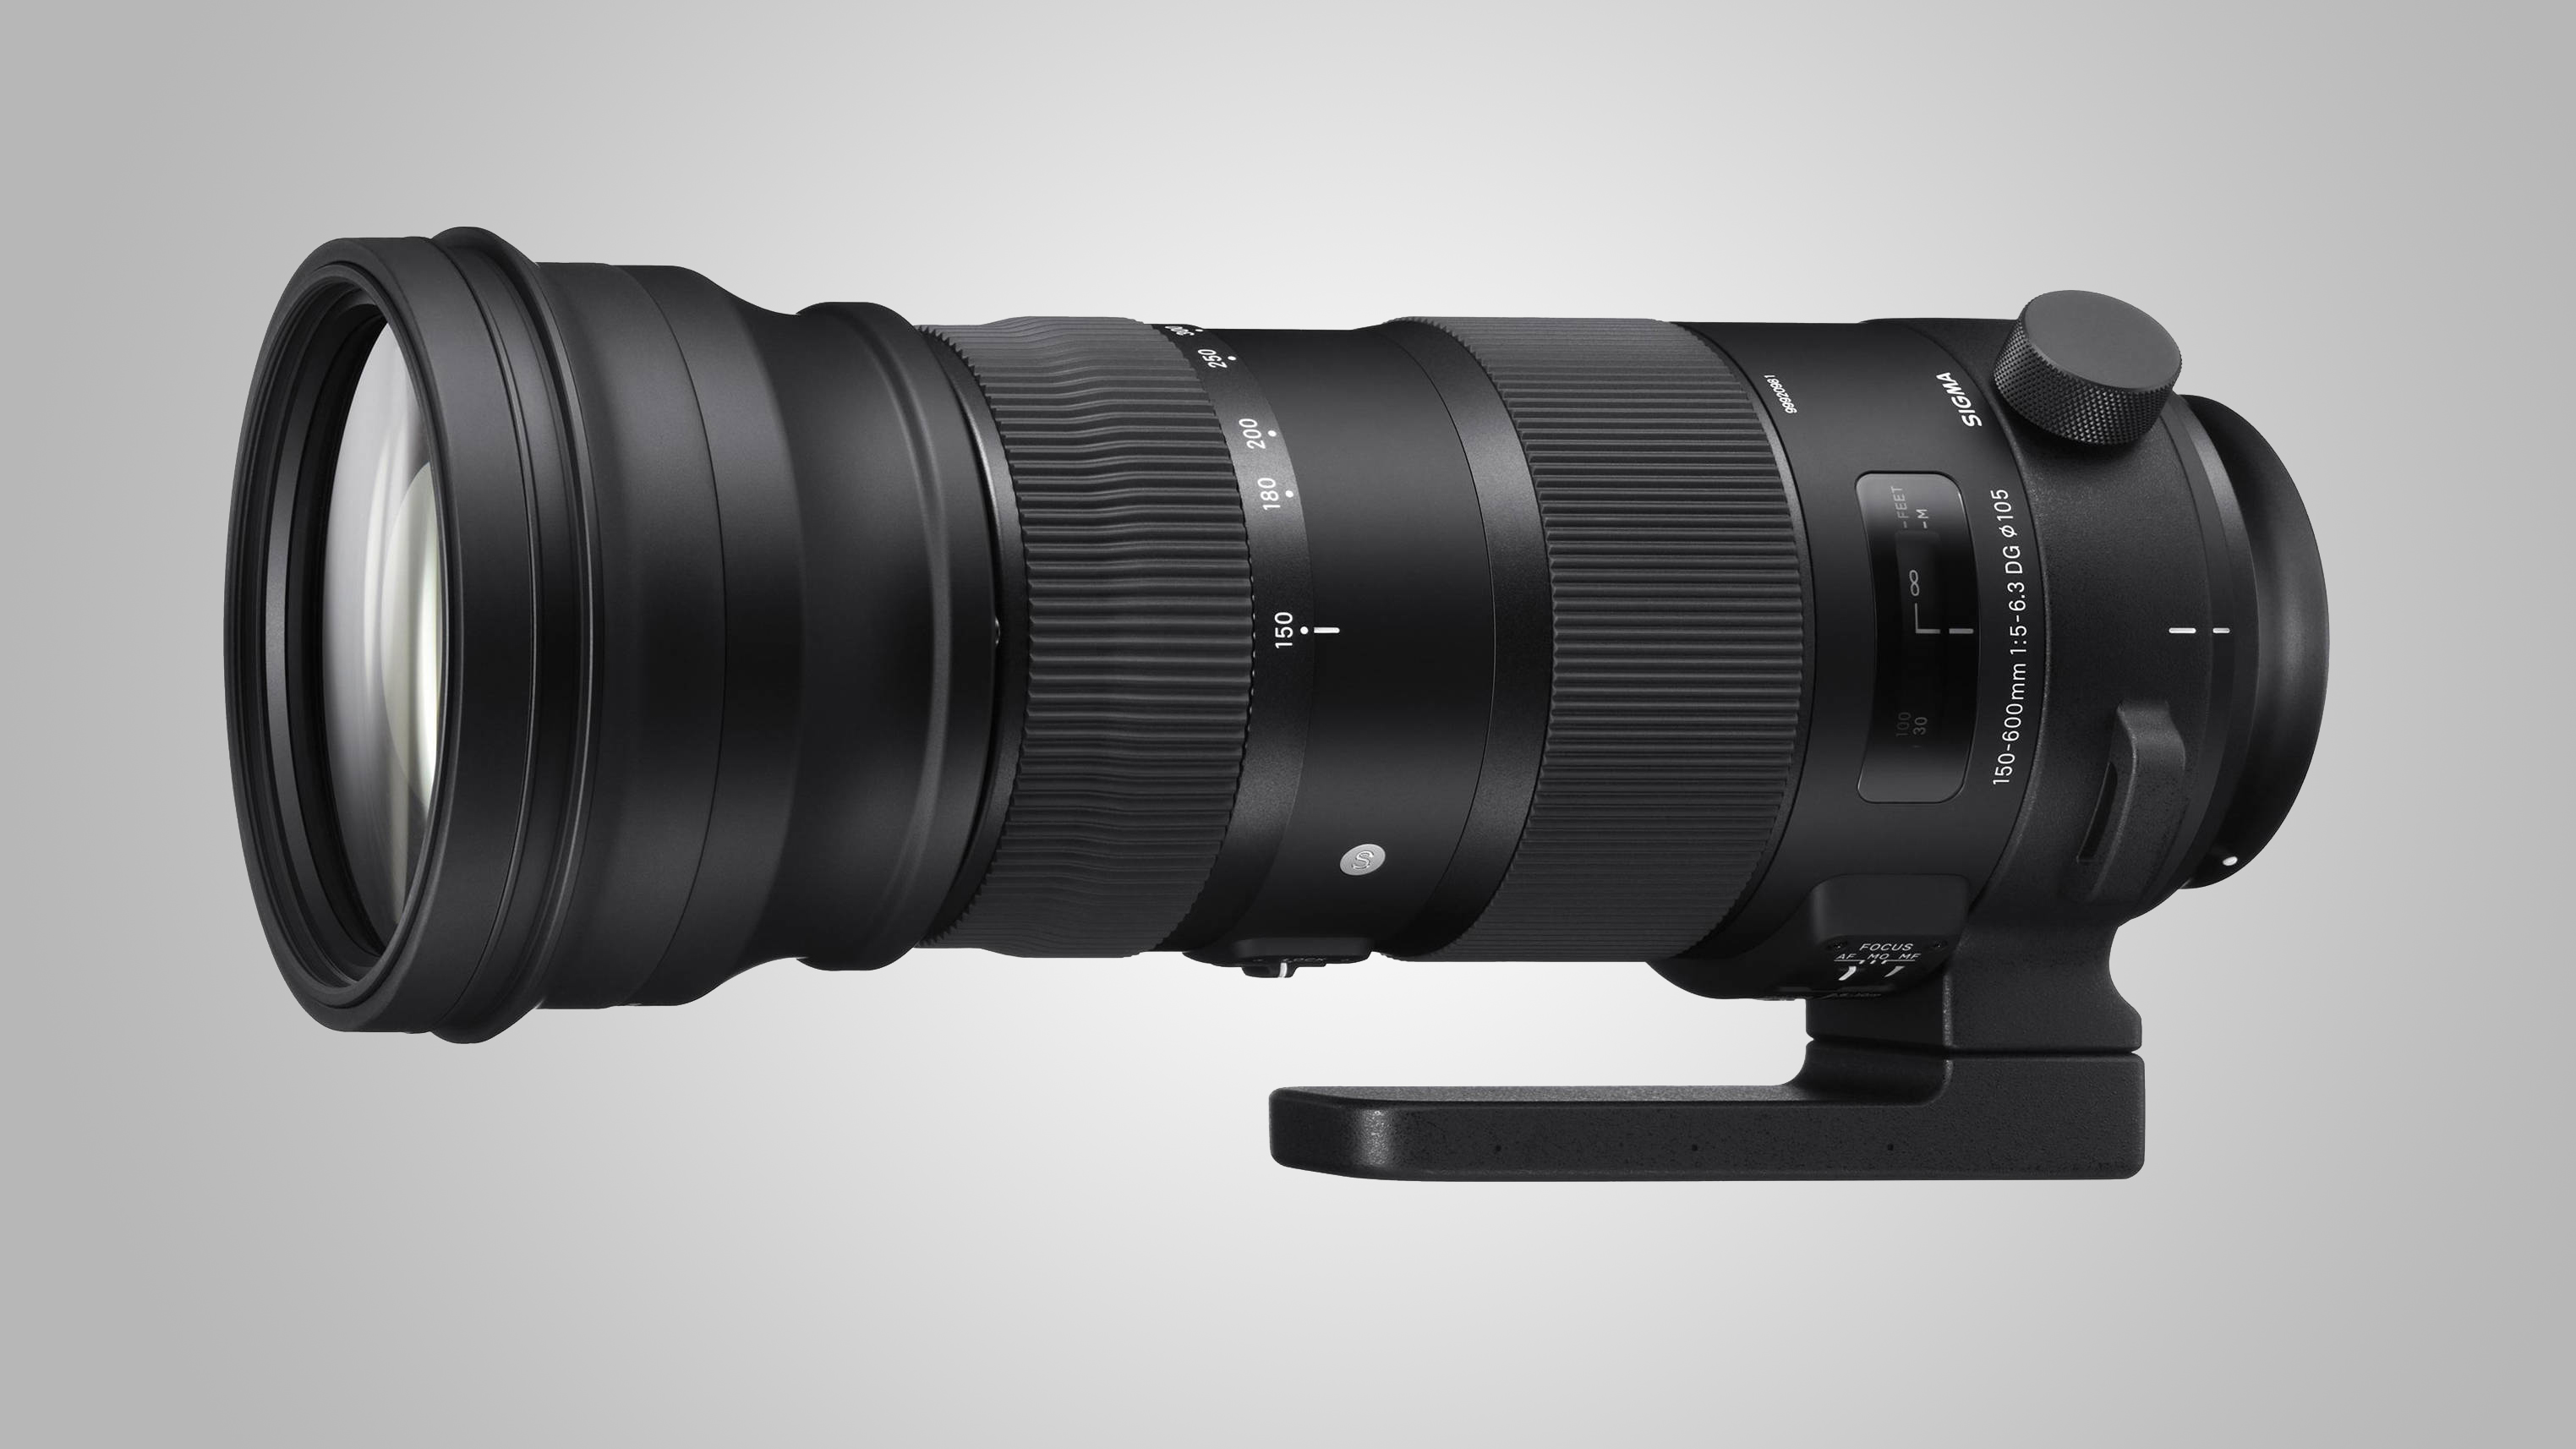
Great-value option: Sigma 150-600mm f/5-6.3 DG OS HSM | C
Nearly a kilogram lighter in weight, this Contemporary lens retains many of the advanced features of the Sport edition, but is cheaper to buy and less of a strain in handheld shooting.
With a range of feature-packed cameras that are fun to use, and a line of stunning lenses, a Fujifilm X-Series kit is the ideal companion for urban portrait shoots.
I have been shooting with the X-Series for four years and love the system and the results I get from it. However, with so many good options available, one problem you may have is choosing a lens or kit to shoot with!
In this guide, I discuss what you need to consider when choosing a lens for a shoot, and a list of my favorite Fujifilm lenses for shooting urban portraits.
Advantages of using a Fujifilm X-Series Kit
There are a few key advantages that the Fujifilm X-Series has for urban portrait shoots. Being a mirrorless system, it’s generally smaller and lighter than DSLR kits. In practice, though, my camera bag probably isn’t much lighter because I usually fill it with more of the excellent Fujinon lenses.
Fujifilm’s X-Series is ideal for urban portrait shoots for so many reasons.
Excellent ergonomics and usability is a hallmark of the system. I love that I can change aperture on the lens instead of via a menu – in fact, I could never move back to a system where I have to change aperture via a menu now. The camera bodies feature shutter speed and ISO dials on top of the camera, so you have all the elements of the exposure triangle at your fingertips without a menu in sight.
Live view is another feature I couldn’t live without – it’s amazing seeing what your exposure will look like before pressing the shutter button. This is particularly useful in low light situations that you often encounter in urban shoots. Another dial on top of the camera is exposure compensation – you can easily adjust the exposure as you look through the viewfinder, which is perfect for the way I shoot.
Using live view on my Fujifilm X-T3, I could see exactly what adding extra exposure compensation would do when photographing Anne.
Another big advantage of Fujifilm cameras is their stunning color rendition – the best of any digital camera manufacturer. Fujifilm has used their decades of knowledge to produce JPG simulations that bear the names of class film emulsions: Provia, Astia, and Velvia, to name three.
The images in this article are JPGs (Provia simulation) with only small edits made in Adobe Lightroom. You can, of course, shoot in RAW alongside JPG and add your own looks or presets in post-production.
Camera bodies
I prefer to take two camera bodies with me on my shoots: the Fujifilm X-T3 and X-T2.
You can pretty much substitute any of the excellent X-Series lineups into your urban portrait kit, from the X-T series I use to the X-Pro line and the X-E line. I’ve even shot urban portraits with the X100 line of fixed-lens compact cameras.
If you only have one camera body, that is workable – you just need to be careful if you plan on changing lenses in urban environments to minimize the possibility of dust ending up on your sensor. The last thing you want on your mind during a shoot is the feeling of dread that you just let a whole lot of dust bunnies inside your camera.
Choosing a lens for an urban portrait shoot is a balancing act between a focal length that flatters your subject, but still allows you to be close. This image of Bailey was taken with a Fujinon 23mm f1.4 lens.
Lenses for urban portraits
The Fujifilm X-Series boasts a stunning range of superb lenses, with more being added every year. Fujifilm regularly updates a lens road map to let photographers know what new additions are coming. Portrait shooters have many fast primes available to them, as well as weather-resistant primes and a fantastic range of zoom lenses.
When choosing a lens for a shoot, I consider the following things:
Focal length
How flattering is this focal length for portrait photography? The images should flatter your client or model and make them look amazing.
Working distance
What’s the practical working distance of your lens? Ideally, for urban portraits, it’s good to have a lens choice that flatters your client for portraits, but without you being too far away. For me, this rules out some options such as the Fujinon XF 90mm F2 R LM WR lens.
In low light, I often find myself shooting at, or close to, the maximum aperture of the lens (the smallest number). In this image of Natasha, I was using the Fujinon 56mm f1.2 lens at f1.6.
Maximum aperture
The maximum aperture of the lens determines how wide it can open. The smaller the number, the ‘faster’ the lens is, allowing you to take images at high shutter speeds in lower light. ‘Slower’ lenses will not be able to shoot at the same shutter speeds unless you crank up the ISO, which can affect image quality.
During the middle of the day, this may not be important, but with less light after the sun goes down, fast lenses are important for sharp images and to keep the ISO lower. The X-series lineup has a range of very fast prime lenses with many maximum apertures at F1.4 and even F1.2.
Weather resistance
If planning a shoot in the rain or snow, a weather-resistant lens and body are a must. This is generally something I don’t need to think about – if it does start raining during a shoot, I usually move to an undercover location. Usually, clients don’t want their hair, makeup, and outfits ruined by a downpour.
Listed below are my choices for urban portrait lenses.
Fujinon XF 35mm F1.4 R
I love this lens – there is real magic to it. It’s my number one choice for urban portraits. The XF 35mm F1.4 is the closest Fujifilm has to the full-frame equivalent angle of view of 50mm – a classic focal length used by photographers for decades.
One of the three original lenses in the X-Series lineup, it has a fast maximum aperture of F1.4, making it perfect for images with a shallow depth of field and night shooting.
Featuring stunning optics and pleasing bokeh, this lens gives you a relatively short working distance for portraits. Best of all, it’s a lot cheaper than most of the other lenses in this guide.
I love this shot – so much fun! Alyssa in a phone booth, Brisbane, Australia.
The 35mm F1.4 lens has a magic quality. I love that the lens is flattering for clients, yet it allows you to get quite close to them while shooting.
Fujinon XF 16mm F1.4 R WR
The next choice on my list is arguably one of the best lenses Fujifilm has ever produced – the stunning Fujinon XF 16mm F1.4 lens.
With a full-frame equivalent of 24mm, you may think this is an odd choice for a portrait session, but it’s a perfect lens for wide-angle environmental shots. With a minimum focus distance of just 15cm, this lens is the perfect option when working in confined spaces.
The excellent build quality of the lens is also matched by its stunning optics. Although any distortion is corrected in-body by the camera, you still need to be careful when shooting with it. Place your model or client towards the center of the frame for the best results.
Sasha sitting on beer kegs in a Brisbane laneway. There wasn’t much room in the laneway, so the 16mm F1.4 was a perfect choice for this shot.
The short working distance and wide angle-of-view enabled me to take this image of Natasha in front of some metal shutters.
Fujinon XF 56mm F1.2 R
The XF 56mm F1.2 R lens is perhaps the jewel in the crown of the X-Series lineup. Stunning image quality and beautiful bokeh make it a winner in anyone’s book.
This is the lens that all Fujifilm portrait photographers either have in their kit or on their wishlist. With a full-frame equivalent of around 85mm, it is substantially lighter than full-frame equivalent lenses for DSLRs. It boasts a super-fast F1.2 maximum aperture, is tack sharp, and has the most pleasing bokeh in the X-Series lineup.
For portrait work, this lens is fantastic. Just bear in mind that in urban environments, it’s not always a suitable choice, as you need a greater working distance when using this lens.
Sasha in Brisbane, Australia. I love how sharp she looks in this frame, and how the out-of-focus lights have rendered in the background.
Natasha in a laneway, Brisbane. With a bit more working distance, full-length portraits are also possible with this lens.
Fujinon XF 60mm F2.4 R Macro
Perhaps the most underrated lens in the entire Fujifilm line up, the XF 60mm F2.4 R Macro, was another of the original three lenses released for the system. It had a reputation for being slow to focus, but improvements to the firmware for this lens have made a big difference. I have no hesitation in using it on shoots.
Although it has the word macro in its name, the lens can only shoot at a 1:2 magnification ratio. (Generally, a 1:1 magnification ratio is regarded as true macro.) With a maximum aperture of F2.4, it’s not as fast as other lenses in this article, but the lens still provides excellent image quality and has a very good bang for your buck.
Alyssa at dusk, Brisbane. The XF 60mm F2.4 is an excellent option if the XF56mm F1.2 is out of your budget.
Alyssa in Brisbane. The XF 60mm F2.4 is stunningly sharp.
Fujinon XF 23mm F1.4 R
The Fujinon XF 23mm F1.4 R is another lens often mentioned as the best in the X-Series lineup. With the 1.5 crop factor, it’s Fujifilm’s closest lens to the traditional full-frame 35mm angle of view. This angle of view makes it perhaps the most versatile lens in the lineup for any given range of shooting scenarios – a big plus.
Another fast lens with a maximum aperture of F1.4, the lens is optically stunning and produces sharp images and beautiful bokeh.
Although I love this lens, I often leave it at home and take along the XF 16mm 1.4 and the XF 35mm 1.4 instead. However, it still deserves a place in this guide as it’s an excellent choice for urban portrait shoots.
Bailey, Cleveland, Australia. The XF 23mm F1.4 lens is super-sharp and produces beautiful bokeh.
Bailey, Raby Bay Harbour, Australia. It was quite dark when I took this shot, but with a higher ISO and some exposure compensation, Bailey looks fantastic – as do the pretty lights in the background.
Conclusion
The Fujifilm X-Series lineup is ideal for shooting urban portraits. The range features a range of compact, feature-packed camera bodies, along with optically stunning fast prime lenses.
Although you could invest some serious money in this system, there are many excellent value-for-money options, including the X-E line of camera bodies, as well as the X-T30 and the X-T20. In terms of lens choices, two of the original X-Series lineup – the XF 35mm F1.4 and XF 60mm F2.4 lenses – represent excellent value for money, blowing the competitor’s budget lenses out of the water in terms of quality.
If you have a bigger budget, also consider the X-T3, the new X-Pro 3, and the excellent XF 16mm F1.4, XF 23 1.4, and XF 56mm 1.2 lenses.
I’ve been using the system for four years and love the images the system produces straight out of the camera, thanks to the magic of Fujifilm’s JPG film simulations. The beautiful rendering of colors makes post-processing work a breeze.
What Fujifilm X-Series camera bodies and lenses do you use for urban portrait shoots? Let us know in the comments below.
The Xiaomi Redmi K30 will be its next affordable flagship. It is already confirmed to be 5G capable, but a new report states that it will be powered by a MediaTek chipset.
Back in November, Xiaomi held a small conference in China where the GM Lu Weibing confirmed that the device will be 5G-enabled. He even shared a teaser image of the front which showed very slim bezels and a punch-hole notch with two selfie cameras. As we approach its early-2020 launch date, more details have surfaced, giving us a better idea at what to expect from the Redmi K30.
A new post on Weibo states that the Redmi K30 5G will be powered by a MediaTek chipset and not a Snapdragon, one which the previous leaks pointed at. Earlier this year, MediaTek did confirm that it has a 5G chipset in development and should be available at scale in early 2020, matching the Redmi K30’s launch time frame. Very little is known about this chipset, including its name, but the company has mentioned that this will be its flagship SoC when it launches. It will be built on a 7nm manufacturing process and will be considerably cheaper than the competition.
European countries, as well as China, will be in the first phase to receive the 5G MediaTek chipset. In contrast, India will be a part of the second phase, and could see a non-5G variant of the chipset being implemented which could also bring the costs lower.
Redmi K20
Back at IFA 2019, Qualcomm also announced that it would be bringing 5G to the Snapdragon 600, 700, and 800 series chipsets. But it seems like this time, MediaTek will take the crown. If the rumor is to be believed, this will be the second time Xiaomi has opted to go for a MediaTek chipset for its popular smartphones, following the Redmi Note 8 Pro, which was powered by the MediaTek Helio G90T gaming chipset.
The Redmi K20 was an excellent device that brought a lot of industry firsts to a never-before-seen price point. It seems like Xiaomi wants to continue that trend with the Redmi K30 series by making them the cheapest 5G smartphones around. We should hear more about these devices in the coming months as the launch is not too far.
Does the Canon EOS R firmware update v.1.4.0 make a difference? Absolutely! Your EOS R got a free upgrade.
It’s been a month since Canon EOS R Firmware v.1.4.0 was made public and I’ve been asked about its performance (more than once). Quite simply, this update brings a great improvement to the AF system.
Prior to installing the update, I created a controlled eye-detection AF test. The test was not highly technical – the longest distance that the EOS R would show a stationary subject’s eye being detected by a specific lens and focal length was determined and recorded. It was not difficult to determine whether or not the new firmware delivered an advantage. That test revealed that v.1.4.0 shows the eye detection box in the viewfinder from a distance 3x farther away (3x-smaller eyes) than the previous firmware version did. The difference is very obvious.
While I was happy with the R’s eye-detection AF performance prior to loading the update, it is especially reassuring to see your subject’s eye being indicated in the viewfinder and this update is a good one. That your camera gets this update for free is especially good.
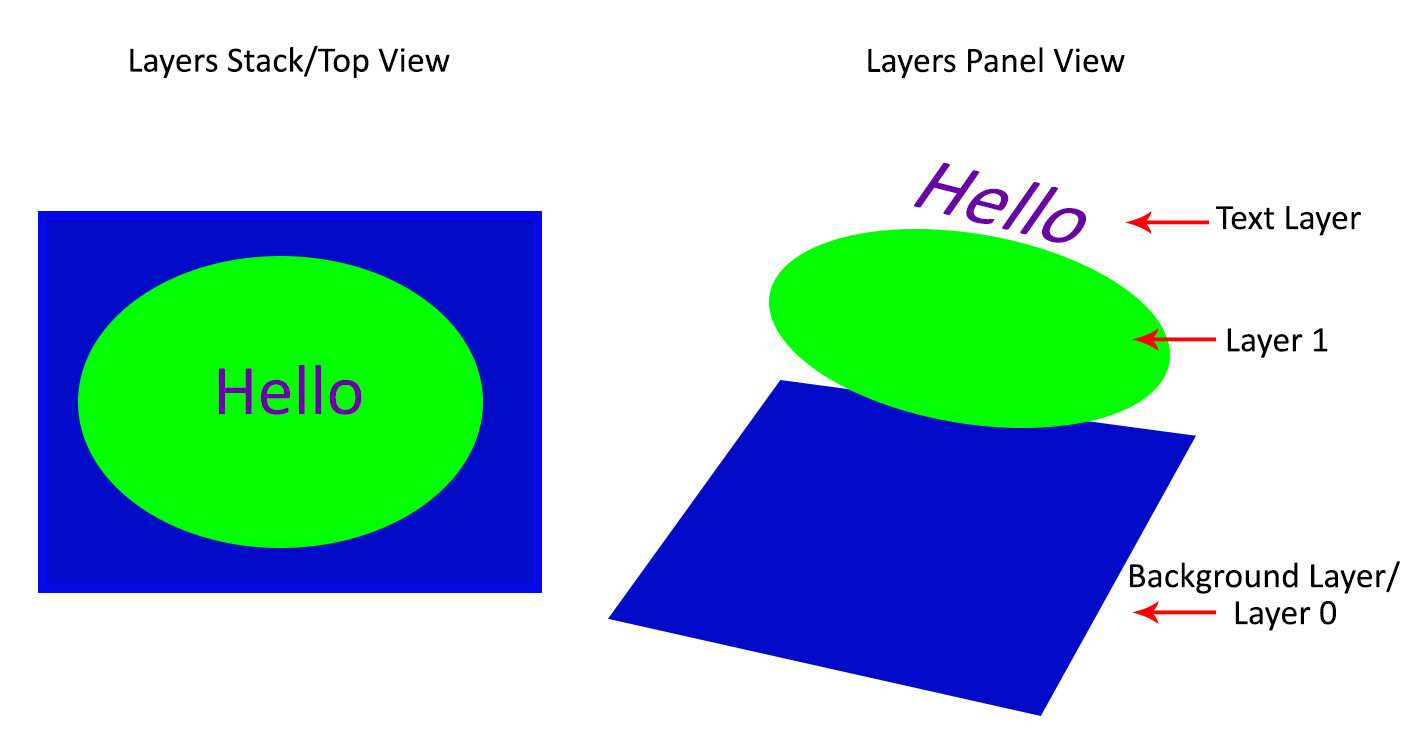
This introduction to Photoshop Layers for beginners will help you learn a great editing habit. So, what exactly is a Photoshop layer? Quite simply put, if you imagine a stack of transparent paper, each sheet is equivalent to a Photoshop layer. When you add/change/remove any of the layers, what you see at the top of the stack forms your entire image.
The first time you open Photoshop, by default, the layers panel is on the right side of your screen and your image opens as a layer named “Background”. Keep this in mind as you read on.
Why use Photoshop Layers?
Now that you have an idea of what a layer is, here is why you should use them:
1. It is a way to work non-destructively
Destructive editing occurs when you move and change the pixels directly in your original image. This happens if you edit your original image/background layer when working in Photoshop. While you can undo your changes, if you exceed the number of “undos” you can apply, those changes commit. Also, you may like some changes, but not others, and there is no way to go back to just that change without undoing other changes you have made too.
Alternatively, when you edit your image on separate layers, both the edited image and the original save (they are saved to a .psd file and this maintains all your layers). This allows you to go back to your original image at any time, simply by hiding layers, or deleting them entirely. This is a form of non-destructive editing.
One thing to remember, however, is that if you resize your entire document (via menu->image->image resize) at any point, that is a form of destructive editing, and you will lose image quality if you try to resize it back to the original size later.
As your editing style evolves, you will appreciate the option of going back to original images at a later date.
Easily add text without affecting your original image
2. It allows organized and flexible editing
Photoshop is usually a great option when you want more control over your editing process. While you start off with a certain end result in mind, you may change your mind, during (or even at the completion of) your process. Surely there are better ways than undoing multiple changes or starting over from scratch right?
Since your original image is unaffected, you can change the text at a later date
Layers allow you to work with your vision without affecting/destroying the original. Since you can work on each layer separately, you have major flexibility. With layers, you can also combine several images into one (composite), These include (but is not limited to), swapping out elements from your image, changing color, tones, and lighting, adding text and resizing, replacing or rotating an object independent of everything else in your image.
You can use layers to replace a plain sky
This non-destructive editing style allows you to undo a change at any point in time, and you have control over each individual layer. This means you can work with different objects and elements of your image without affecting anything else.
How to use Photoshop Layers
If you do not see the Layers Panel on the right-hand of your screen, you need to turn it on. To do so, go to Menu->Window->Layers.
As mentioned before, when you open an image in Photoshop, it opens as a background layer. You will notice that there is a small lock icon on the right side of the background layer. This lock is intended to prevent inadvertent changes.
The first step is usually to duplicate this layer. That way, the background layer remains untouched (original).
To start, duplicate your background layer:
Open an image in Photoshop
Right-click on the thumbnail image in your layers panel named “Background,” and choose the duplicate layer option
Click OK. A new layer will appear above your original layer with the default name “Background Copy” – you can rename it to anything you want. I suggest renaming it to something that relates to the changes you are making. This makes it easier to find later if you have many layers.
As you become comfortable working with layers, you will find yourself making new layers for each change you want to make e.g. if you are retouching an image or replacing a sky. This comes with the knowledge that, later on, you can adjust the intensity of any of those changes independently.
I used Layers for Sky Replacement, with a Layer Mask to recover the top branches
Adjustment Layers
Photoshop also has another layer type called Adjustment Layers. These layers are not a duplicate of other layers; instead, they adjust the information of the layer directly beneath it. Thus you can simply use an Adjustment Layer to effect change on the image without changing the original layer image. For example, you can increase/decrease the contrast or brightness of your layer.
Notice how adjustment layers look different from other layer types. These adjust the layer below them.
Adjustment layers do not actually contain any pixels but instead are a series of instructions for Photoshop on what changes you ask it to make. You can access the Adjustments Layer menu at the bottom of the Layers panel or choose Windows and check the Adjustments option.
Layer Masks
A Layer mask is another non-destructive editing technique in Photoshop, used to control the transparency of the layer you apply it to. An even simpler definition is that a layer mask can make a layer visible or invisible. This is done by painting either white (to make it visible) or black (to make it invisible).
Blending Modes
At the upper left corner of the Layers panel is the blend modes drop-down menu. These “modes” are set to Normal by default and control how pixels on the different layers interact with each other. An easy way to understand what the different blending modes do is to duplicate your image (as described above) and cycle through them.
An example of how different blend modes change the look and feel of your image: 1. Normal 2. Multiply 3. Soft Light 4. Vivid Light 5. Hue 6. Luminosity
Important layering notes for beginners
When there are several layers, your changes only affect the layer that is active or selected. This is why it is a good practice to name your layer (Step 3 above) based on what you are using the layer for.
You can save the edits as a Photoshop (PSD) file, close it and open it at a later date to find all your layers (and changes) as you left it. Of note, saving it this way increases the size of your file. If you are finished with your edits and don’t need a large PSD file, you can merge all the layers (or flatten the file) and save it to a smaller, more compressed file type, such as a jpeg. Of course, in doing so, you will no longer have the ability to access those individual layers later.
Layers work in order. This means that the layer on top “covers” everything below it. You can, however, reorder your layers by moving them up or down by simply dragging them. Keep in mind that the layer on the top will be most visible.
Conclusion
The key thing to remember as a beginner is that Photoshop layers are a recommended non-destructive way to work. It is flexible, which allows you to organize your work, effect change in selected areas, and undo changes easily.
When you do not merge your layers, you can open your Photoshop file years later and make changes, all without affecting your original image.
I hope you can utilize these Photoshop Layers for Beginners tips, and if you have any tips on this topic, please share in the comments below.
TBao may not be the most familiar brand name to many people, but this Chinese vendor is trying pretty hard to differentiate itself from the army of smaller identikit laptop vendors that operate in South East Asia.
One of its latest products is the TBOOK5 Pro laptop, and it looks to stand out from the crowd with one very unique selling point (editor's note: the laptop now costs $ 470 with coupon code O3AC1635DC0F4000)
The keys on its keyboard have rounded edges that give it a rather peculiar look. The marketing department at TBao calls it "retro punk", claiming that it has a "realistic knocking and light rebound, so that it has a retro charm in both appearance and trial feel".
Steampunk appeal?
At $ 489.00 at the time of writing, the TBOOK5 Pro is quite expensive for what it offers in terms of components; there's an Intel Celeron 3867U paired with a dedicated Geforce 940MX GPU with 2GB video memory, a full HD display, a full metal body, a backlit keboard and a fingerprint reader.
This makes it as expensive as outrageously stunning Inspiron 14 5000 (5481) from Dell, which also has 8GB of RAM and 256GB SSD with Windows 10 and a 14-inch display.
Its keyboard remains its main attraction and we can’t wait to see other rivals come up with similar designs although, truth be told, it is very unlikely that any of them will replicate the touch and feel of a true mechanical keyboard.
The time has come for the fantastic, epic trilogy of fantasy novels – the on screen adaptation of His Dark Materials as a series is finally premiering. Don't want to miss what is set to be another incredible HBO show? Keep reading to find out how to watch His Dark Materials online – no matter where on Earth you are.
Yep, HBO (and the BBC) is bringing His Dark Materials to your screens and from the teaser trailer it's set to be as epic as the novels. The short clip promises an eight part series with action, fantastical creatures, a search for the truth and more twists and turns than you could possibly imagine.
The teaser trailer shows that the series follows the brilliant adventures of the characters in the Northern Lights, specifically focusing on the fierce hero Lyra Belacqua as she tries to find her kidnapped friends and unearth the plot behind these kidnappings.
We can be sure to see some pretty impressive visual effects as there will be a variety of fantastical daemons – the physical manifestation of people's souls. Set in an alternative universe, you can expect a series filled with mystery, intensity and the search for justice. As the series unravels, we'll will see how instrumental Lyra becomes in all the chaos that descends upon their universe.
Can't wait to watch? Keep reading to find out how to watch His Dark Materials online – no matter where in the world you are. For a change, it's great news in the UK, where you get to see it first and for FREE!
Watch His Dark Materials online from outside your country:
If you're away on vacation or just temporarily overseas when the show premieres, do not panic! You can still watch His Dark Materials online as it happens (or on catch up). Using a little handy trick, you can get around geo-restrictions and digital borders that would usually get in the way by using a VPN (assuming you don't breach any broadcaster Ts&Cs, of course).
This will allow you to gain access to all the incredible His Dark Materials episodes as they happen without even having to be in one of the countries its airing in by changing your IP. That way you can watch the show while abroad.
Which VPN is best for you? Our personal favorite is ExpressVPN. And how do you use that to watch His Dark Materials online? Read on to find out all you need to know.
Posing can feel a little repetitive after a few shots during maternity photo sessions and if this is how you feel, read the following posing guide for maternity sessions, so that you can get more ideas for your next shoot!
Interacting with the belly is a great pose for maternity photos.
Basic posing for maternity
Basic posing for maternity sessions is centered around the baby bump and the mama-to-be, specifically. You can use very basic posing to build from and add more variety to the poses. However, these basic poses are perfect for any session and can work well in any situation or location.
At 45-degrees from the camera is the best way to highlight the bump. Notice the hand placing to accentuate the silhouette.
In order to flatter the baby bump the best, turn your client at least 45-degrees from the camera to either side. Ask which side is more natural to your client, so they feel more stable and at ease.
After you have turned your client, give her some shape by adding lines to her body. This creates more flow and adds some curves to break up the body. To do this, have your client pop out the knee that is closest to the camera. This helps guide the eye up from her leg to the bump, then ultimately resting on her face.
The knee closest to the camera is best for giving shape to the body, creating a natural leading line.
Finally, use her hands to cradle the bump, further adding emphasis to it. You can pose hands in a variety of ways:
Place one on top of the bump and one under
Both under
One on the side and one under
Only one hand on the bump
If your client is wearing a long, flowy dress, pose her hand under the belly, so that the bump is more prominent. With a flowy or loose dress, it can be difficult to fully see the bump’s shape if it’s not gathered underneath.
Same hand position in two different posed shots.
Using this basic set up is easy to build upon and add partners or other siblings to the mix. Posing the mama first is helpful as well, so that she doesn’t have to move around too much.
One great tip is to avoid having your clients look directly down at her belly. This can create an unflattering photo. Instead, have her look down with her eyes keeping her chin slightly up. Have her look down as if is she is trying to look past her belly and at her feet.
Posing with partners
Next in your posing guide for maternity sessions, is posing with partners. Posing with partners makes any maternity session a little more intimate.
Pose the mama first and have her partner fit in. This makes it easier to build poses and change it up when you want variety without tiring the mama out.
Using props can help with posing and highlighting certain details of the session.
Fit the partner in slightly behind your client and have their arms holding the baby bump. The partner can place their hand closest to the photographer under the belly. This might require the partner to come out a bit from behind. That’s okay. If they look comfortable in the pose, it’ll look better in the final image.
With the hands farthest from the camera, have the partner put their hand on the arm close to the shoulder. The mama can place her other hand on top of her bump.
Another great pose with the partner is to turn the partner away from your client slightly so they’re facing opposite each other with their shoulders touching.
Here, ask them to hold hands and have the mama lean into her partner. With her other hand, have her place it under the bump and pop one knee out to give her body a curve.
The bump isn’t the only focus. Try posing the partner caressing and cradling the bump by kneeling and getting close. Here you can ask them to give the bump gentle kisses. Talk to the baby, or simply close their eyes and enjoy.
In this pose, have mama look away and get a close shot of the moment. This can eliminate double chins or unflattering poses.
Posing with siblings
The next point in your posing guide for maternity sessions is working with children.
Working with children during a maternity session doesn’t need to get out of control. It’s best to start with the complete family, move onto shots with the mama and siblings, then some creative shots of everyone. Then, finally, let them go and play.
Allow children to cuddle and get close.
Getting photos of the siblings first can make the whole session go smoother in general. Again, begin by posing mama first. If they are in the session, place the partner next. Then place the children, or child, next to the parents.
For creative posing, if the children are 5 years or younger, you can have the parents hold them. Then get close-up shots of the family interacting.
Have them hold hands and walk along a path while they talk and interact with each other. These poses are more authentic and help children to be more active in the photos rather than forced to pose.
Switch between natural posing and posed
What is natural posing? It is when you give your clients an activity to do and allow them to enjoy the moment. For example, you can ask your clients to walk along the shore while they look at each other and enjoy the beach views.
Alternatively, it can be having the partner kneel down to the level of the belly and have them talk to the baby. Capture these moments from a bit of a distance so that your clients feel that they can enjoy the intimate moments.
Posed is when you direct your clients to stand, sit, or pose how you want for the final image. This can feel stiff after a while, so mixing natural poses with posed ones can offer a lot of variety in the final gallery.
In conclusion
Posing for maternity photos doesn’t have to be just posed, you can mix in a bit of the excitement and natural expressions adding to a variety of poses to build from.
I hope your posing guide for maternity sessions helps you with your next shoot. Do you have any posing ideas that work for maternity photos? Post in the comments below!
Here’s a sneak peek at an intelligent, Adobe Sensei-powered feature headed to Photoshop soon. Meredith Stotzner shares how the new Object Selection Tool speeds up your selection workflow by snapping to the object you want to select using machine learning technology.
They say that a picture is worth a thousand words. That means that your photographs should be a great way for you to communicate. The question is, do your photographs communicate the right thousand words to tell your story?
Photo by E_Bass; ISO 400, f/4.5, 1/45-second exposure.
Have you ever had the experience of photographing in a wonderful location, feeling eager to rush home and look at your pictures, only to be disappointed in the results? It’s quite a challenge to convert a three-dimensional, full sensory experience into a two-dimensional photograph.
I would like to share a few tips on composition that I think can boost your success rate in capturing your experience while photographing. Instead of just raising your camera for a quick snapshot, take the time to make a careful composition that will guide your viewer to understand what you think is important in the scene, and even how you feel about it.
Tip #1: Choose colors and tones that reinforce your story
Light is the fundamental building block of any image. Light produces two kinds of contrast: color contrast and tonal contrast. Color is the hue that you see, like red, or green, or purple. Tone is another word for brightness, or how light or dark something is. Our brains are good at forming associations, and we associate colors and tones with particular feelings. These same associations appear in our spoken language. You’ve heard the expressions, “He was in a dark mood,” and “She was feeling blue.”
Blue connotes melancholy or tranquility. It’s also a color associated with stability and reliability. (What color are the logos of IBM, Microsoft, and Ford?) Red is the color of passion. Photographing an orange beach umbrella gives a stronger impression of a hot day than a purple one. Using dark tones creates a sense of gloom and foreboding. Light-toned images make us feel light-hearted and uplifted. Consider carefully whether the tones and colors in your image strengthen the story you want to tell or contradict it.
Photo by Susanne Nilsson; ISO 200, f/11.0, 1/1000-second exposure.
Tip #2: Use lines to guide your viewer’s eye
Color and tone also reveal lines in your image. Lines are the boundaries created where two contrasting colors or tones meet. A thin shape, like a road, the stem of a plant, or a tree branch, may also be perceived as a line in your photograph. The brain’s visual cortex is programmed at a fundamental level to follow lines.
This is a powerful tool for you as a photographer. You can guide your viewer’s eye toward what you consider important in the image by using something in the environment to point to it. Conversely, be careful not to inadvertently place lines so that they lead your viewer out of the image.
Tip #3: Orient the lines in your image so that they convey the right emotion
Just as with colors, our brains also make emotional associations with line orientation. Vertical lines in an image give an impression of power, strength and pride. Horizontal lines are stable and calm. Diagonal lines, on the other hand, are dynamic, and signify motion or change. Curved lines may convey a sense of melancholy or of hope, depending on the direction in which they curve.
Photo by Mike Steinhoff; ISO 200, f/5.0, 1/125-second exposure.
Think carefully when composing your image so that you include colors, tones, and lines that reinforce the story you’re trying to tell. You’ll be much more likely to create a photograph that captures and communicates how you felt when you were observing the original scene.
About the Author: Julie Waterhouse writes for Ultimate Photo Tips, which provides friendly education and encouragement for photo enthusiasts around the world, presented in a way that’s clear, organized, and easy to understand (ultimate-photo-tips.com). Whether you’re looking for the answer to a specific question, or just want to explore and learn.